---
title: Visitor Deletion Jobs (Early Access)
description: This article describes how to set up automated visitor deletion jobs to delete visitor records from the Tealium Customer Data Hub.
url: https://docs.tealium.com/administration/early-access/data-storage/visitor-deletion-jobs/
---
The Visitor Deletion Jobs feature is currently in early access and only open to select customers at this time. If you are interested in trying out this feature, please contact your account manager for information about early access.
## How it works
A visitor deletion job is an automated process to delete multiple visitor records from all products in the Tealium Customer Data Hub. A visitor deletion job processes CSV files that you upload to the S3 bucket for your account (a Tealium S3 bucket or your own S3 bucket). These CSV files contain visitor IDs that specify the visitor records to delete.
When a visitor deletion job is enabled, it checks the S3 bucket every hour for a new CSV file. When a new file is found, the job processes the CSV file and for each visitor ID, deletes the visitor profile data from the following areas in Customer Data Hub:
* Tealium AudienceStream
* Tealium AudienceStore
* Tealium AudienceDB
* Tealium EventStore
* Tealium EventDB
You can use the visitor deletion job interface to check the status and results of each CSV file that is processed. After a file is processed, a log file of the results can be downloaded from the interface for legal record-keeping and GDPR compliance auditing.
You can also use [visitor search](https://docs.tealium.com/visitor-search/) or the [visitor lookup API](https://docs.tealium.com/about-visitor-privacy/) to delete visitor records, but with those methods you can only delete one visitor at a time. A visitor deletion job lets you delete multiple visitors at once.
When a visitor record is deleted, it does not trigger the "Left Audience" action in connectors. Connector actions for audiences are executed only when rules are re-evaluated and a visitor's status transitions from being included in the audience to being excluded.
### Requirements
* Permission Needed: Publisher role.
For more information, see [Managing Server-Side User Permissions](https://docs.tealium.com/about-managing-server-side-user-permissions/).
* Access to an Amazon S3 bucket to upload the CSV files.
### File processing limits
Keep in mind the following limits on file uploads and file processing:
* The maximum CSV file size is 10 MB.
* The maximum deletion data processed per hour is 1 GB (100 CSV files of 10 MB each). If the 1 GB maximum is exceeded, those files are processed at a later time.
* High demand in a region may result in slower processing times.
## File formats
### Input file
A visitor deletion job processes CSV (Comma Separated Values) files containing a header line and visitor ID values. The first line is ignored when the platform processes the file. All other lines in the file contain a single visitor ID attribute value.
For example:
```
"customer_id"
"00003579"
"00035728"
"00000352"
...
```
#### File prefix
The input files must be named using the following format:
`{prefix}_{version}.csv`
|FORMAT| DESCRIPTION|
|---| ---|
|`prefix`| A unique identifier for a specific visitor deletion job.|
|`version`| A unique identifier for a file within a prefix, usually a timestamp and an optional version number.|
If a file with a duplicate file name is uploaded, it will not be processed.
File names are case-sensitive and cannot contain special characters other than hyphen '-' and underscore '\_'.
For example, if a job deletes visitor data based on the `customer_id` attribute, the prefix for the CSV files could be `customer_id_deletes` and the version could be the month, day, and year in `mmddyyyy` format.
File names with this prefix and version would be as follows:
```
customer_id_deletes_03152021.csv
customer_id_deletes_03172021.csv
customer_id_deletes_03212021.csv
...
```
### Results file
After an input file is processed, the results are available for download as a log file. Each line of the results file contains a visitor deletion confirmation record with the following fields:
* Visitor ID value (same value from the input file)
* Confirmation UID
* Status, one of the following:
* **Success** - Visitor profile was found and deleted.
* **Failed - not found** - Visitor profile could not be found.
* **Failed - error** - The visitor profile was not deleted. Includes details on why the deletion failed.
* Timestamp, if **Status** = **Success**, date and time when the visitor was deleted.
## Managing visitor deletion jobs
### Adding a visitor deletion job
Before you add a visitor deletion job, first determine which visitor ID attribute you will use to identify the visitor records to be deleted.
To create a visitor deletion job:
1. Navigate to **Server-Side Tools > Visitor Deletion Jobs**, then click **+ Add Visitor Deletion Job**.
1. Enter a name for the job.
1. Select a **File Service** from the list.
1. Enter the prefix of the file names for this job.
All CSV files for this job must begin with this prefix.
1. Select the **Visitor ID Attribute** that is used in the CSV files.
1. If you are ready to begin processing visitor deletions, toggle **Enable/Disable Visitor Deletion Job** to **ON**.
1. Click **Save**.
After you have added a visitor deletion job, you can delete visitor data by creating a CSV file and uploading it to the Amazon S3 bucket for the job.
For more information on uploading a CSV file, see [Upload a File to a File Service](https://docs.tealium.com/about-file-import/).
### Editing a visitor deletion job
To modify a visitor deletion job:
1. In the **Visitor Deletion Jobs** list, select a job. 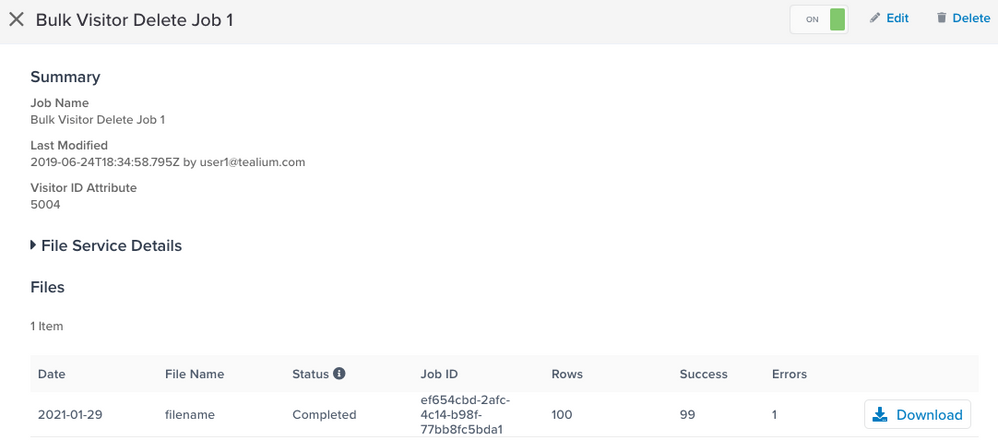
The **Job Summary** is displayed and shows the following for each file in the S3 bucket:
* **Date** - The date the job was run.
* **File Name** - The name of the input file that was processed.
* **Status** - The status can be one of the following:
* **Processing** - The CSV file is being processed. A job can have the `In Progress` status for up to 6 days while deletions are being processed. Larger files require longer processing times.
* **Completed** - The CSV file has been processed and the results are available for download.
* **Failed** - An error occurred during CSV file processing. A job can fail for various reasons, including AWS service issues or lack of permission for a data source.
* **Job ID** - A unique ID for this file and the processed results.
* **Rows** - Number of rows in the input file.
* **Success** - Number of successful deletions.
* **Errors** - Number of errors and deletions that failed. The results file provides more information on deletion errors.
1. Click **Edit**.
1. When you finish editing, click **Save**.
### Enabling a visitor deletion job
If you expect to be uploading CSV deletion files on a regular basis (every day or every week), you can keep the job enabled. If you will be uploading files less often, you may want to disable the job to avoid having the job check for CSV files unnecessarily.
To enable a visitor deletion job:
1. In the **Visitor Deletion Jobs** list, select a job.
1. Toggle **Off** to **On.**
1. In the confirmation dialog, click **Enable**.
### Deleting a visitor deletion job
Deleting a job and its history of processed files is permanent. You cannot undo this action.
To delete a visitor deletion job:
1. In the **Visitor Deletion Jobs** list, select a job.
1. In the **Summary** screen, click **Delete**.
1. In the confirmation dialog, click **Delete**.
### Viewing the results for a visitor deletion job
To view the results of a processed file:
1. In the **Visitor Deletion Jobs** list, select a job.
1. Select a visitor deletion job.
The **Files** section of the **Summary** page shows a list of processed files, including the file status.
1. Locate a processed file, then click **Download**.