---
title: Set up Single Sign-On for Tealium Accounts
description: This article describes how to set up Single Sign-On (SSO) for an account.
url: https://docs.tealium.com/administration/security-access/single-sign-on/sso/
---
## Requirements
* **Identity Provider**: SAML 2.0 support
* **Tealium**: Account Admin and User Admin permissions
If you have access to multiple Tealium accounts, SSO is only enabled for your primary account.
## How it works
SSO is a secure way of using one authentication system to gain access to multiple applications. Tealium supports Security Assertion Markup Language (SAML) 2.0 to implement SSO and acts as the service provider (SP) for your Identity Provider (IdP) configuration. Using SAML for Tealium SSO lets you secure users' accounts under your trusted enterprise IdP.
### Supported IdPs
Tealium SSO supports and has configuration instructions for connections to the following IdPs:
* Amazon AWS
* ADFS (Active Directory)
* Azure
* Jumpcloud
* OneLogin
* Okta
Tealium also supports SSO implementation to IdP platforms not listed above. However, additional testing and configuration time may be required to set up IdP connections from other platforms. Contact Tealium Support for questions regarding implementation of other IdP platforms.
## Tealium SSO login process
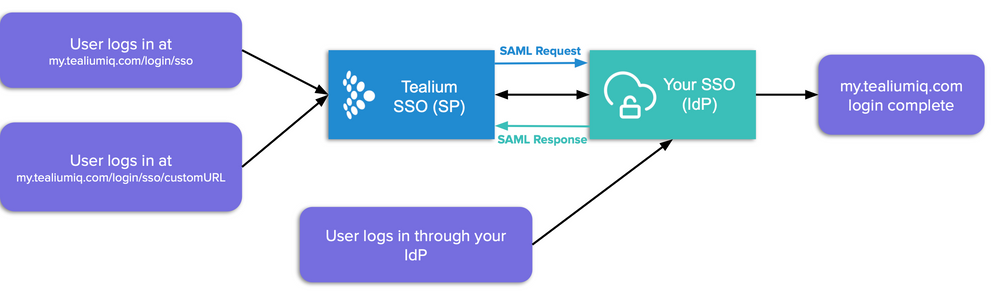
The Tealium SSO login process follows these steps:
1. Log in to your Tealium account with Tealium SSO using one of the following login options:
* Through Tealium at `https://my.tealiumiq.com/login/sso`
* A custom Tealium URL, such as `https://my.tealiumiq.com/login/sso/customURL`
* Through your IdP
1. If you log in through `my.tealiumiq.com`, the Tealium SSO SP validates your IdP connection information and sends a SAML request to your IdP, redirecting you to the IdP login page. If you log in with your IdP, you will skip this step.
1. Your IdP sends a SAML response to Tealium SSO SP and Tealium SSO SP validates the login information.
1. A new Tealium login session is created.
## Configure and manage SSO
To set up and manage Tealium SSO go to:
**Admin menu > SSO (Single Sign-On)**.
After you establish a connection to your IdP and turn on authentication, Tealium SSO is activated across client- and server-side products.
Set up your Tealium SSO in four steps:
[Step 1: Configure your IdP](#step-1-configure-idp)
[Step 2: Connect to your IdP](#step-2-connect-to-idp)
[Step 3: Test your SSO](#step-3-test-your-sp-initiated-sso)
[Step 4: Activate your SSO](#step-4-activate-your-sp-initiated-sso)
### Step 1: Configure IdP
Create a new SAML SSO connection by completing the following steps:
1. Navigate to **Admin Menu > SSO (Single Sign-On)**.
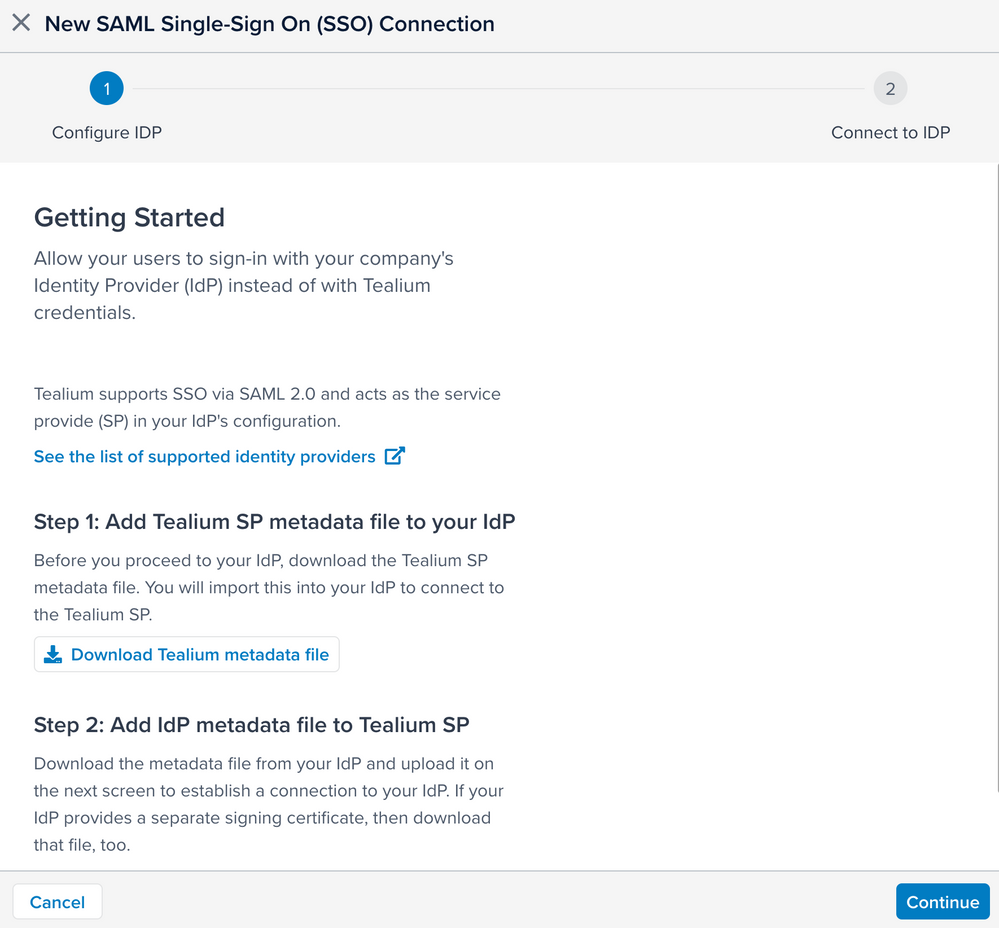
2. In the **New SAML Single-Sign On (SSO) Connection > Configure IdP** screen, download the Tealium metadata file to your computer and then import this file into your IdP.
3. Create a new Tealium application in your IdP and download your IdP metadata file. Each IdP requires a different configuration to access and download a metadata file for creating a new SSO connection.
For specific IdP instructions, see [IdP Configuration Instructions](#idp-instructions).
Ensure you have the following information from your IdP:
* SAML Metadata file
* Email address of an administrator of your IdP account
* (Optional) SAML 2.0 Signing certificate. Your signing certificate may be a part of your metadata file.
4. After you configure your IdP and collect the required information for a new SSO connection, click **Continue** in the Tealium New SAML Single-Sign on (SSO) Connection wizard.
### IdP instructions
The following table lists instructions on how to set up your IdP to work with Tealium SSO:
| IdP | Custom Configuration Information |
| --- | --- |
| Amazon AWS | Follow the instructions in the [Amazon AWS documentation](https://docs.aws.amazon.com/singlesignon/latest/userguide/other-idps.html) to download your metadata file to upload to Tealium. |
| ADFS | Follow the instructions in [SSO configuration with ADFS (Active Directory) IdP](https://docs.tealium.com/sso-adfs-idp/) to download your metadata file to upload to Tealium. |
| Azure | Complete the steps in [SSO configuration with Azure IdP](https://docs.tealium.com/sso-azure-idp/) to download a metadata file from your Azure account. For more information, see the [Azure documentation](https://docs.microsoft.com/en-us/azure/active-directory/manage-apps/add-application-portal-setup-sso). |
| Jumpcloud |Follow the instructions in the [Jumpcloud documentation](https://support.jumpcloud.com/support/s/article/getting-started-applications-saml-sso2) to download your metadata file to upload to Tealium. In your setup, ensure the following values are set:- Setup contains an **email** attribute with a value of `user.email`.
|
| OneLogin | Follow the instructions in the [OneLogin documentation](https://onelogin.service-now.com/support?id=kb_article&sys_id=b2c91143db109700d5505eea4b9619d5) to download your metadata file to upload to Tealium.
In your setup, ensure the following values are set:- User has an attribute set to `email`.
- **Audience** is set to the same value as the **Location** attribute of the **AssertionConsumerService** node in the Tealium metadata file.
- **Recipient** is set to the same value as the **Location** attribute of the **AssertionConsumerService** node in the Tealium metadata file.
- **ACS (Consumer) URL Validator** is set to the same value as the **Location** attribute of the **AssertionConsumerServicenode** in the **Tealium** metadata file. Every slash must be escaped with backslash.
- For example, if the **Location** attribute has a `https://prod-federation.auth.us-west-1.amazoncognito.com/saml2/idpresponse` value, then the **URL Validator** should be `https:\/\/prod-federation.auth.us-west-1.amazoncognito.com\/saml2\/idpresponse`
- **ACS (Consumer) URL** is set to the same value as the **Location** attribute of the **AssertionConsumerService** node in the Tealium metadata file.
- **Login URL** is set to `https://my.tealiumiq.com/login/sso/{ACCOUNT_NAME}`.
- **SAML Initiator** is set to **Service Provider**.
|
| Okta | Complete the steps in [SSO configuration with Okta IdP](https://docs.tealium.com/sso-okta-idp/) to download your metadata file to upload to Tealium. For more information, see the [Okta documentation](https://help.okta.com/oie/en-us/Content/Topics/Apps/Apps_App_Integration_Wizard_SAML.htm). |
### Federation ID
By default, Tealium uses the user's email address to identify the user during login. Federation ID allows for an alternative user identifier.
* The Federation ID maps to the SAML NameID property.
* If a Federation ID is not assigned to a user in Tealium, the system defaults to matching the Email attribute. For more information, see [Edit a user](https://docs.tealium.com/users/#edit-a-user).
* Email attribute mapping is still required in your SAML configuration.
Contact Tealium Support to enable Federation ID on your account.
### Step 2: Connect to IdP
Connect to your IdP by completing the following steps:
1. In the **Connect to IdP** screen, upload the SAML metadata file you downloaded from your IdP. The **Identity Provider** field auto-populates with the name of your IdP after the connection is established.
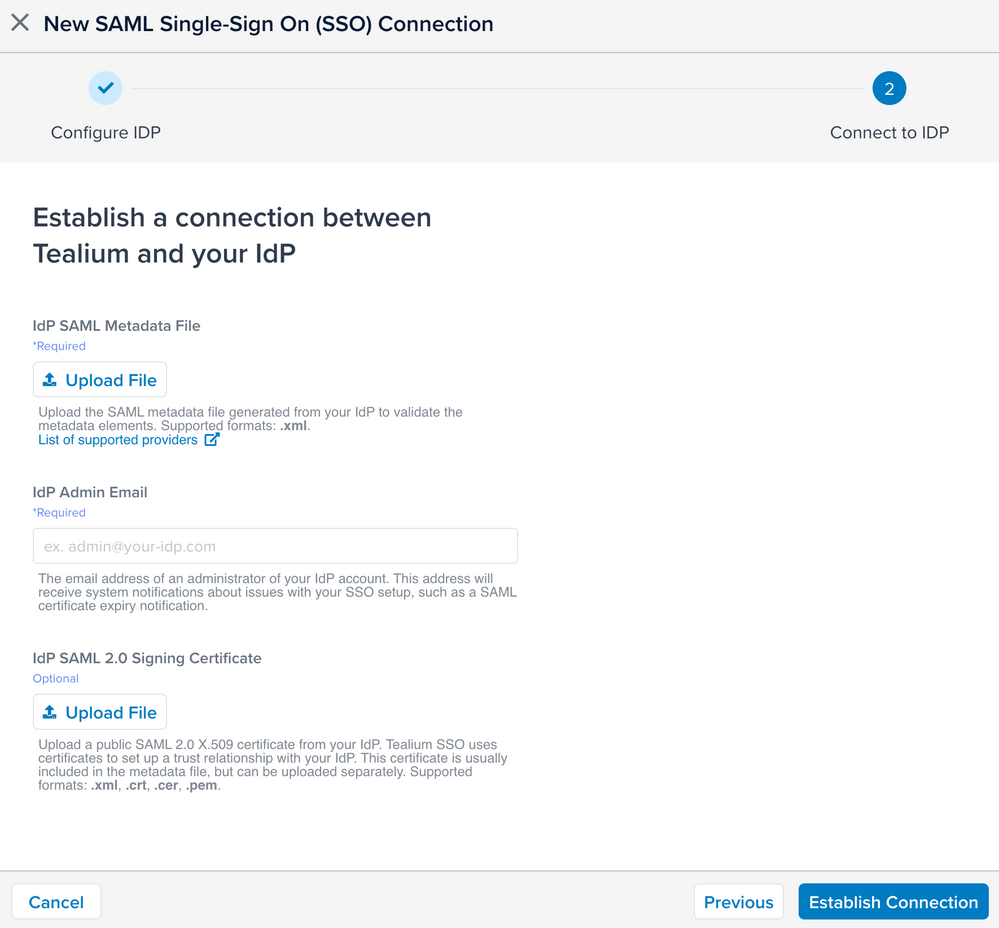
2. In the **IdP Admin Email** field, enter the email address of an administrator of your IdP account.
3. (Optional) If your IdP provides you with a separate signing certificate, upload that file under **IdP SAML 2.0 Signing Certificate**.
4. Click **Establish Connection**.
### Step 3: Test your SP-initiated SSO
After connecting to your IdP, your SSO is set to **Test** authentication mode. **Test** mode allows users in your account to choose either the Tealium-initiated login or the SP-initiated login. Use this mode to validate your SP-initiated login before switching on the authentication mode. For successful testing, ensure you log in using the following URL: `my.tealiumiq.com/login/sso`.
To test the connection to you IdP, copy and paste the **Test URL** from under **Certificate Details** in your browser.
### Step 4: Activate your SP-initiated SSO
After you are satisfied with the SP-initiated login experience for your users, complete the following steps to activate the SP-initiated SSO.
1. From the **Manage SSO** screen, switch the **Authentication Mode** to **On**. Switching the authentication mode to **On** forces all users in your account to authenticate through the SP-initiated login and resets the Tealium-provided login credentials for all users.
1. A confirmation dialog appears. Verify that you test the SSO authentication flow and provide notice to the users in your account about the new SSO login procedures before you activate the new SSO login. After verifying the statements, click **Activate SSO**.
1. Click **Save**.
Switching your authentication mode from **Test** to **On** activates your SSO authentication and deactivates your Tealium login. To reactivate your Tealium login, switch the authentication mode back to **Test**.
With Tealium SSO turned on, Tealium will no longer manage the passwords for your users. You can still add users and manage permissions from within Tealium, but functionality related to passwords and authentication (for example, [multi-factor authentication](https://docs.tealium.com/multi-factor-authentication-mfa/)) is no longer available through the Tealium interface. Users authenticate through your corporate system and then use a custom SSO URL to access their Tealium account.