---
title: Adobe Analytics (SiteCatalyst) Tag Setup Guide (Legacy)
description: This article describes how to set up the Adobe Analytics (Legacy) tag in your iQ Tag Management account.
url: https://docs.tealium.com/client-side-tags/adobe-analytics-sitecatalyst-tag-legacy/
---
This is the legacy Adobe tag for the newer (Recommended) version, the [Adobe AppMeasurement for JavaScript tag](https://docs.tealium.com/adobe-appmeasurement-for-js-tag/), available from the tag marketplace.
## How it works
Adobe Analytics (SiteCatalyst) is Adobe’s Software as a Service (SaaS) application offering Web Analytics.
## Before you begin
Consider the following items before you begin:
* If you want to use the Adobe Experience Cloud ID Service, add the Adobe Experience Cloud ID Service tag **before adding** this tag.
* Delete your existing template when changing the S-Code version to pull in the correct template.
* Map to `s_account` to set the report suite based on a variable value. This overrides the default setting and the dynamic account list setting.
* When mapping to `s_account`, change the Use Dynamic Account configuration setting to **Yes**.
* Choose an S-Code version with the **AAM** option to include Adobe Audience Manager. This requires a partner value.
* For third-party tracking, the default server location is **122**(`122.2o7.net`).
* For `112.2o7.net` data collection servers, set **Server** and **Server Secure** directly.
* Example: `mysite.112.2o7.net`
### Prerequisites
* **Local Copy of `s_code.js`**
* To set up this tag you will need the `s_code.js` JavaScript file generated from your Adobe account.
* Sections of that code are copied into your TiQ configuration.
The name of your JavaScript library file may be different.
* [Learn more about s_code.js](https://marketing.adobe.com/resources/help/en_US/sc/implement/impl_js_file.html).
* **Solution Design Reference**
* (Optional) This document defines all of the props, eVars, and events that are tracked in your Adobe Analytics solution.
* This information is needed to accurately configure the Adobe tag in TiQ.
### Supported Versions
* Versions H.20 - H.27 (H.25 - H.27 with Adobe Audience Manager)
## Tag Configuration
First, go to Tealium's tag marketplace and add the Adobe Analytics (Legacy) tag (Learn more about [how to add a tag](https://docs.tealium.com/manage-tags/)).
After adding the tag, configure the following settings:
* **S-Code Version**
* The version of the ` s_code.js` library.
* Versions 25 through 27 have support for Adobe Audience Manager.
* **Report Suite**
* The default report suite to use.
* This may change based on value set in Dynamic Acct List.
* Reference `s_code.js`: `s.account`
* **Server**
* Data collection server.
* Reference `s_code.js`: `s.trackingServer`
* **Server Secure**
* The "https" data collection server.
* Reference `s_code.js`: `s.trackingServerSecure`
* **Namespace**
* Only applies to third-party cookies when Server and Server Secure end in `2o7.net`.
* Reference `s_code.js`: `s.namespace`
* **Enterprise Cloud ID**
* If using the Visitor API in version H.27 and higher, enter your Enterprise Cloud ID here.
* Learn more about the [Adobe Enterprise Cloud ID Service](https://marketing.adobe.com/resources/help/en_US/mcvid/mcvid-requirements.html).
* **Auto Link Tracking**
* The recommended values is the default value, **Yes**.
* If set to **No**, you must duplicate all of the automatic link tracking using other methods, such as the [Link Tracking Extension](https://docs.tealium.com/link-tracking-extension/).
* **Download Types**
* List the types of file extensions whose downloads you want to track as download links.
* Reference `s_code.js`: `s.linkDownloadFileTypes`
* **Internal Link Filters**
* Used to ensure that link clicks are not reported as exit clicks to Adobe report.
* Reference `s_code.js:` `s.linkInternalFilters`
* **Currency Code**
* The three-letter currency code, such as `USD` for U.S. Dollars.
* Reference `s_code.js`: `s.currencyCode`
* **Use Dynamic Acct**
* Set to `Yes` to be able to send data to different report suites based on the domain or other dynamic value.
* **Dynamic Acct List**
* Used to dynamically set the report suite based on domain or other dynamic value.
* Example: `testreportsuite=testing.example.com,qa.example.com;prodreportsuite=www.example.com`
* Learn more about [using a dynamic account list in SiteCatalyst](http://omniture.custhelp.com/app/answers/detail/a_id/1440).
* **S-Object Name**
* Default name is `s`.
* Set a different name if running multiple instances of the legacy Adobe Analytics tag or the Adobe AppMeasurement tag on the page.
* **Clear Vars**
* Clears the props, eVars, and events after each tracking call.
* Default value is `No`.
* **Partner**
* Enter your partner ID for use with Adobe Audience Manager, otherwise leave it blank.
* Reference `s_code.js:` `DIL.create()`
## Load Rules
[Load Rules](https://docs.tealium.com/about-load-rules/) determine when and where to load an instance of this tag on your site.
Recommended load rule for Adobe Analytics: **All Pages**
## Data Mappings
Mapping is the process of sending data from a [data layer variable](https://docs.tealium.com/data-layer-variables/) to the corresponding destination variable of the vendor tag. For instructions on how to map a variable to a tag destination, see [Data Mappings](https://docs.tealium.com/iq-tag-management/data-mappings/manage/).
Data layer variables (eVars, props, etc) can be mapped using the mapping toolbox.
1. Click the Data Mappings tab and the click **+ Select Destination**.
A mapping toolbox appears.
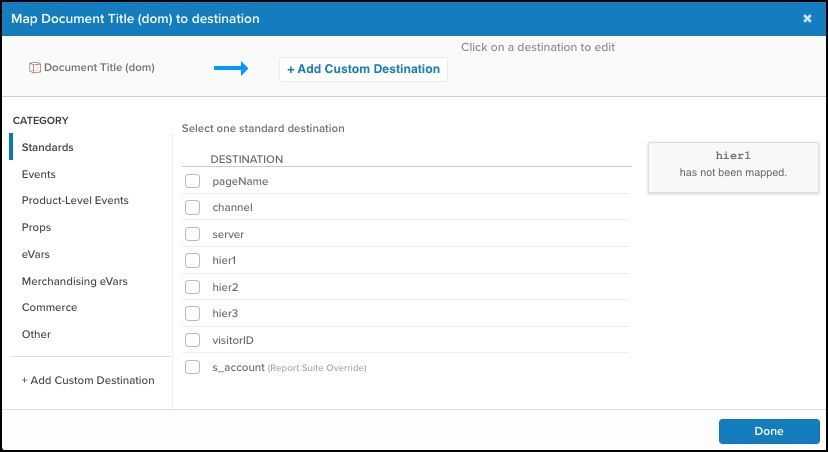
1. You can add additional mappings quickly by clicking **+ Add Custom Destination** and typing another prop or eVar in the text box.
Multiple props and eVars for the same variable should be separated by a comma (`,`). Ensure that you use a capital `V` in the eVar to match the expected Adobe syntax.
### Available Data Layer Variables
#### Standard
| Variable | Description |
|:------------------------|:----------------------|
| `pageName` | Page name |
| `channel` | Channel |
| `server` | Server |
| `hier1` through `hier3` | heirs |
| `visitorID` | Visitor ID |
| `s_account` | Report Suite Override |
#### Events
| Variable | Description |
|:-----------------------------|:------------|
| `prodView` | prodView |
| `scOpen` | scOpen |
| `scAdd` | scAdd |
| `scRemove` | scRemove |
| `scView` | scView |
| `scCheckout` | scCheckout |
| `purchase` | purchase |
| `event1` through `event1000` | events |
#### Product-Level Events
| Variable | Description |
|:----------------------------------------------|:----------------|
| `PRODUCTS_event1` through `PRODUCTS_event100` | Products Events |
#### Props
`prop1` through `prop75`
#### eVars
| Variable | Description |
|:-------------------------|:-------------|
| `campaign` | (eVar0) |
| `eVar1` through `eVar75` | evars |
| `contextData.myvar` | Context data |
#### Merchandising eVars
| Variable | Description |
|:----------------------------------|:---------------|
| `PRODUCTS_eVar1` through `eVar75` | Products eVars |
#### Commerce
| Variable | Description |
|:-------------------|:---------------------------------------------------|
| `purchaseID` | |
| `transactionID` | |
| `state` | |
| `zip` | |
| `PRODUCTS_id` | |
| `PRODUCTS_category` | |
| `PRODUCTS_quantity` | |
| `PRODUCTS_price` | |
#### Other
| Variable | Description |
|:---------------------------------|:------------|
| Link Tracking - `doneAction` param | (H25 only) |
| `List 1` through `List 3` | Lists |
## E-Commerce Mapping
To properly format the Adobe products string and send revenue data to your report suite, you must add and configure the [E-Commerce Extension](https://docs.tealium.com/e-commerce-extension/). The variables set in the extension are formatted to the expected syntax by the tag integration automatically.
For example, the variables for product category, product ID, product quantity, and product price are converted into the product string as shown in the following example where multiple products are handled:
`s.products= product_category;product_id;product_quantity;product_price;;`
### Mapping Events
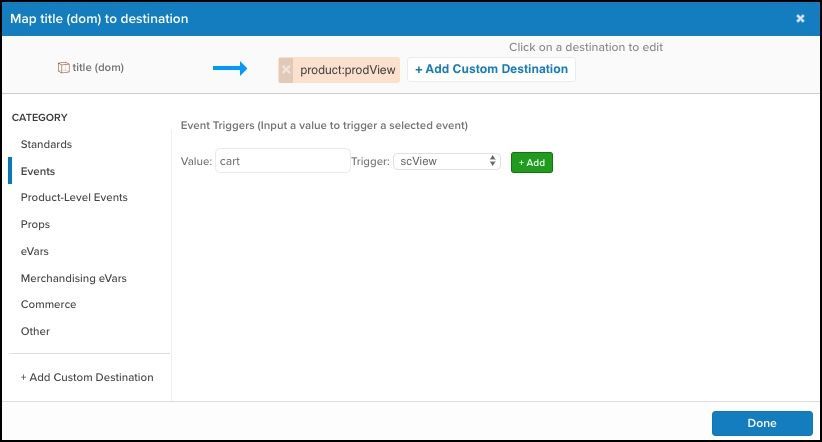
Use the Events section of in the mapping toolbox to define when an event should be triggered depending on the value of a certain variable.
When a variable is selected and you click **Events** in the left sidebar, two fields appear: **Value** and **Trigger**.
* The **Value** box is where you define the value of the variable.
* The **Trigger** box is where you select the Adobe event to track.
In this example. we configure the Adobe events `prodView` and `scView` to trigger when the variable `page_type` equals `product` and `cart`, respectively:
### Merchandising eVars
In Adobe implementations, attaching an eVar value to the `s.products` string lets you associate an eVar with the products. For example, if you have an array variable named `product_discount` that you want associated with each product in the product string, a merchandising eVar mapping will create the `s.products` string accordingly.
#### Example:
```
utag_data.product_id = ["prodA", "prodB"];
utag_data.product_price = ["25.12", "10.99"];
utag_data.product_discount = ["**12.34**", "**1.23**"];
```
Next, if you map `product_discount` to merchandising `eVar4`, the result is the following `s.products` string:
`s.products=";prodA;1;25.12;;**evar4=12.34**,;prodB;1;10.99;;**evar4=1.23**"`
If you map a non-array variable (single value) to a merchandising `eVar`, that single value is applied to each product.
#### Example:
```
utag_data.product_id = ["prodA", "prodB"];
utag_data.product_price = ["25.12", "10.99"];
utag_data.product_discount = "**1.99**";
```
With the same mapping as above, the resulting `s.products` string is:
`s.products=";prodA;1;25.12;;**evar4=1.99**,;prodB;1;10.99;;**evar4=1.99**"`
### Product-Level Events
Product-level events work similarly to merchandising `eVars`. You can use either a single value to apply the same variable to all products in the product string, or an array of values to apply a different value to each product in the product string.
#### Example:
```
utag_data.product_id = ["prodA", "prodB"];
utag_data.product_price = ["25.12", "10.99"];
utag_data.order_discount = "**12.00**";
```
Next, if you map `order_discount` to `product event15`, the following `s.products` string.
`s.products=";prodA;1;25.12;**event15=12.00**;,;prodB;1;10.99;**event15=12.00**;"`
Notice that both products have the same order discount applied to them.
Mapping arrays for merchandising `eVars` and product-level events is available in version H.26 and newer.
## Required Extensions for doPlugins
The following two sections of code in the `s_code.js` file need to be copied into extension in your TiQ configuration:
* Do Plugins Section
* Plugins and Modules
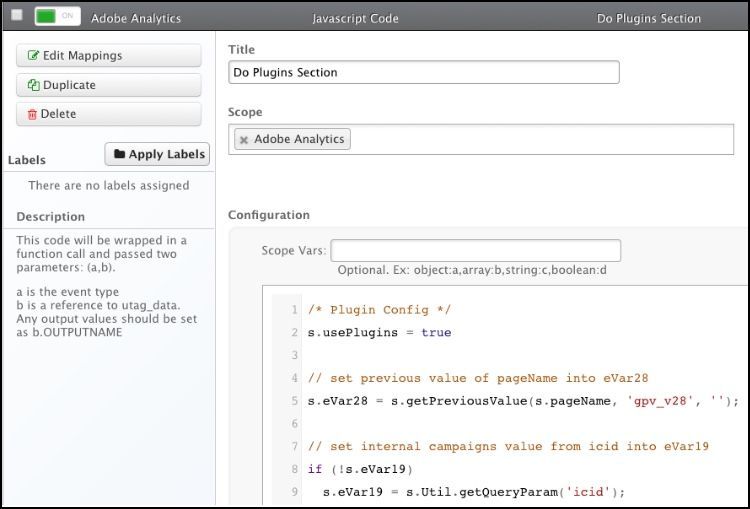
### Do Plugins
The **Do Plugins** section is always above the **Plugins and Modules** section in the `s_code.js`. This section usually starts with the following lines:
```
/* Plugin Config */
s.usePlugins=true;
```
Copy everything from these lines down to the line with:
```
s.doPlugins=s_doPlugins;
```
Paste this code block into a [JavaScript Code extension](https://docs.tealium.com/advanced-javascript-code-extension/) scoped to the Adobe Analytics tag and name the extension `Do Plugins Section`:
### Plugins and Modules
The Plugins and Modules section of the `s_code` begins with:
```
/***********************PLUGINS SECTION ********************/
```
and ends just before this line:
```
/************* DO NOT ALTER ANYTHING BELOW THIS LINE ! **************/
```
Copy this entire code section and paste it into a second JavaScript Code extension scoped to the Adobe Analytics tag. Name this extension `Plugins and Modules`:
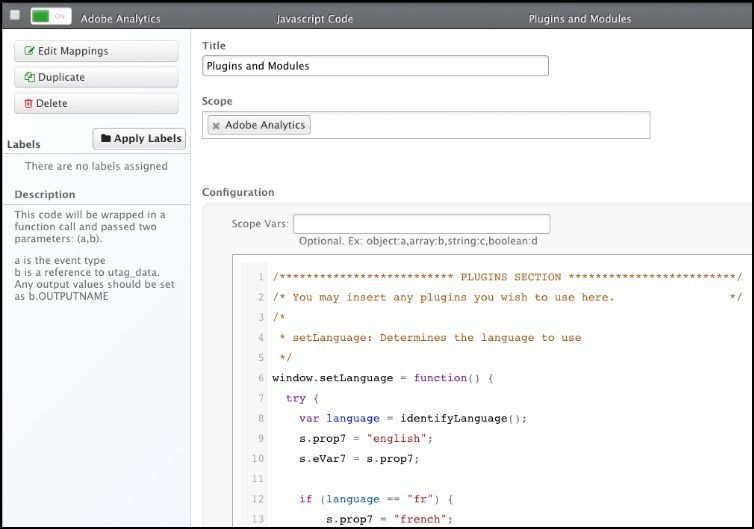
Next, drag the **Plugins and Modules** JavaScript extension just above the **Do Plugins** section JavaScript extension.
The section of code beginning with
```
/************* DO NOT ALTER ANYTHING BELOW THIS LINE ! **************/
```
is the core Adobe `s_code` library and is loaded through the tag template within TiQ.
## Upgrading to a Newer Version
Use the followings steps to upgrade to a newer base code for the Adobe tag:
1. Open the tag and click **Edit**.
1. In the **S-Code Version** field, select the version you want from the drop-down list, for example **H.27**.
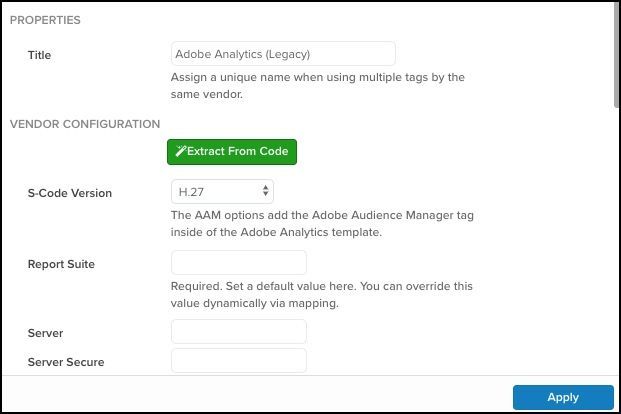
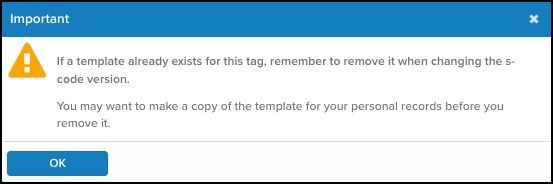
A warning modal appears that indicates that the tag template needs to be updated.
1. Click **OK**.
1. Scroll down to **Advanced Settings** and click to expand.
1. Select **Edit Templates**.
1. In the text field, copy and paste the entire template to a text file as a backup.
1. Remove the current template by selecting it and clicking the Trash icon.
1. Save and publish your changes.
The latest tag version is now loaded.
## Advanced Configuration
### Setting s.events
Within the Adobe tag template, Tealium offers a function called `u.addEvent()` to assist in setting the `s.event` string. This method appends new values to the end of `s.events`, which allows you keep all previously set events and simply add another event when needed. To use this method, you need a variable called `sc_events` in your configuration.
Use the following steps to customize `s.events` using `u.addEvent`:
1. Add a [Set Data Values](https://docs.tealium.com/set-data-values-extension/) extension.
1. Set the **Scope** to the Adobe Analytics tag.
1. From the **Set menu, select **sc_events**.
1. From the **To** menu select **JS Code**.
1. In the text field, type: `u.addEvent("CUSTOM_EVENT")`
Where `CUSTOM_EVENT` is the event you want to append to the `s.events `string, such as **event10**.
1. To add multiple events in one step, pass an array to `u.addEvent`, as follows:
`u.addEvent(["event1","event2","scView"]);`
### SiteCatalyst Dynamic Variables
Adobe supports a notation called dynamic variables that reuses values that appear in more than one property to help minimize the size of tracking pixels.
The Adobe tag in TiQ applies this notation automatically when sending the pixel request to Adobe. This means is you might see a value such as `v3:D=c2` in one of your variables. In this case, `v3` is `eVar3` and `D=c2` is the value from `s.prop2`. Instead of repeating the value of `s.prop2`, this shortened notation is used as a reference to `prop2`, which Adobe interprets properly on their servers. The resulting tracking pixels are smaller and faster, which allows for packing the maximum amount of data into one pixel request.
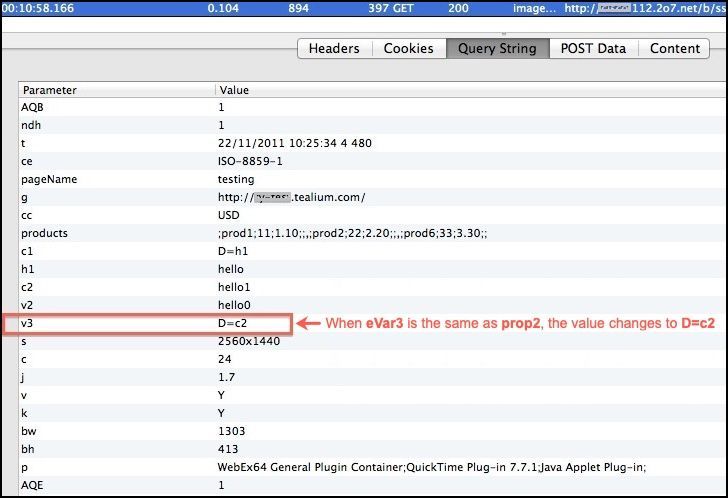
Learn more about [SiteCatalyst Dynamic Variables](http://omniture.custhelp.com/app/answers/detail/a_id/10099).