---
title: Adobe Target Using Global mbox with utag.sync.js
description: This article describes how to set up Adobe Target Using Global mbox with utag.sync.js in your Tealium iQ Tag Management account.
url: https://docs.tealium.com/client-side-tags/adobe-target-using-global-mbox-with-utagsyncjs/
---
## Before You Begin
This article assumes familiarity with the following topics:
* [Adobe Target Tag Setup Guide](https://docs.tealium.com/adobe-test-target-tag/)
* [Asynchronous Flicker Free Target Implementation](https://docs.tealium.com/flicker-free-test-and-target/)
## Overview
Adobe Target has two methods that can be used to modify content.
* Place Regional mboxes in pages in the exact locations where content will be modified.
* Place a Global mbox create statement in the page and define all logic within the Adobe TnT interface as to which content will be modified.
This post will review the implementation for the Global mbox approach. The Global mbox approach is a synchronous implementation. As a best practice, we recommend that you keep everything asynchronous to mitigate risk. Be sure to understand the risks with loading elements synchronously.
The method outlined in this post will allow you to keep your Tealium implementation asynchronous, but load the Global mbox synchronously. This solution also assumes you are using one of the later versions of the `mbox.js` file from Adobe Target. The later versions will create the container with the `mboxDefault` class automatically, whereas the older versions of `mbox.js` will not.
If you are using an older version of `mbox.js`, we can still support it, but it will take an additional step. See the Legacy `mbox.js` section for more information.
## Enable utag.sync.js in Publish Settings
First, you need to enable the appropriate publish setting:
1. In the admin menu, click **Configure Publish Settings**. The **Publish Configuration** dialog appears.
1. Enable the **Flicker-Free Support for Adobe Target** feature.
You will now have an additional template in the Manage Templates section where you can paste the code you want to load within the `utag.sync.js` file.
## Code utag.sync.js into page
You will now need to code your pages with the `utag.sync.js` file. This file, as mentioned, should be included in the of the page and needs to be included synchronously. Ensure that the `utag.sync.js` file is included on all pages where you will use Adobe Target.
With the `utag.sync.js` file, you will not be able to assign load rules to this file. The only way to keep the code within `utag.sync.js` from running would be to use "if" statements or other conditions within the file itself.
## Download mbox.js
After you have set up your campaign and offer within the Adobe interface you'll need to download the `mbox.js` file.
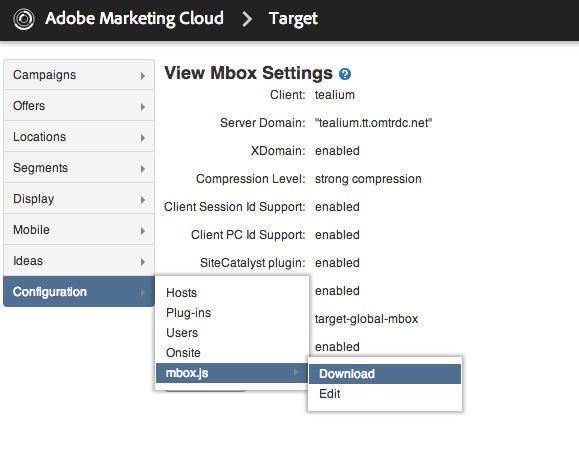
## Host the mbox.js file locally
You'll need to save the `mbox.js` file on all hosts (domains) serving mboxes. This needs to be a publicly accessible file so it can be loaded from your site.
## Configure utag.sync.js
Once you have downloaded the `mbox.js` file, open the file and copy its contents.
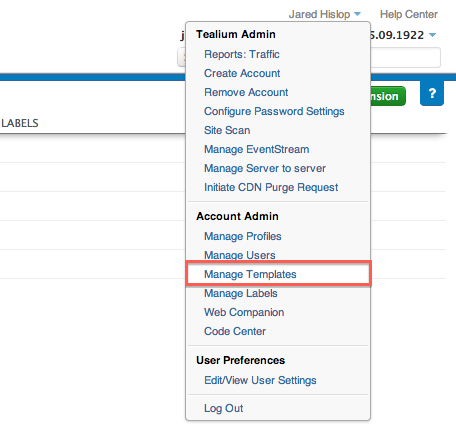
Open the template for the `utag.sync.js` file (uTag sync) within the Tealium user interface. This is done by clicking on your name in the upper right hand corner of the screen and selecting **Manage Templates**. From the drop-down that appears, select **uTag sync**.
In the template copy and paste the following:
```
var mboxjs_location = "//path/to/mbox.js";
var global_mbox_name = "Global mbox name";
document.write('');
document.write('');
```
The first line is where you will add the path to your `mbox.js` file. Replace `//path/to/mbox.js` with the actual path.
The second line is where you add the name of your Global mbox. Replace `Global mbox name` with the name of your Global mbox.
Attached is a text file that shows what a sample `utag.sync.js` template would look like once you've added everything.
## Legacy mbox.js
If you're using an older version of the `mbox.js` file you will need to create the mboxDefault element manually. To do this we will use similar code as above:
```
//Create mboxDefault
document.write('')
```
This shouldn't need to be altered because it will simply create a div element in the head that is above the `mboxCreate` function that looks like this:
```
```
This block needs to go between the two existing lines that start with document.write.
Using this method, in the `utag.sync.js` file you will have the `mbox.js` code, followed by this other block of code that creates the element, then you will have the code that calls the `mboxCreate` function. You can see a sample of this in the Sample `utag.sync.js` Legacy Template file that is attached.
## Conclusion
Once this is set up, you will have the `utag.sync.js` file coded into the head of your website synchronously. In the body of your page you will have the main Tealium Library (`utag.js`) file loaded asynchronously.
Within the `utag.sync.js` you will have pasted the `mbox.js` file and added a small snippet, or two small snippets, to call `mboxCreate()`.
`utag.footer.js` is deprecated and is no longer an option. Older implementations that are using `utag.footer.js` will continue to function as before. You do not need to change the scope for your old Content Modification extensions. The old Content Modification extensions originally scoped to 'Footer' will appear to be scoped to 'DOM Ready' and will continue to publish to the `utag.footer.js` file.