---
title: Facebook Pixel Setup Guide (Legacy)
description: The Facebook Pixel tag combines the functionality of the Facebook Custom Audiences Pixel and the Conversion Tracking Pixel.
url: https://docs.tealium.com/client-side-tags/facebook-pixel-legacy/
---
This is the legacy version of the tag and will soon be deprecated and replaced with the [Facebook Pixel tag](https://docs.tealium.com/facebook-pixel-tag/)
## Prerequisites
* Facebook Ads Account
* Upgraded Facebook Pixel (or legacy Custom Audiences pixel)
* Conversion Pixel (legacy)
## Tag Configuration
First, go to the Tealium tag marketplace and add the Facebook Pixel tag to your profile. For more information, see [Manage Tags](https://docs.tealium.com/manage-tags/#add-a-tag).
The best practice is to configure a single tag instance per pixel ID for standard PageView and event tracking.
After adding the tag, configure the settings described in the following table:
| Setting | Description |
|:------|:-----------------|
| Title |
Enter a unique name to identify the tag
Important if you are adding multiple instances of this tag
|
| Facebook Pixel ID |
Your Facebook Pixel ID
This appears as a long series of numbers in the code snippet
You may add multiple pixel IDs as a comma-separated list
Example: `fbq('init', '12345678901234')`
|
| Conversion Pixel ID |
Required only for tracking legacy Conversion Pixel (deprecated)
The ID appears in the code snippet as: `fb_param.pixel_id = '12345';` OR `fbq('track', '12345') OR fbq.push(['track', '12345', { }]);`
|
| Allow Default Page View |
Triggers the PageView event on all pages
`True`
Default value
Turns on automatic PageView tracking for non-conversion events
`False`
Turns off PageView triggering when tracking conversion events
Tip: If you do not want this default behaviour, you can turn it off using the flag `disablePushState`. When you set this flag to `true`, it will stop sending `PageView` events on history state change.|
| Default Event to Send |
Select the event you want to trigger by default
This is primarily for use with the Conversion Pixel
Enables the use of `trackCustom` for Facebook event tracking calls.
You can track custom events by calling the `fbq('trackCustom')` pixel function, with your custom event name and (optionally) a JSON object as its parameters.
Example: To track visitors who share a promotion to get a discount, you could track them using the custom shown in the following example: `fbq('trackCustom','ShareDiscount',{promotion:'share_discount_10%'});`
|
## Load Rules
[Load rules](https://docs.tealium.com/about-load-rules/) determine when and where to load an instance of this tag on your site.
Recommended Load Rule:
* For tracking standard PageView and events, use the default **All Pages** rule
* For tracking legacy Conversion Pixel, apply custom rule conditions to load the tag on specific conversion pages.
## Data Mappings
Mapping is the process of sending data from a [Data Layer Variable](https://docs.tealium.com/data-layer-variables/) to the corresponding destination variable of the vendor tag.The destination variables for the Facebook Pixel tag are built into the Data Mapping tab. For instructions on how to map a variable to a tag destination, see [Data Mappings](https://docs.tealium.com/iq-tag-management/data-mappings/manage/).The following sections describe available categories:
### **Standard**
Use these mappings to override the tag configuration settings. This can be useful if you want to set values dynamically based on your data layer.
| Destination Name | Destination Variable | Description |
|:----|:--|:-----------|
| Facebook Pixel ID | `cust_pixel` | Numeric identifier(s) of the Facebook Pixel |
| Conversion Pixel ID | `conv_pixel` | Numeric identifier of the legacy conversion pixel |
| Allow Init Page View [`true`/`false`] | `page_view` | 'init' track call |
| List of Events to fire | `evt_list` | Events listed either as comma-separated values or an array in your variable |
| Enable trackSingle [`true`/false] | `track_single` |
Enables use of `trackSingle` and `trackSingleCustom` for event tracking.
Restricts event tracking to the pixel ID(s) added to the Facebook Pixel configuration in Tealium iQ in situations where multiple Facebook pixels are loaded.
Enables the use of `trackCustom` for Facebook event tracking calls.
Custom event names must be strings, and cannot exceed 50 characters in length.
|
### **Advanced Matching**
With this additional data, you can report and optimize your ads for more conversions and build larger re-marketing audiences. You can pass the customer identifiers that you collect from your website during the check-out, account sign-in or registration process as parameters in the pixel.
In Advanced Matching, the case of the term entered is normalized unless the item to be matched is already recognized.
| Destination Name | Destination Variable | Description |
|:------|:--|:------|
| Email | `em` | Email |
| First Name | `fn` | First name |
| Last Name | `ln` | Last name |
| Phone Number | `ph` | Numeric value of phone number |
| Gender | `ge` | `f` or `m` |
| Date of Birth | `db` | [ `yyyymmdd`] |
| City | `ct` | City |
| State | `st` | 2-letter code |
| Zip | `zp` | Zipcode |
### **E-Commerce**
Since the Facebook Pixel tag is e-commerce enabled, it will automatically use the default [E-Commerce Extension](https://docs.tealium.com/e-commerce-extension/) mappings. Manually mapping in this category is not needed unless you want to override any extension mappings or an e-commerce variable is not offered in the extension.
| Destination Name | Destination Variable | Description | E-Commerce Extension Variable |
|:---|:--|:---|:------|
| Order ID | `order_id` | Unique identifier assigned to the final order | `_corder` |
| Sub Total | `sub_total` | Sub total amount of the final order | `_csubtotal` |
| Currency | `order_currency` | Currency used in the payment | `_ccurrency` |
| List of Product IDs | `product_id` | Unique identifier of each product in the product array | `_cprod` |
| List of Product Names | `product_name` | Name of each product in the product array | `_cprodname` |
| List of Categories | `product_category` | Category of each product in the product array | `_ccat` |
| List of Prices | `product_unit_price` | Unit price of each product in the product array | `_cprice` |
### Limited Data Use
| Variable | Description |
|:---|:---------|
| `lmt_data.use_ldu` (Use LDU) |
If `true`, use Facebook’s Limited Data Use option
If `false`, do not use Facebook’s Limited Data Use option
|
| `lmt_data.ldu_types.geolocate` (LDU should Geolocate) |
If `true`, the LDU geolocates the user.
If `false`, the LDU does not geolocate the user. If **Use LDU** is enabled, then **LDU should Geolocate** is also enabled by default.
|
| `lmt_data.ldu_types.california` (LDU is California) |
If `true`, sets the state and country California-specific values inside the template. Only enable this option if the user is located in California and needs to be processed with Limited Data Use.
If `false`, does not set the user’s state and country California-specific values inside the template.
|
## **Events**
Map to these destinations for triggering specific events on a page. Events are used for tracking conversions and building targetable audiences for your Facebook ads.
The Purchase event is automatically triggered when an Order ID value is available, either through the E-Commerce extension or a direct data mapping.
Use the following steps to map an event:
1. In the **Trigger** field, enter the value of the variable you are mapping to the destination that corresponds to the event selected.
For example, if you want to trigger the **Purchase** event when `event_name="order"` is in your UDO, you would enter `order` (assuming you are currently mapping the variable `event_name`).
1. In the **Event** list, select the event you want (for example, **Purchase**).
1. Click **+ Add.**
### **Custom Events**
For custom events, select **Custom** and enter a name for the custom event.
In this following example the custom event "InboundLead" will be triggered when the variable `event_name` equals `inbound_lead_event`.
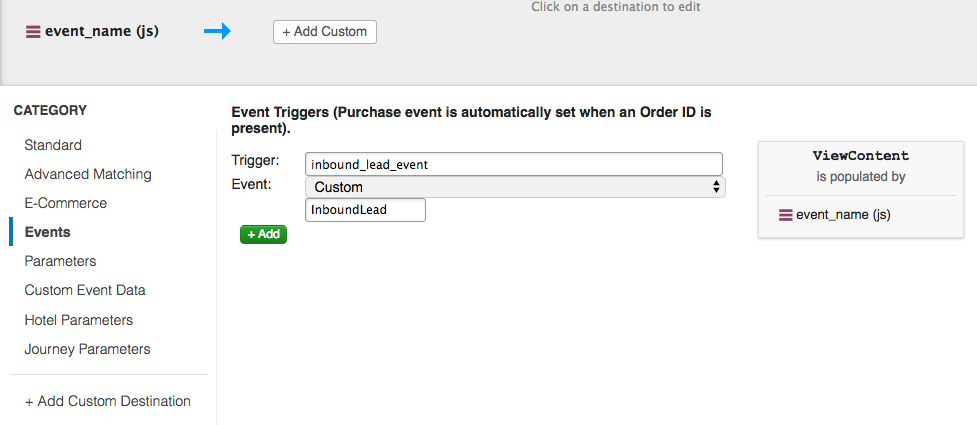
To edit a custom event, single click on the destination input field to edit the event name directly. The values are entered in the form: `{VARIABLE_VALUE}:{DESTINATION_EVENT}`.
* The left-side of the colon is the variable value that will trigger the event, such as `inbound_lead_event`
* The right-side of the colon is the custom event name, such as `InboundLead`.
### **Custom Event Data**
Map to these destinations if you want to pass a custom parameter with a custom Event that you mapped in the [Events tab](#events_tab).
Use the following steps to map a Custom Event Data variable:
1. In the **Event Name** field, enter the name of the custom event exactly as specified in the **Events** tab.
1. In the **Parameter** field, enter the name of the parameter you want to send.
1. Click **+ Add**.
### Full List of Standard Events
| Destination Event | Event Description |
|:--|:------|
| AddPaymentInfo | Visitor adds payment details during the checkout process |
| AddToCart | Visitor adds an item to the cart |
| AddToWishlist | Visitor adds an item to the wish list |
| CompleteRegistration |
Visitor completes a registration form
Example: visitor successfully subscribes to a newsletter
|
| Contact | When a person initiates contact with your business through telephone, SMS, email, chat, or other method. |
| Conversion | For legacy Conversion Pixel only; requires the Conversion Pixel ID to be set |
| Custom |
Visitor action is treated as a custom event
Can be used for reporting custom audiences and custom conversions
|
| CustomizeProduct | When a person customizes a product. |
| InitiateCheckout |
Visitor takes the first step to begin checkout process
Example: visitor clicks **Go to Checkout** button
|
| Lead |
Visitor action indicates his or her buying intent
Example: visitor signup for a trial product
|
| PageView | Visitor views any page on your site |
| Purchase | Visitor successfully completes the last step in the checkout process Note: This event is required for tracking conversions; make sure to map it in the **Events** Tab |
| Schedule | When a person books an appointment to visit one of your locations. |
| Search | Visitor performs a search action |
| StartTrial | When a person starts a free trial of a product or service you offer. |
| SubmitApplication | When a person applies for a product, service, or program you offer. |
| Subscribe | When a person applies to start a paid subscription for a product or service you offer. |
| ViewContent | Visitor views a specific page, indicating their browsing intent |
## Parameters
Map to these destinations if you want to pass additional data with the event(s) that you mapped earlier.
Parameters are only used with pre-defined events. See the [Custom Event Data](#custom-event-data) section to learn how to pass a parameter with a custom event.
Use the following steps to pass a parameter with a predefined event:
1. In the **Event** field, select a Facebook event from the drop-down list.
1. In the **Parameter** field, select a Facebook parameter from the drop-down list.
For a **Custom** parameter, enter a name to identify the parameter.
1. Click **+ Add**.
### Full List of Predefined Parameters
| Destination Parameter | Description |
|:---|:---|
| Value | Value associated with the event |
| Currency | Currency associated with the Value parameter |
| Content Name | Name of the product or page |
| Content Type | Type of the product or page associated with the event |
| Content IDs | Any identifier(s) associated with the event |
| Content Category | Category of the product or page |
| Number of Items | Number of items at checkout |
| Search String | Keyword/term used in the search action |
| Order ID | Unique identifier of the final order |
| Status | Status of the CompleteRegistration event |
| Custom | Custom parameter to be passed with a predefined Event |
### **Hotel Parameters**
Map to the destinations listed in the following table to send hotel-related search and hotel booking details with the event(s) you mapped earlier.
#### Full List of Hotel Parameters
| Parameter | Description|
|:------|:-----|
| Content Type |
(Required) Type of the product or page associated with the hotel.
Note: Ensure that the variable value equals `hotel`. |
| Content IDs |
(Required) Unique identifier(s) associated with the hotel.
|
| Destination |
(Required) String value describing the city, state, or country where the hotel is located. Example: `San Fransisco`.
|
| Check-in Date |
(Required) The date on which the visitor will be checking in to the hotel
Corresponds to timezone of the hotel
The following date formats are supported:
`YYYYMMDD`
`YYYY-MM-DD`
`YYYY-MM-DDThh:mmTZD`
`YYYY-MM-DDThh:mm:ssTZD`
|
| Check-out Date |
(Required) The date on which the visitor will be checking out of the hotel
Corresponds to timezone of the hotel
The following date formats are supported:
`YYYYMMDD`
`YYYY-MM-DD`
`YYYY-MM-DDThh:mmTZD`
`YYYY-MM-DDThh:mm:ssTZD`
|
| Value |
(Required) Relative value of the event to the advertiser
Required for the Purchase event
|
| Currency |
(Required) Currency associated with the Value parameter
Required for the Purchase event
|
#### Optional Hotel Parameters
| Parameter | Description |
|:--|:-------|
| City |
(Optional) City where the hotel is located
|
| Region |
(Optional) State/District where the hotel is located
|
| Country |
(Optional) Country where the hotel is located
|
| Number of Adults |
(Optional) Number of adults specified in the booking/search
|
| Number of children |
(Optional) Number of children specified in the booking/search
|
| Suggested Hotels |
(Optional) Identifiers of other hotels recommended for the visitor
|
| User Score |
(Optional) Relative value of the visitor to the advertiser
Must contain a numerical value
|
| Hotel Score |
(Optional) Relative value of the hotel to the advertiser
Must contain a numerical value
|
| Purchase Currency |
(Optional) Currency associated with the hotel booking transaction
|
#### Optional Hotel Parameters for Search Events Only
| Parameter | Description |
|:----|:-----|
| Preferred Star Ratings |
(Optional) Search criteria is filtered by the hotel's star ratings
|
| Preferred Price Range |
(Optional) Search criteria is filtered by room rates
|
| Preferred Neighborhoods |
(Optional) Search criteria is filtered by location neighborhood
|
### **Journey Parameters**
Map to the destinations listed in the following table to send visitor's travel details (flight or route journey) with the event(s) you mapped earlier.
#### Full List of Journey Parameters
| Parameter | Description|
|:----|:-----------|
| Content Type |
(Required) Indicates whether the journey type is flight or non-flight
Note: The variable value must equal `flight` for flight journeys and `route` for non-flight journeys.|
| Origin |
(Required) String value describing the city, state, or country where the journey begins.
Example: `San Fransisco, California, USA`.
|
| Destination |
(Required) String value describing the destination city, state, or country.
Example: `Toronto, Ontario, Canada`.
|
| Departing Departure Date |
(Required) Date and time when the outbound journey begins
The following date formats are supported:
`YYYYMMDD`
`YYYY-MM-DD`
`YYYY-MM-DDThh:mmTZD`
`YYYY-MM-DDThh:mm:ssTZD`
|
| Returning Departure Date |
(Required) Date and time when the return journey begins
The following date formats are supported:
`YYYYMMDD`
`YYYY-MM-DD`
`YYYY-MM-DDThh:mmTZD`
`YYYY-MM-DDThh:mm:ssTZD`
|
| Value |
(Required) Relative value of the event to the advertiser
Required for the Purchase event
|
| Currency |
(Required) Currency associated with the Value parameter
Required for the Purchase event
|
#### Required Flight Parameters
The following parameters are **required** when the `content type` value equals `flight`:
| Parameter | Description|
|:--|:--------|
| Origin Airport |
(Required) [IATA](https://en.wikipedia.org/wiki/International_Air_Transport_Association_airport_code) code (the three-letter airport identifier) of the origin airport
|
| Destination Airport |
(Required) [IATA](https://en.wikipedia.org/wiki/International_Air_Transport_Association_airport_code) code (the three-letter airport identifier) of the destination airport
(Optional) Name of the city where the journey begins
|
| Origin Region |
(Optional) Name of the state/region where the journey begins
|
| Origin Country |
(Optional) Name of the country where the journey begins
|
| Destination City |
(Optional) Name of the destination city
|
| Destination Region |
(Optional) Name of the destination state/region
|
| Destination Country |
(Optional) Name of the destination country
|
| Departing Arrival Date |
(Optional) Date and time on which the visitor arrives at their destination
The following date formats are supported:
`YYYYMMDD`
`YYYY-MM-DD`
`YYYY-MM-DDThh:mmTZD`
`YYYY-MM-DDThh:mm:ssTZD`
|
| Returning Arrival Date |
(Optional) Date and time on which the visitor returns to the origin, completing the journey
The following date formats are supported:
`YYYYMMDD`
`YYYY-MM-DD`
`YYYY-MM-DDThh:mmTZD`
`YYYY-MM-DDThh:mm:ssTZD`
|
| Number of Adults |
(Optional) Number of adults in the travel
|
| Number of children |
(Optional) Number of children in the travel
|
| Number of Infants |
(Optional) Number of infant babies in the travel
|
| Travel Class |
(Optional) Indicates the type of class the visitor will be travelling in.
For `flight` journey, the variable should contain enum values such as `economy`, `premium`, `business`, `first`.
For `route` journey, the variable should contain a custom string value.
Example: `Economy`
|
| User Score |
(Optional) Relative value of the visitor to the advertiser
Must contain a numerical value
|
| Purchase Value |
(Optional) Price of the travel booking
Recommended for Purchase and InitiateCheckout events.
|
| Purchase Currency |
(Optional) Currency used in the booking transaction
|
#### Optional Journey Parameters for Search Events Only
| Parameter | Description|
|:----|:-------|
| Preferred Number of Stops |
(Optional) Search criteria is filtered by the number of stopovers
Set the variable value to `0` for direct flights and `1` if the visitor has specified the number of stopovers.
|
## Use Cases
This section provides use cases that represent real-life scenarios.
### Use Case: Tracking PageView and Standard/Custom Events
Set the PageView event to be fired automatically on all pages and trigger all non-conversion with mappings.
Use the following steps to set up this use case for your environment:
1. Configure the following settings:
* **Pixel ID**: `FB_PIXEL_ID`
* **Allow Default Page view:** `True`
* **Default Event to Send**: `None`
1. Load the tag on all pages (default rule).
1. Map the variable `event_name` to the non-conversion event(s) of choice.
### Use Case: Tracking PageView and Conversion Event (Deprecated)
Triggering a conversion event requires the Conversion Pixel ID. You may do this in the same tag instance you are using for tracking PageView and non-conversion events.
Use the following steps to set up this use case for your environment:
1. Configure the following settings:
* **Pixel ID**: `FB_PIXEL_ID`
* **Conversion Pixel ID**: `CONVERSION_PIXEL_ID`
* **Allow Default Page view**: `True`
* **Default Event to Send**: `None`
1. Load the tag on all pages (default rule).
1. Map the variable `event_name` to the conversion event(s) of choice.
### Use Case: Tracking Legacy Conversion Pixel Only (Deprecated)
The Conversion Pixel needs to be tracked in a separate tag instance. In this tag instance, leave the Pixel ID blank and disable automatic pageview tracking. Because you are not tracking specific events, no data mappings are required.
Use the following steps to set up this use case for your environment:
1. Configure the following settings:
* **Conversion Pixel ID**: `CONVERSION_PIXEL_ID`
* **Allow Default Page view**: `False`
* **Default Event to Send**: `Conversion`
1. Apply custom load rules to load this tag on specific conversion pages.
### Use Case: Multiple Pixels on A Single Page
The following use cases represent scenarios that can be used for multiple pixels on a single page:
* **Shared Event Tracking**
* If you want multiple Facebook Pixels to share pageview and event tracking, you can add a comma-separated list of those pixel IDs to the Facebook Pixel ID field in the tag configuration settings.
* Having several Facebook Pixels with their own pixel IDs may share event tracking with other Facebook Pixels on the page if their Enable trackSingle setting is `false`, although this may result in inconsistent tracking behavior and is not recommended.
* **Individual Event Tracking**
* If you are loading more than one Facebook Pixel on a single page, and you want to keep the tracking events from being recorded for all of the pixels on that page, then make sure the **Enable trackSingle** setting is `true`.
* This setting will fire event tracking only for the pixel IDs added for that tag.
* If your Facebook Pixel in Tealium iQ was added before March of 2018, you may not be able to take advantage of the trackSingle feature.
* In this case, [update your Facebook tag template](https://docs.tealium.com/about-templates/) to the latest version. Note that the trackSingle setting is set to `true` as default.
* You must map to `track_single` and set the value to `false` to override and disable this feature.
* **Versions that predate March 2018**
* If you added your tag after March of 2018, refer to the use cases above when setting up multiple Facebook pixels
* Older versions of the Facebook Pixel were not designed to be [loaded more than once on a single page](https://www.facebook.com/business/help/community/question/?id=10100525729830570).
* The Facebook JavaScript library initializes a single instance of the `fbq` object, which is used for all tracking that occurs on the page (thus reusing the same pixel ID).
* If you require more than one Facebook pixel, each with a different pixel ID, to be fired on a single page, and you are unable to update the tag template, then we recommend implementing the `