---
title: Splunk Tag
description: This article will guide you in configuring the Splunk tag in Tealium iQ and configuring the Tealium Digital Analytics App within the Splunk interface.
url: https://docs.tealium.com/client-side-tags/splunk-tag/
---
## Add the Tag
Tealium iQ's Tag marketplace offers a wide variety of tags. For more information, see [Manage Tags](https://docs.tealium.com/manage-tags/#add-a-tag).
The Splunk tag can be located through the **Big Data** category in the Marketplace.
Set the following fields:
* **Title**: The default title is `Splunk`. You may enter a descriptive title to identify the tag instance.
* **Server**: This field is prepopulated with the location pathname of the Amazon S3 bucket tied to your account and profile.
Do not change this server setting unless you want to send the data to a custom server.
* **Require Mapping**: This setting lets you decide what data points you want to send.
* Select the default setting of **No** if you intend to send the entire data layer.
* Select **Yes** if you want to send only the mapped data points.
## Apply Load Rules
[Load Rules](https://docs.tealium.com/about-load-rules/) determine when and where to load an instance of this Tag. The **Load on All Pages** rule is the default Load Rule. To load this Tag on a specific page, create a new load rule with the relevant conditions.
Do not proceed to Data Mappings if you have disabled mapping for the Tag instance. Instead, click **Finish** to complete the tag configuration.
## Map Data Sources
The following steps are required only if you have set **Require Mapping** to **Yes**.
1. In the **Tag Settings** window, click **Next** or select the **Data Mappings** tab.
1. From the **Data Sources** drop-down, select the data source you want to map.
1. Click the **Select Destination** button.
1. Because there is no mapping toolkit for this tag you must create custom destination variables to map. Enter a custom variable in the **Custom Destination** text field. It is recommended to choose short variables to avoid exceeding any browser-imposed character limits on GET requests.
1. Click **+ Add** which will add the custom destination variable.
1. Click **Close** to return to the **Tag Settings** window.
1. Repeat steps 3 to 5 to add more destinations.
1. Then click **Finish** to save the tag definition or **Cancel** to exit without adding the tag.
## Splunk Integration
Before you begin the integration process, contact your account manager to request the Amazon Web Services Key ID and Secret key for your profile.
### How to Install Amazon S3 Add-on (Splunk Connector)
1. Navigate to the Splunk Apps site at and download the Tealium Digital Analytics App. An app file (`*.tar` or `*.tgz`) required by the connector will be downloaded in the process.
You will need to obtain account credentials from your Splunk administrator to log in to access the download page.
1. Launch Splunk and log into your account.
1. Click **Apps** at the top-left corner of the screen. From the drop-down menu, click **Manage Apps**.
1. In the next screen, click the **Install App From File** button. This will open the **Upload app** screen.
1. Click the **Choose File** button and select the downloaded app file from your computer to upload it.
### Add an S3 Input for Splunk Add-on for AWS
Please visit the following Splunk article for implementaiton instructions:
### Setting up Data Inputs for your Splunk Instance
1. Click on **Settings** at the top-right corner of the Splunk interface. From the drop-down menu, click **Data Inputs**.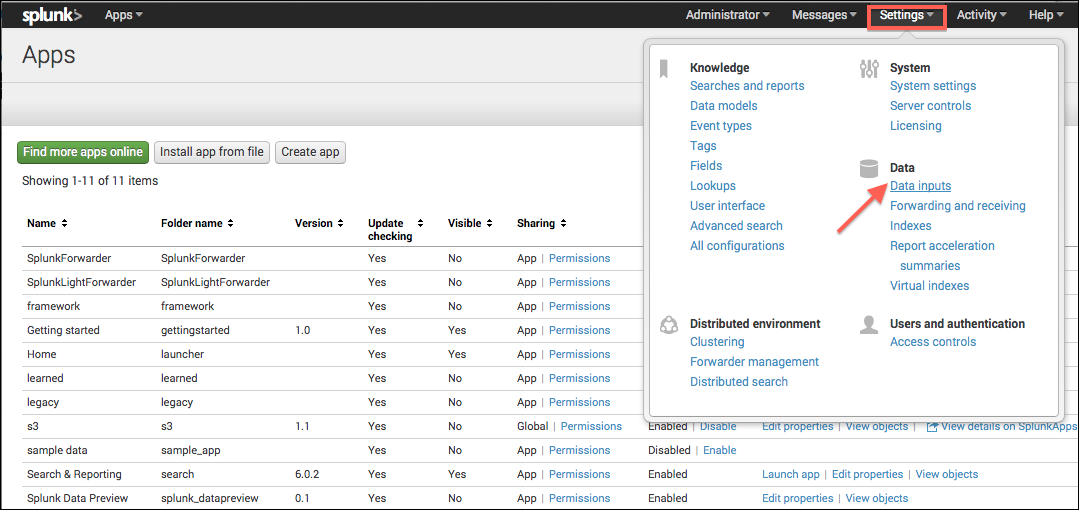
1. Click on **Amazon S3**. In the next screen, click **New** to create a new configuration.
1. In the **Add new** screen, enter your S3 credentials.
* In the Resource name field, enter the uconnect server pathname (see Configuring the Tag).
If the uconnect pathname contains `account.name`, replace the `.` with `/` and change it to `uconnect.tealiumiq.com/account/name`.
* Enter the Key ID and the Server key in their respective fields.
1. Click **Save**. This completes the Splunk integration.