---
title: Manage user permissions
description: This article explains how to manage user permissions.
url: https://docs.tealium.com/iq-tag-management/administration/user-permissions/manage/
---
## Add a user
To add a new user, you must have **Manage Account** and **Manage User** permissions.
Use the following steps to add a new user and assign permissions:
1. In the admin menu, click **Manage Users**.
1. In the **User Manager** dialog, click **+ Add User**.
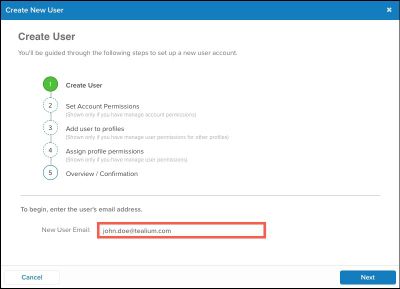
1. In the **Create New User** dialog, enter the user's email address in the **New User Email** field, then click **Next**.
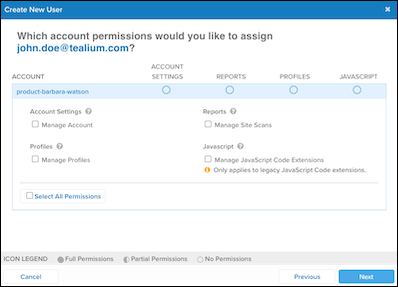
1. Select the account permissions for this user, then click **Next**.
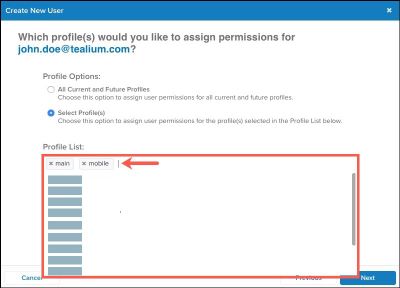
1. Select **Select Profile(s)**.
The list of profiles that you have access to is displayed in the **Profile List**. If you select multiple profiles, you can set permissions for each profile separately, or apply the same permissions to all the selected profiles.
1. In the **Profile List**, select the profiles for which you want to assign permissions for the user, then click **Next**.
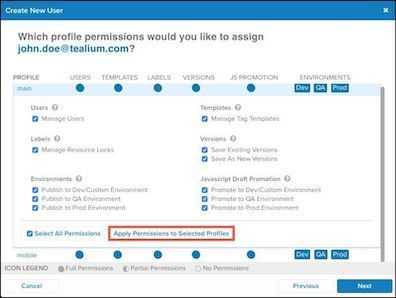
1. Select one or more profile permissions to assign to the user, or select **Select All Permissions**.
If you selected multiple profiles, you can click each profile to set permissions. To set the same permissions for all selected profiles, set permissions for one profile, then click **Apply Permissions to Selected Profiles**.
1. When you finish selecting profile permissions, click **Next**.
1. Review and confirm that the selected permissions and publish environments are correct, then click **Finish**.
An activation email is sent to the user's email address.
1. Click **Close**.
## Change user permissions
To modify a user, you must have **Manage Account** and **Manage User** permissions.
Editing permissions for users is a separate process from adding or removing permissions. The following sections describe the methods used to edit user permissions:
* Edit permissions (add and remove) for a single user
* Add permissions for multiple users
* Remove permissions from multiple users
### Edit profile-level permissions
Use the following steps to edit profile-level permissions for a single user:
1. In the admin menu, click **Manage Users**.
1. In the **User Manager** dialog, select the user whose profile-level permissions you want to change.
1. Click **Edit/View User Permissions**.
1. Click **Select Profiles(s)**.
1. In the **Profile List**, select the profiles for which permissions need to be changed, then click **Next**.
1. Edit the profile-level permissions for the user, then click **Next**.
Permissions that are not selected are removed for the selected user..
1. Review and confirm that the updated profile-level permissions are correct, then click **Finish**.
1. Click **Close**.
### Add profile-level permissions for multiple users
Use the following steps to profile-level permissions for multiple users:
1. In the admin menu, click **Manage Users**.
1. In the **User Manager** dialog, select the user accounts to which you want to add account-level permissions.
1. In **Bulk User Options**, click **Add Profile Permissions**.
1. Under **Profile Options**, select either **All Current and Future Profiles** or **Select Profile**.
If you selected **Select Profile**, select one or more profiles in the **Profile List**.
1. Click **Next**.
1. Select the permissions to add to the user accounts or select **Select All Permissions**, then click **Next**.
Leaving a permission checkbox blank or deselecting a permissions does not remove that permission from any selected user.
1. Review and confirm that the selected permissions are correct, then click **Finish**.
1. Click **Close**.
### Remove profile-level permissions for multiple users
Use the following steps to remove profile-level permissions for multiple users:
1. In the admin menu, click **Manage Users**.
1. In the **User Manager** dialog, select the user accounts from which you want to remove permissions.
1. Click **More** and select **Remove Profile Permissions**.
This step does not remove the **All Current and Future Profiles** permission. Clicking **Remove from Profile** removes the users from this profile only.
1. Select **Select Profile**.
Select **All Profiles** to remove users permissions for all profiles to which you have access. If the users have the **All Current and Future Profiles** permission, selecting this option removes permissions from all current and future profiles.
1. Select the profile-level permissions to remove from the user accounts, then click **Next**.
The permissions selected to remove are highlighted in red.
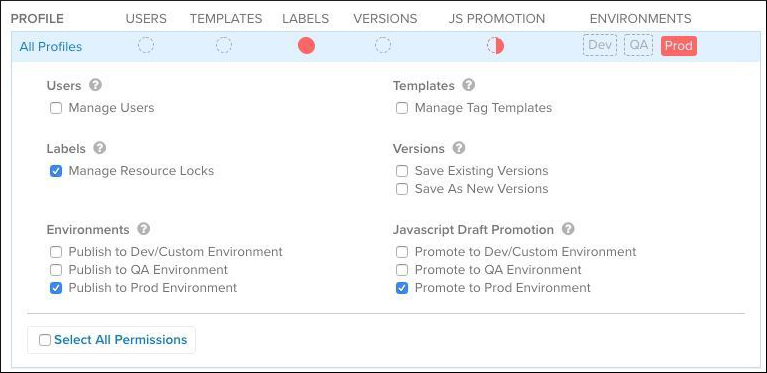
Leaving a permission unselected or deselecting permissions does not remove the permission from the user accounts.
1. Review and confirm that the selected permissions should be removed, then click **Finish**.
1. Click **Close**.
## Remove a user
Use the following steps to remove a user's client-side access:
1. In the admin menu, click **Manage Users.**
1. In the **User Manager** dialog, select the user you want to remove.
1. Click **More** and select **Remove User**.
1. In the **Remove User** dialog, confirm the user to be removed, then click **Remove User**.
The user no longer has access to the client-side profile.