---
title: Create a mobile profile
description: Learn how to create a mobile profile.
url: https://docs.tealium.com/iq-tag-management/profiles/create-mobile-profile/
---
Use mobile profiles to manage settings and vendor tracking for your mobile app separately from your website.
## For Tealium Prism
A mobile profile is used with an installation of one of the following mobile application platforms:
* [Tealium Prism](https://docs.tealium.com/platforms/prism-mobile//)
### Create a mobile profile for Tealium Prism
For [Tealium Prism](https://docs.tealium.com/platforms/prism-mobile//), you configure a mobile profile when you create it. No additional activation steps are required.
1. In Tag Management, go to **Admin Menu > Manage Profiles**.
1. In the side panel, under **Profiles**, click **+ Add**.
1. Enter a profile name.
1. Select **Mobile Profile**.
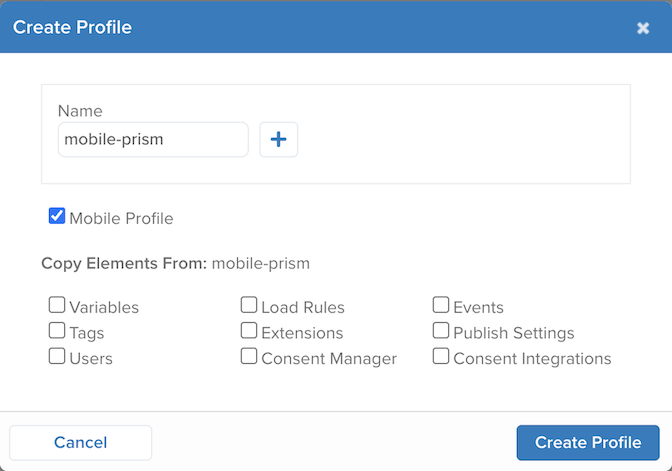
1. Click **Create Profile**.
For more information on configuring a Tealium Prism mobile profile, see:
* [Prism: Modules](https://docs.tealium.com/platforms/prism-mobile/modules/)
* [Prism: Rules](https://docs.tealium.com/platforms/prism-mobile/rules/)
* [Prism: Barriers](https://docs.tealium.com/platforms/prism-mobile/barriers/)
* [Prism: Transformations](https://docs.tealium.com/platforms/prism-mobile/transformations/)
## For Tealium for iOS (Swift) 2.x and Tealium for Kotlin
These section is for installations of the following libraries:
* [Tealium for iOS](https://docs.tealium.com/platforms/ios-swift/install/)
* [Tealium for Android](https://docs.tealium.com/platforms/android-kotlin/install/)
For these SDK versions, first you create a profile, then you convert it to a mobile profile. We recommend that you create a separate profile for each mobile application that you intend to install Tealium on. For example, the most common profile names for mobile apps are: `mobile-ios` and `mobile-android`.
### Create and activate a mobile profile for iOS and Android
For new mobile installations, we recommend using [Tealium Prism](#for-tealium-prism).
To create and activate a profile for use with the Tealium for iOS or Android SDK:
1. Log in to Tealium Tag Management.
1. Go to **Admin Menu > Manage Profiles**.
1. Enter a profile name and click **Create Profile**.
Do not select **Mobile Profile** unless you are using the Tealium Prism SDK. For Swift 2.x and Kotlin SDKs leave this checkbox unselected.
1. In the profile switcher, select the profile you just created.
1. In the admin menu, click **Configure Publish Settings**. The **Publish Configuration** dialog appears.
1. Click the **Mobile Library Publishing** tab.
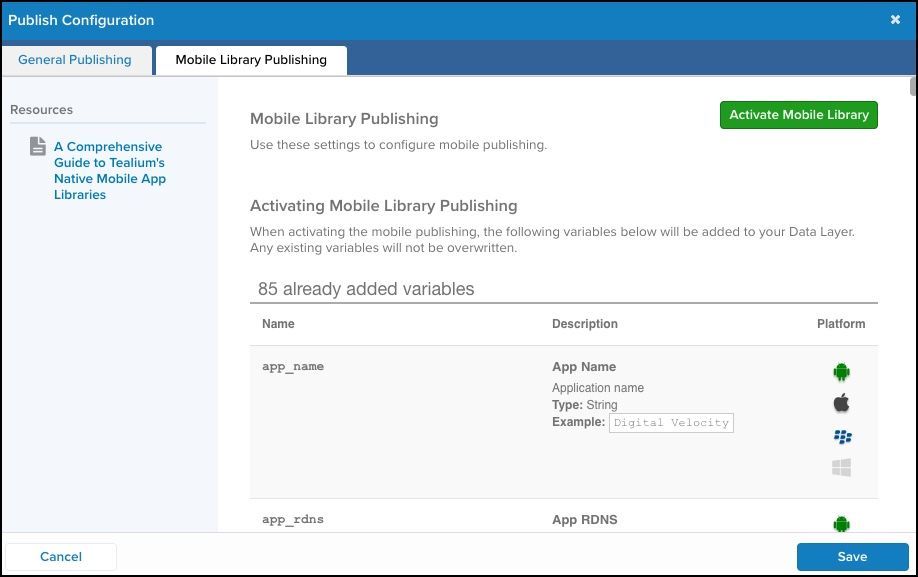
1. Click **Activate Mobile Library** and then click **Activate** to confirm.
1. Click **Save**.
1. Save and publish your settings.
Standard mobile variables are added to the profile and available to the data layer settings for use with tags and extensions.
This profile can now be referenced in your mobile application by referencing the account name, profile name, and publish environment. For setup instructions, see:
* [Tealium for iOS](https://docs.tealium.com/platforms/ios-swift/install/)
* [Tealium for Android](https://docs.tealium.com/platforms/android-kotlin/install/)
### Configure mobile settings
Use the following steps to adjust your mobile configuration settings:
1. Log on to Tealium Tag Management and select the account and profile for mobile application.
1. In the admin menu, click **Configure Publish Settings**. The **Publish Configuration** dialog appears.
1. Click the **Mobile Library Publishing** tab.
Mobile publish settings are enabled by default. You can optionally scroll through the mobile publishing settings, as described in the following table, and adjust as needed.
| Configuration| Description|
|:------------ |:------------|
| Tag Management| - Enables mobile tag management in your application for client-side event tracking.
- `utag.js` runs in a webview.
|
| Tealium Collect| - Enable native mobile tracking for server-side data management (HTTP calls directly to EventStream).
- Set to **OFF** if you enabled Tag Management.
|
| Tealium S2S Legacy| - Set to **ON** for events and views to be sent through Tealium S2S legacy protocol.
|
#### Batching
| Configuration| Description|
|:------------ |:------------|
| Send Batch Data after every (#) event | - Lets you set the number of events (size of batch) that must occur before data is sent back.
- Entering a value of or **1** essentially turns off batching.
- The default value is set to **1**.
|
| WiFi Only Sending | - By enabling **ON**, events only send when the user's device is connected to WiFi.
- The default value is **OFF**.
|
| Battery Saver | - By enabling **ON**, data is only sent when the device has adequate battery power and is not in power saving mode.
- iOS: 20% battery and not charging.
- Android: 15% battery
- The default value is **ON**.
|
#### Data Retention
| Configuration| Description|
|:------------ |:------------|
| Dispatch Expiration in (#) days | - Specify how long (in days) the data persists in the application if no data has been sent back.
- A value of **-1** means there is no dispatch expiration.
- The default value is set to **-1**.
- Dispatch expiration is also applied to events queued due to WiFi only Sending or Battery Saver settings.
|
| Minutes Between Synchronization | - The number of minutes between configuration checks (checks occur at launches and wakes).
- The default value is **15.0**.
|
| Queue Capacity | - The number of events and views to store on the device until ready to send.
- **0** = no offline dispatching
- **-1** = no limit
- The default value is **-1**.
|
#### Debugging
| Configuration| Description|
|:------------ |:------------|
| Set Debugging Log Level | - Lets you enable logging.
- Select one of the following settings:
- **Default** – Sets the log level to match the Environment setting in your configuration.
- **Dev** – Log activity, info, warnings, and errors
- **QA** – Log info, warnings, and errors
- **Prod** – Log errors
- **Silent** – Do not log
|
When you are ready, click **Save**, and save and publish your settings.
The next time your mobile application is loaded, the new configuration is detected and applied.