---
title: Manage profiles
description: This article explains how to manage profiles.
url: https://docs.tealium.com/iq-tag-management/profiles/manage/
---
## Create a profile
Only users with the **Create Profile** legacy permission or the [profile admin role](https://docs.tealium.com/admin-roles/) can create client-side profiles. To create a server-side profile, contact Tealium Support.
You can create one or multiple profiles at the same time.
Use the following steps to create a profile:
1. In the admin menu, click **Manage Profiles**. The **Manage Profiles** dialog appears.
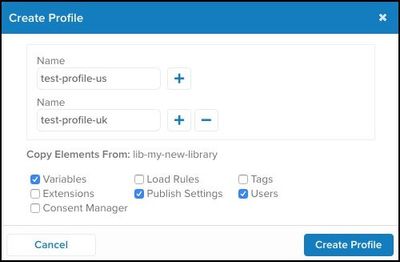
1. Under **Profiles** on the left, click **+ Add**. The **Create Profile** dialog appears.
1. In the **Name** field, enter a name for the new profile.
The name can be a maximum of 50 characters and only contain the following characters: `a-z`, `0-9`, period (`.`), and hyphen (`-`).
The following restrictions apply to naming: The names `main` and `all` are reserved and cannot be used, the name cannot contain a double hyphen (`--`), and the name cannot begin with a period, such as `.profile2`.
1. You can optionally click the plus button (**+**) to add more profile names.
1. Check any items in the **Copy Elements From** section to be copied from the current profile to the new profile.
1. Click **Create Profile** to create the profile.
The new profile display in the **Profiles** list.
Creating a profile happens immediately. If there are any required libraries present, they will be linked to the profile automatically. Any variables based on AudienceStream attributes will not be copied upon profile creation. You must manually add attribute-based variables to newly-created profiles.
### Copy the tag template for utag.js or utag.sync.js
Tag templates for individual tags were copied in the previous steps, but the templates for `utag.js` and `utag.sync.js` were not.
Use the following steps to copy the tag template for `utag.js` and `utag.sync.js` from the origin profile and paste them into the new profile.
#### From the source profile
1. Log in to the source profile.
1. In the admin menu, click **Manage Templates**.
1. In the drop-down list, select one of the following to display the template code.
* For `utag.js`: `uTag Loader (Profile) UID:loader`
* For` utag.sync.js`: `uTag Sync (Profile) UID:sync`
1. Enter **Ctrl-A/Cmd-A** to highlight the template content and then enter **Ctrl-C/Cmd-C** to copy.
1. Click the **X** in the upper-right of the window to close.
#### From the new profile
1. Log out of the origin profile.
1. Log in to the new profile.
1. In the admin menu, click **Manage Templates**.
1. In the drop-down list, select one of the following to display the template code.
* For `utag.js`: `uTag Loader (Profile) UID:loader`
* For `utag.sync.js`: `uTag Sync (Profile) UID:sync`
1. Click **Delete** in the upper-right corner to remove the tag template content.
1. Enter **Ctrl-V/Cmd-V** to paste the contents copied from the origin profile.
1. Click **Save Profile Template** to save the new template code.
1. Save and publish your changes.
1. Repeat the steps in this section for each additional profile if more than one profile was created in the copy.
## Switch profiles
Each account may contain several profiles. Use the following steps to switch to another profile:
1. Click the profile drop-down menu.
1. From the **Profile** drop-down menu, select the profile you want to switch to.
1. From the **Version** drop-down menu, select the version of the profile to switch to.
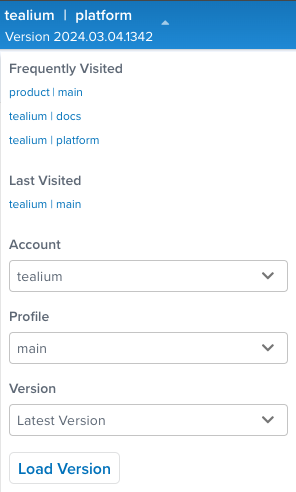
* The most recent profile version is the default selection.
1. Click **Load Version**.
For more information, see [Profile Switcher](https://docs.tealium.com/profile-switcher/).
## Remove profile
To remove a profile, submit a request to [Tealium Support Desk](https://support.tealiumiq.com).