---
title: Manage profile libraries
description: This article explains how to manage profile libraries.
url: https://docs.tealium.com/iq-tag-management/profiles/profile-libraries/manage/
---
## Create a library
Though all users in an account can see all libraries, only users with the **Manage Profiles** permission can create a profile library.
Use the following steps to create a new library:
1. In the admin menu, click **Manage Profiles**. The **Manage Profiles** window appears with all libraries and profiles for your account on the left.
1. Next to **Libraries**, click **Add**.
The **Create Library** dialog appears.
1. In the **Name** field, enter the name for your library.
As a best practice, use a naming convention to differentiate your libraries from your profiles. For example, adding `lib-` in front of your library names makes it easy to determine if you are working with a library or a profile. Profiles and libraries cannot share names.
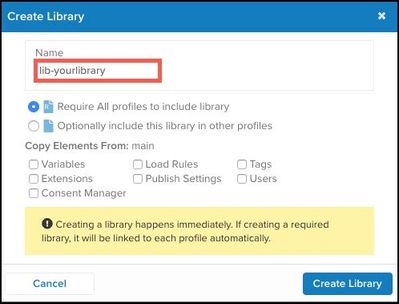
Library names have the same limitations as profile names: no spaces and only lowercase letters, numbers, periods, and dashes.
1. Select one of the following checkboxes to determine if the library is optional or required:
* **Require All profiles to include library**
All profiles include this library automatically.
* **Optionally include this library in other profiles**
You specify which profiles include this library.
1. In **Copy Elements From**, select one or more boxes to select the specific elements you want to include from the profile or library you selected. The elements you select are copied from the profile/library that you are currently logged into. If you select none, you will create a blank library.
* Variables
* Extensions
* Consent Manager
* Load Rules
* Publish Settings
* Tags
* Users
1. Click **Create Library**.
Wait for the library to publish and display a success message.
1. Click **Apply**.
You must log into the library by selecting it from the account/profile menu and clicking **Load Version**.
## Edit a library
Use the following steps to edit a library:
1. In the admin menu, click **Manage Profiles**.
The **Manage Profiles** window appears with all libraries and profiles for your account on the left.
1. Click the library you want to view and select the correct profile from the **Profiles** drop-down list and then click **Edit**.

1. Select **Require All profiles to include library** or **Optionally include this library in other profiles** and click **OK**. When editing a library, the changes go into effect immediately.
Although changing a required library to an optional library does not affect the profiles that are linked to it, changing an optional library to a required library automatically links the library to each profile.
1. Click **Apply** to exit the window.
## Save a library
Consider the following before saving your library:
* You may only perform a **Save as** action with a library. You cannot use the **Overwrite existing version** option.
* As a best practice, develop a naming convention to keep track of your library versions. By default, the **Version** field displays a date and timestamp.
* Changes to a library do not automatically propagate to all the profiles that load it. You must re-publish each profile to include the changes to the library.
For more information, see [Save and publish a version](https://docs.tealium.com/save-publish-a-version/)
Use the following steps to save a library:
1. Click **Save/Publish**.
1. In the **Version** field, enter the name of the new version.
1. In the **Notes** field, enter notes about changes you made to the profile library. This is a required field, you cannot save the profile library without entering notes. The notes entered in this field are useful if you need to roll back to this profile library in the future.
1. (Optional) Select one or more [Publish Locations](https://docs.tealium.com/about-publishing/) to publish this version to a publishing environment. You can also select the **Custom** checkbox to select a [custom environment](https://docs.tealium.com/custom-publish-environments/).
You cannot link to a profile library in a custom environment and any custom environments on a library are not recognized in links to child profiles.
1. Click **Publish**.
After you publish your changes to the library, you need to load each profile that is linked to the library to import the latest changes, and then save those profiles.
## Link a library to a profile
You may link a library to profile, or a profile to a library. After you create a link between a library and a profile, the next time you load the profile, the contents of the library will be imported.
To link a library to a profile:
1. In the admin menu, click **Manage Profiles**. The **Manage Profiles** window appears with all libraries and profiles for your account on the left.
1. From the profiles list, select the profile that you want to link to the library.
Optionally, select a library that you want to link.
1. Select the library from the drop-down list at the top of the window.
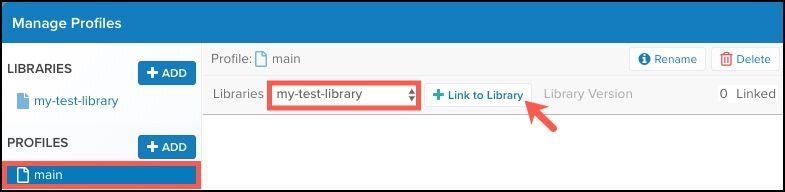
1. Click **+ Link to Library**. The library selected appears.
1. Select the publish environment (Dev, QA, Prod) of the library you want to link to the profile.
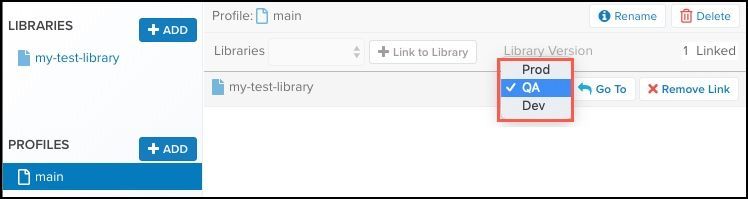
1. To remove a link, click **Remove Link**.
You cannot remove a link to required libraries.
1. Click **Apply**.
## Publish linked profiles
Regardless of whether the library is optional or required, additions of new libraries or changes to existing libraries require that you publish a new version of the linked profiles to import the latest library configurations. You must publish each profile individually.
Use the following steps to determine which profiles are linked to a library:
1. In the admin menu, click **Manage Profiles**. The **Manage Profiles** dialog appears.
1. Under the **Libraries** section, click the library to inspect.
The profiles linked to this library appear in the main window on the right. The **Library Version** column displays which publish environment of this library the profile is linked to.
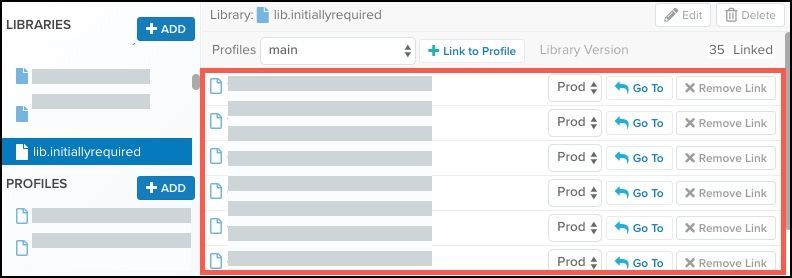
1. Click **Cancel** to close the window.
## Delete a library
Deleting a library is an irreversible action. We recommend that you phase out the use of a library across all affected profiles prior to deleting.
To delete a library, contact your account manager.