---
title: Manage Environments
description: The Manage Environments screen is where you get the code snippet to add the Universal Tag (utag.js) to your website or create custom publishing environments.
url: https://docs.tealium.com/iq-tag-management/save-publish/manage-environments/
---
The [Code Center](https://docs.tealium.com/code-center/) screen has been replaced by the [Manage Environments](https://docs.tealium.com/manage-environments/) screen on accounts that use [platform permissions](https://docs.tealium.com/about-platform-permissions/). Accounts that use legacy permissions still use the Code Center screen.
For more information about installing Tealium on your website, see the [Quick Start Guide for Web](https://docs.tealium.com/getting-started-web/).
## Access Manage Environments
To access the Manage Environments screen, in the admin menu, click **Manage Environments**.
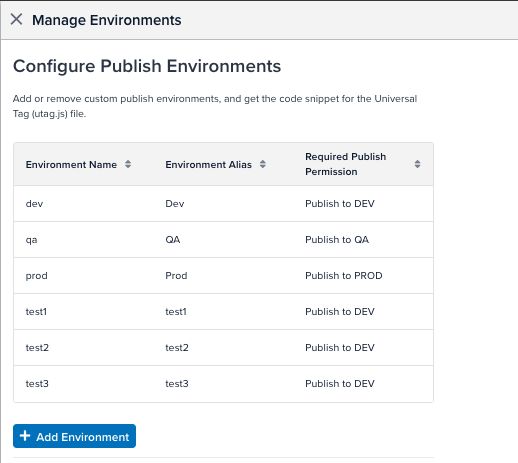
The **Configure Publish Environments** table lists the environments available on your account:
* **Environment Name**: The environment name is one of three default environments (Dev, QA, Prod) or any custom environments that Tealium publishes to. You cannot change default environment names, and you cannot change custom environment names after you create the custom environment.
* **Environment Alias**: The alias appears throughout the platform. You can change the alias for the default environments.
* **Required Publish Permission**: This is the permission necessary to publish to this environment. Only [profile admins](https://docs.tealium.com/admin-roles/#profile-admin) can change the permissions needed for a publishing environment.
Each environment displays an edit icon and a delete icon. You cannot delete the three default environments.
## View or edit environments
Click the environment name on the **Manage Environments** screen to view an environment's details:
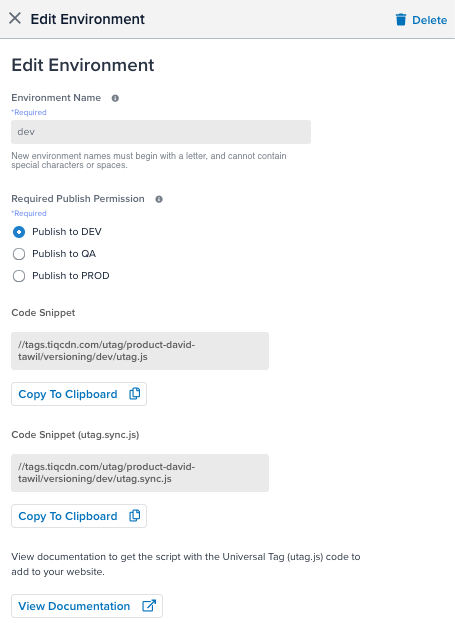
To edit an environment:
1. Click the environment's name.
The **Edit Environment** screen is displayed.
1. For default publishing environments, enter a new alias for the environment. The platform will display the alias instead of the enrivonment name. For example, if you change Dev to Development, the **Save/Publish** window displays the following under **Publish Locations**: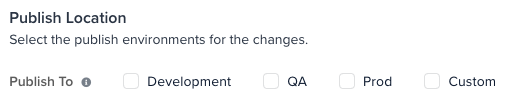
1. You can change the required permission for custom publishing environments. Select the required publishing permission for the new environment:
* Publish to Dev
* Publish to QA
* Publish to Prod
1. Click **Save**.
### Code Snippet
The Universal Tag is a small piece of JavaScript code called `utag.js` that contains all of the generated code necessary to load third-party tags onto your site. It enables Tealium iQ Tag Management to fire tags by inserting the following code into the page:
The **Code Snippet** section of the **Edit Environment** screen displays the code snippet that you need to update in the `a=` line of the Universal Tag (`utag.js`) code when you add the Universal Tag to your web pages.
The `utag.js` code snippet resembles the following:
```html
//tags.tiqcdn.com/utag/[ACCOUNT]/[PROFILE]/[ENV]/utag.js
```
The screen also offers a `utag.sync.js` version of the code:
```html
//tags.tiqcdn.com/utag/[ACCOUNT]/[PROFILE]/[ENV]/utag.sync.js
```
* `[ACCOUNT]` represents the account name.
* `[PROFILE]` represents the profile name.
* `[ENV]` represents the environment name.
For example, for the `prod` environment on the `sample` profile in the `example` account, the **Edit Environment** screen shows the following:
```html
//tags.tiqcdn.com/utag/example/sample/prod/utag.js
```
Click **Copy to Clipboard** to copy the code snippet.
For more information about installing the Universal Tag on your web pages, see [installing the Universal Tag (`utag.js`)](https://docs.tealium.com/platforms/javascript/install#universal-tag-utag-js).
## Custom publish environments
If you need more than the three default environments, you can create custom environments.
To learn more, see [Custom Publish Environments](https://docs.tealium.com/custom-publish-environments/).
## Add a custom publish environment
To create a custom publish environment:
1. In the admin menu, click **Manage Environments**. The **Manage Environments** dialog is displayed.
1. Click **+ Add Environment**.
1. Enter the name of the new environment. The environment name can only contain numbers and letters. Spaces and special characters are not allowed in the environment name.
1. Select the required publishing permission for the new environment:
* Publish to Dev
* Publish to QA
* Publish to Prod
1. Click **Add Environment**.
1. Save and publish your profile.
When you create a custom publish environment, it is added to the **Publish Locations** for every tag, extension, and event listener on the profile.
For more information about custom publish environments, see [custom-publish-environments](https://docs.tealium.com/custom-publish-environments/).
## Delete custom publish environment
To delete a custom environment, click the delete icon in the **Manage Environments** screen. A prompt is displayed to confirm deletion.