---
title: Tealium + Invoca Integration Guide
description: This article describes how to get the most out of Tealium and Invoca by setting up the Invoca tag in Tealium iQ Tag Management and then enabling the bi-directional integration in Tealium AudienceStream.
url: https://docs.tealium.com/partners-and-industries/tech-partners/tealium-invoca-integration-guide/
---
With bi-directional integration, Tealium and Invoca help organizations use Invoca call interaction data and cross-channel customer profiles. This integration powers intelligent customer engagements and provides accurate insights.
## Requirements
Tealium
* (Required) iQ Tag Management
* (Recommended) AudienceStream to achieve the most value out of the bi-directional integration.
Invoca
* (Required) A network account. This integration is only available for network Invoca accounts. For more information, see [Invoca: Platform Organization and Account Types](https://community.invoca.com/t5/invoca-overview/platform-organization-and-account-types/m-p/466#U466).
## How it works
Invoca helps marketers optimize for the most important step in the customer journey: the phone call. With the Invoca call and conversational analytics platform, marketers can:
* Get granular campaign attribution to understand why customers are calling.
* Gain real-time intelligence about who is calling and analyze what is being said in the conversations.
* Put the data to work directly in the platform by automating an ideal customer experience before, during, and after each call.
See the [Tealium + Invoca Technology Partnership Overview](https://tealium.com/technology-partner/invoca/) for more information.
## Section 1: Manage your Invoca tag using Tealium iQ
Use the following steps to add an Invoca tag:
1. Log in to your Tealium account.
1. Add the InvocaJS Web Integration tag to your account. For more information, see [Invoca Web Integration tag](https://docs.tealium.com/invocajs-web-integration-tag/).
* If you want to use more than one Invoca tag, give each a unique name.
1. Log in to your Invoca account.
1. Click the gear icon in the top-right corner and select **Invoca Tags**.
* If you have more than one Invoca tag, click the menu below **Invoca Tags** and select the tag you’d like to add to your Tealium account.
1. Scroll down to **Code Snippets** and copy your 4-digit network ID and unique tag ID: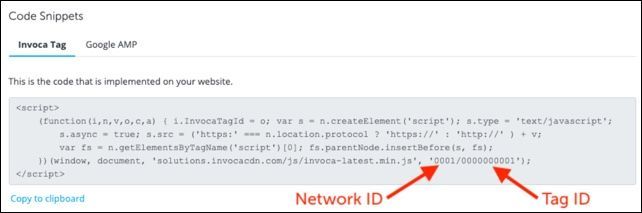
1. In the Tealium tag configuration page, enter your Invoca network ID and unique Tag ID.
1. Apply load rules that you want to use for the Invoca tag. We recommend that you use the “All Pages” load rule.
1. Select the environments to which you want to deploy your Invoca tag.
## Section 2: Send Invoca data to your Tealium account
### Step 1: Create a data source for Invoca in Tealium
To create a data source for Invoca in your Tealium account, use the following steps:
1. Log in to your Tealium account.
1. Add a new data source. For more information, see [Create a data source](https://docs.tealium.com/create-data-source/).
1. Under **Developer Languages**, select **HTTP API Data Source**.
1. Name your new data source as `Invoca Post-Call Webhook`.
1. Click **Continue** and **Skip** to skip the **Event Specifications** step.
1. Copy the account, profile, and data source key shown on this page.
1. When finished, save and publish your profile.
### Step 2: Configure the Tealium integration tile in Invoca
To connect Invoca to your Tealium account, use the following steps:
1. In the Invoca sidebar menu, click **Integrations**.
1. Select **Manage Integrations**.
1. Click the **Tealium** tile.
* If the tile in your account says **Learn More**, talk with your Customer Success Manager or account manager to discuss adding the integration, enabling access, or both.
1. Enter a name to identify your Tealium account.
1. Enter the Tealium account name, profile, and data source key.
#### Create an action
To create an action, use the following steps:
1. Click **+ New Action**.
1. Enter a name for the action. We recommend that you include `Call` or the name of the signal in the name to distinguish between actions you have already set up in Invoca.
1. If you want to filter the calls or signals to send, select a profile (if at the network level) or a campaign (if at the profile or advertiser level).
* While most customers choose to send data for all, consider filtering if you have multiple Tealium accounts and specific Invoca profiles or Invoca campaigns mapped to each one.
1. From the **Triggered By** menu, select the Invoca transaction type to send to Tealium as an event. If you want to report calls, select **All Calls**.
* If you want to report a signal, select **Signal** and then select the specific signal from the list that appears to the right.
* If you want to send more than one transaction type, create separate actions for each transaction type.
Triggering on the paid calls transaction type is related to affiliate/ or publisher calls that qualify for a commission in Invoca.
1. The Tealium event name corresponds to the **Triggered By** selection you made for this action. It will be sent in the `tealium_event` attribute and identifies the type of event. You may enter the custom event or marketplace event name.
For custom events, once data starts flowing, you can define an event specification in Tealium.
1. If you want to send additional Invoca parameters to Tealium as attributes, enter the name and value under the **Additional Parameters** section. The name on the left is usually hard-coded text and an attribute you will define when creating a custom event in Tealium. The value can be hard-coded text or you can select an Invoca substitution token to dynamically populate values that Invoca has captured.
1. Click **Save**.
Repeat the action setup procedure and select an existing environment for each transaction type you want to report to the Tealium account as an event. If you have multiple Tealium accounts you want to integrate, use the option to create a new action under a new Tealium account.
### Step 3: Capture the Tealium visitor ID
To configure your Invoca tag to capture the Tealium visitor ID, use the following steps:
1. Log in to your Invoca account.
1. Create a new marketing data field with the following settings:
* **Field type:** `Short Text`
* **Partner (API) Name:** `tealium_visitor_id`
* **Friendly Name:** `Tealium Visitor ID`
* **Attribution:** `Unique`
1. Click the gear icon and select **Invoca Tags**, then locate the Invoca tag that is implemented on your website.
1. Click the **Revision History** tab and either create a new draft or continue editing an existing draft.
Do not select the **New Tag** button
1. For **Notes**, enter `Adding Tealium visitor ID`.
1. On the **Edit Tag** page under the **Marketing Data** section, locate the **Tealium Visitor ID** parameter.
1. Under **Data Source Type**, select **DataLayer** and make sure that it is enabled.
1. For the **Data Source Name**, enter `utag.data.tealium_visitor_id`.
1. Test your changes and confirm that everything is working properly.
1. Click **Save & Go Live**.
If the Invoca tag consistently runs before the Tealium script that sets the identifier, we recommend using the **Re-run attribution** setting in the Invoca tag. The timing depends on the number of tags you have loading on your site and the timing for each. We suggest that you set the delay to five seconds and run tests to find the optimal timing.
1. If you have multiple Invoca tags, publish updates to each.
## Section 3: Customize call routing and caller experience
To set up your Tealium account to send visitor profile data back to Invoca, use the following steps:
1. Log in to your Tealium iQ account and go to your Invoca tag.
1. Create a custom data mapping for each parameter in your Tealium account that you want to send to Invoca. You can send as many of these variables as you want to Invoca, limited only by the number of custom marketing data fields available in your Invoca account.
1. Name the destination of each data mapping according to the variable you’ve selected. For example, use the name `invoca_leadscore` for a lead score variable.
1. Save a list of all your destination names in a note.
1. Return to your Invoca account.
1. For each data mapping you created, use the following settings:
* **Field type**: `Short Text`
* **Partner (API) Name**: Enter a name that reflects the variable you selected earlier. For example, `tealium_leadscore`.
* **Friendly Name**: Enter a label that reflects the variable you selected earlier. For example, `Tealium Lead Score`.
* **Attribution**: `Last`
1. Click the gear icon and then select **Invoca Tags**.
* If you have more than one Invoca tag, use the tag selection drop-down menu to find the tag you want to use with your Tealium integration and edit that tag.
1. Scroll down to the **Marketing Data** section of the tag wizard and find all of the new marketing data fields.
1. Click the **Enabled** slider to let your tag collect data for each of those fields.
1. Fill in the data source type and name for each field, replacing the red text with the destination name you chose for each related parameter:
* **Data Source Type**: `JavaScript Data Layer`
* **Data Source Name**: `localStorage.getItem("DESTINATION NAME")`
1. Save and test your Invoca tag revision.
1. Click **Go Live**.
## Section 4: Validate your integration using Tealium Live Events and add Event Specifications
Using event specifications in Tealium EventStream, you can view the following to validate and troubleshoot your Invoca for Tealium integration:
* Live events.
* A record of your Invoca Tag firing.
* Data collected and transferred through this integration.
To create event specifications for your Invoca + Tealium integration:
1. Log in to your Tealium account and go to EventStream.
1. Go to **Data Sources** and scroll down to the **Invoca Post-Call Webhook** data source.
1. Click **View in Live Events**.
1. From the **Live Events** menu, find and select an event sent by an Invoca webhook. You will see all of the data sent to Tealium from one phone call.
1. Create a new event specification from this event. For more information, see [Event Specifications](https://docs.tealium.com/manage-event-specifications/).
1. Name the event specification `InvocaPhoneCall`.
1. Uncheck the **Required** checkbox for all attributes.
1. Save and publish your changes to the appropriate environments.
This event specification will primarily be used for troubleshooting purposes and to track the total volume of phone calls passing through Invoca.
## Webhook data example
This example shows the webhook sent on your behalf:
```json
{
"tealium_account" : "{Your Tealium Account Name}",
"tealium_profile" : "{Your Tealium Profile}",
"tealium_datasource" : "{Data Source Key}",
"tealium_event" : "{Event Name}",
"tealium_visitor_id" : "",
"connect_duration" : "",
"call_start_time_utc" : "",
"utm_source" : "",
"utm_medium" : "",
"utm_campaign" : "",
"utm_content" : "",
"calling_page" : ""
}
```
## Related Documentation:
* [Invoca: Best practices for configuring and managing your integrations](https://community.invoca.com/t5/invoca-overview/best-practices-for-configuring-and-managing-your-integrations/ta-p/584#U584)
* [Invoca: How to configure and deploy your Invoca Tag with the Invoca Tag Wizard](https://community.invoca.com/t5/call-tracking/how-to-configure-and-deploy-your-invoca-tag/ta-p/465#U465)
* [Invoca: What kinds of data can Invoca collect about a phone call?](https://community.invoca.com/t5/invoca-reporting-suite/what-kinds-of-data-can-invoca-collect-about-a-phone-call/ta-p/695#U695)