---
title: Set up Charles to proxy an Android device
description: This article describes how to set up your Android device to proxy network requests through Charles. Charles can help you troubleshoot and debug your implementation of Tealium for Android.
url: https://docs.tealium.com/platforms/android-kotlin/charles-proxy-android/
---
## Configure Charles proxy
Use the following steps to configure Charles proxy:
1. Go to **Proxy > Proxy Settings**.
2. Click the **Proxies** tab, and in the HTTP Proxy Port field enter `8888`.
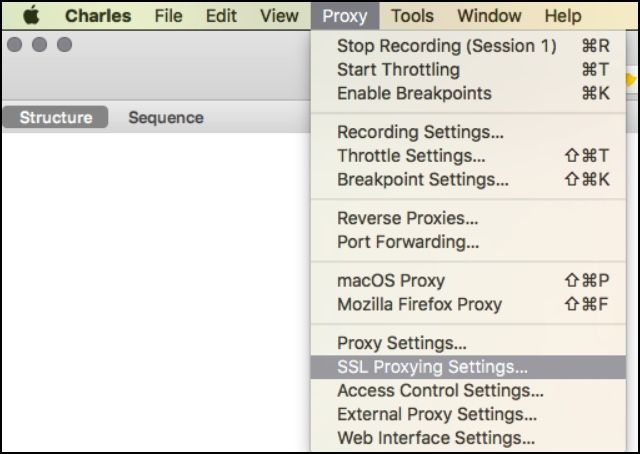
3. Go to **Proxy > SSL Proxying Settings**
4. Click the **SSL Proxying** tab and select the **Enable SSL Proxying** checkbox to configure a location.
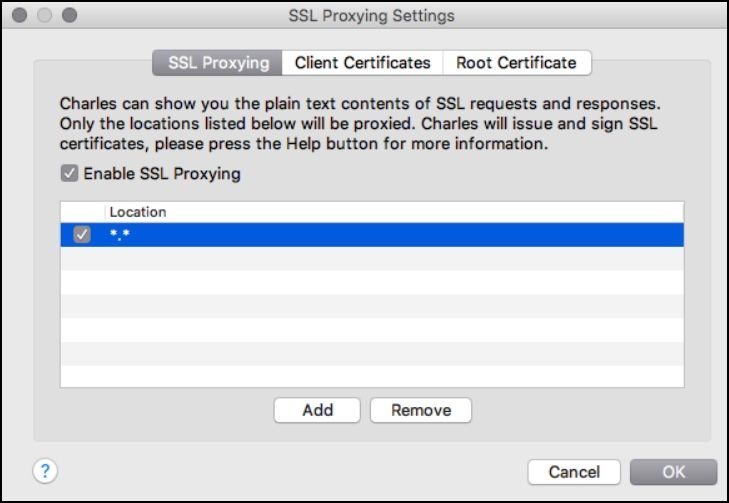
* By default, Charles will only perform SSL proxying for specific domains you include in the list.
* Click **Add**, and enter `*.*` in the location list above.
* If your app ceases to function correctly, it's possible that the app is rejecting the self-signed certificate from Charles proxy. If this happens, disable the wildcard match, and list only the `*.tealiumiq.com` and `*.tiqcdn.com` Tealium domains.
5. The port default value is `443`. You can leave this field blank, because Charles will set it automatically.
### Identify your IP address
To identify your computer's IP address:
1. Go to **System Preferences > Network > Wifi > Advanced > TCP/IP**.
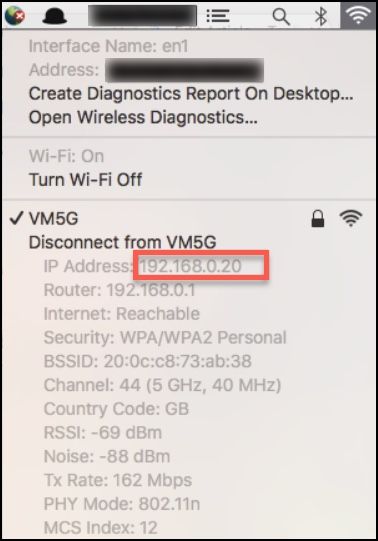
On a Mac, you can hold down the **Option** key while clicking the network icon in the system tray.
2. Make note of the IPV4 Address, as it will be needed in later steps.
### Configure your Android device to use the Charles proxy
Use the following steps to configure your Android device to use Charles proxy:
1. Go to **Settings > Wifi**.
2. Press and hold down the power key on the Wifi network device you are currently connected to.
3. When the modal appears, select **Modify Network**.
4. Select **Show Advanced Options** to display proxying options.
5. Under **Proxy**, select **Manual**.
6. In the **Proxy Host Name** field, enter the IPV4 address you previously saved from your development machine.
7. In the **Proxy Port** field, enter `8888`, the same port you used when configuring Charles.
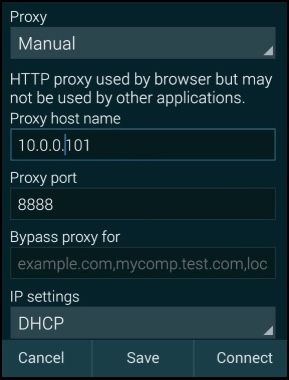
8. Click **Save** to save the settings and exit.
9. Open a browser on your device to test. Charles displays a dialog prompting you to allow or deny SSL proxying.
10. Click **Allow**. If you are not prompted to allow SSL proxying, restart Charles and try again.
11. Navigate to [http://charlesproxy.com/getssl](http://charlesproxy.com/getssl) from your device and download the Charles SSL certificate.
On newer versions of Android, you may get an error on downloading, such as `download unsuccessful`. If this happens, use the following instructions:
* Go to **Help > SSL Proxying > Save Charles Root Certificate**.
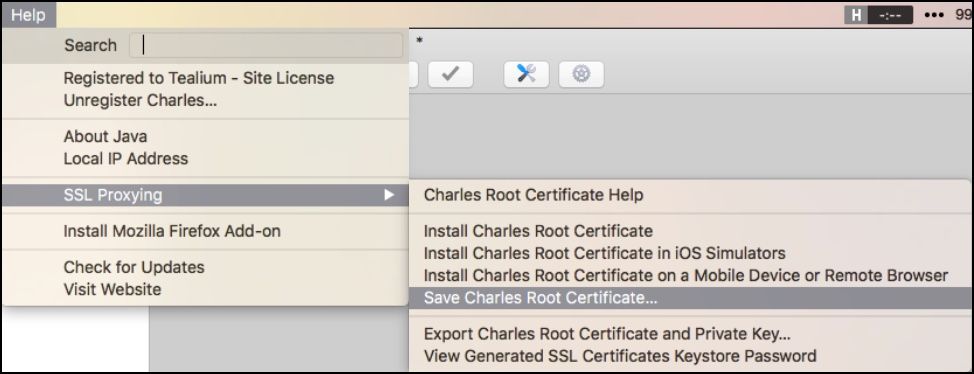
* Change the file type from the default `.pem` to `.cer` and save in a location that you will remember for later.
* Transfer the `.cer` file to your device using an SD Card, USB Cable, or remote transfer such as Google Drive.
* Open the file from a file manager such as the Android File Manager, or a third party file manager such as File Commander.
* You will be prompted to save the certificate. Continue with the remaining steps.
12. Name the certificate and confirm it as a trusted certificate. Ensure that you disable or remove it when complete.
13. After the certificate is installed, set up a PIN.
### Additional configuration steps for Android N and above
As of Android N, additional steps area required to to add configuration to your application so that it trusts the SSL certificates generated by Charles SSL proxying. This means that you can only use SSL proxying with applications that you control.
To configure your app to trust Charles, you must first add a [Network Security Configuration File](https://developer.android.com/training/articles/security-config.html) to your app. This file can override the system default, enabling your app to trust user-installed CA certificates, such as the Charles Root Certificate.
In your configuration file, you can optionally specify that this only applies in debug builds of your application, so that production builds use the default trust profile.
Use the following steps to add the Network Security Configuration File and reference the file in the manifest for your app:
1. Use the following example to create a Security Network Configuration file.
```xml
```
2. Name the file `network_security_config.xml`.
3. Copy the file to `res/xml/network_security_config.xml`.
4. Use the following example to add a reference to the `network_security_config.xml` file to the manifest for your app:
```xml
...
```
For additional information, see the **Android** section of the [Charles proxy SSL Certificates](https://www.charlesproxy.com/documentation/using-charles/ssl-certificates/) documentation.
## Tips to filter your view of network traffic
The following table provides tips used to filter your view of network traffic:
| Filter | Action |
| ---- | ---- |
| Filter by device | - To ensure that you only view traffic from your Android device and not the local machine, go to the **Proxy** menu and uncheck **macOS/Windows proxy**.
- This step will disable Charles proxy for local traffic from your machine and Charles will only display traffic from remotely-connected devices.
| Filter by domain | - Filter your traffic to view only what you are interested in by clicking the **Sequence** tab in Charles and use the filter field to filter by domain, such as `collect.tealiumiq.com`.
- Regex is also an option if you enable it in the search settings. Enabling Regex lets you use a `*.tealiumiq.com` filter to view all hits going to the Tealium servers.
|
## Clear Certificates and Remove the PIN from a device
Clearing the certificate and removing the PIN from an Android device is optional.
Use the following steps to clear the certificate, remove the PIN, or both:
1. Open the **Settings** application on your Android device.
1. Navigate to **Security > Clear Credentials** at the bottom of the list of options.
1. Click **Clear Credentials**.
1. Confirm that you want to clear the credentials.
1. To remove the PIN, navigate to **Settings > Lock Screen > Screen Lock** and remove the PIN.
For more information, see [Charles SSL Proxying](http://www.charlesproxy.com/documentation/proxying/ssl-proxying/) and [Set up Charles to proxy an iOS device](https://docs.tealium.com/platforms/ios-swift/charles-proxy-iosdevice).