---
title: Trace
description: Learn to use trace for debugging.
url: https://docs.tealium.com/platforms/getting-started-mobile/trace/
---
[Trace](https://docs.tealium.com/manage-traces/) is a testing and inspection tool for your Tealium EventStream and Tealium AudienceStream configuration. Use a trace to capture a visitor workflow and watch how events and customer data is processed in real-time.
## Mobile Trace Tool
### Supported platforms
The following platforms support the Mobile Trace Tool:
* [Android (Kotlin)](https://docs.tealium.com/platforms/android-kotlin/)
* [iOS (Swift v2.x)](https://docs.tealium.com/platforms/ios-swift/)
Do not add a trace to bulk events.
Do not add a trace as a permanent parameter to monitor production data.
### How it works
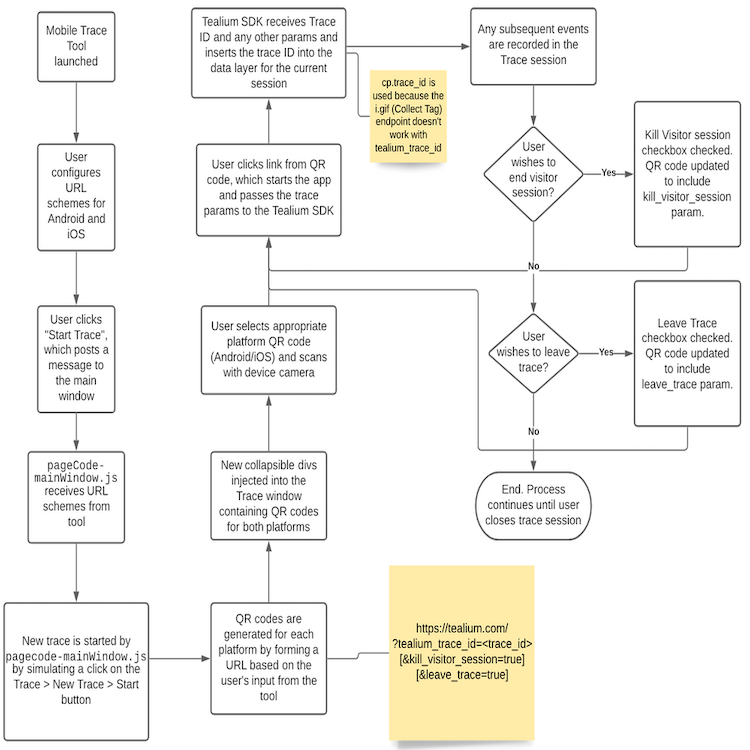
The Mobile Trace Tool enhances the trace feature by providing a QR code that is scannable by your device, enabling you to quickly view events coming from the Tealium Mobile SDKs.
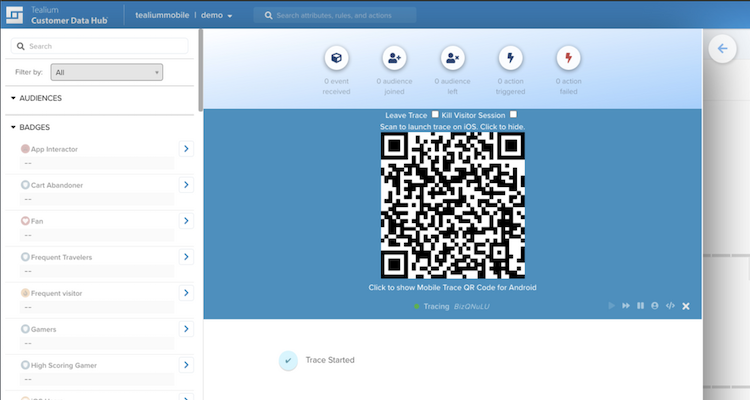
After clicking **Start Trace** in the tool, once per Tealium platform session, a QR code is automatically injected into the main browser window each time you start a new trace.
QR codes are generated for each platform ([Android](https://docs.tealium.com/platforms/android-kotlin/) or [iOS](https://docs.tealium.com/platforms/ios-swift/)). After you scan the appropriate QR code with your mobile device's camera, click the link from the QR code to start the app and pass trace parameters to the Tealium SDK. The Tealium SDK receives the trace ID (along with other parameters) and inserts the trace ID into the data layer for the current session.
All subsequent events are recorded in the trace session until you end the session or leave the trace.
The following diagram illustrates how it works:
### Install
To use this tool:
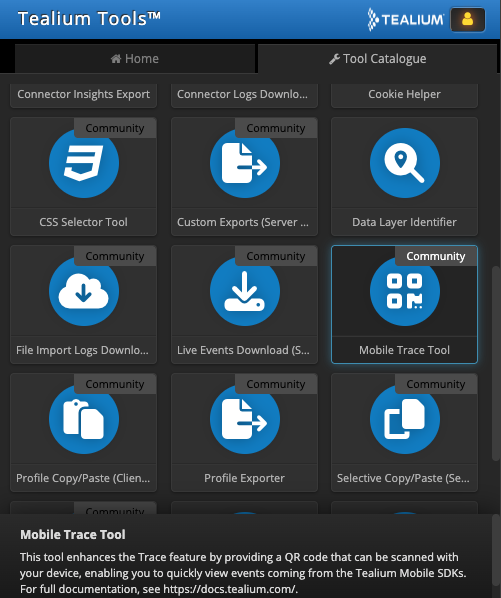
1. Install the [Tealium Tools browser extension](https://docs.tealium.com/tealium-tools-browser-extension/) for your browser.
1. After installation has completed, open the Tealium Tools extension.
1. Click the **Tool Catalogue** tab.
1. Click **Mobile Trace Tool**.
### URL schemes
To use the Mobile Trace Tool, determine which URLs are handled by your mobile apps to configure the URL schemes.
The QR code trace feature launches your app from a URL and listens for a specific query parameter. To launch your app directly from a URL, your app must have registered itself to handle specific domains.
Typically, most apps already handle specific URLs. For example, if your website domain is [https://mycompany.com](https://mycompany.com), your app registers itself as a handler for this domain and, if your app is installed on a user's device, the user is prompted to launch the link in your app instead of within a browser.
Some apps register custom URL schemes such as `mycompanyapp://` instead of `http` or `https`. These also work with the Mobile Trace Tool.
Once you have established which URL schemes launch your app, enter these into the input fields in the Mobile Trace Tool. The tool supports different schemes for Android and iOS if necessary, but are usually the same for both platforms.
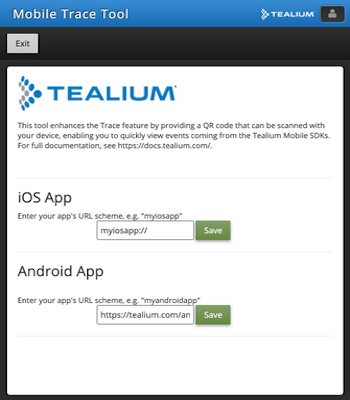
Click **Save** next to each URL scheme to store the setting in the browser's `localStorage`. Click the blue pencil icon to edit the URL schemes as needed.
### Start a trace
Before starting a trace, verify that you are in the Tealium server-side platform. Click **Start Trace** in the Mobile Trace Tool to start a new trace and add the Mobile Trace QR codes into the trace window.
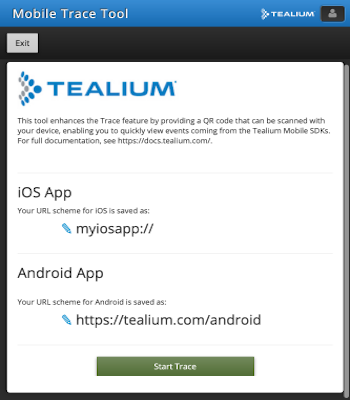
After starting a trace, close the Tealium Tools UI as it's not required for the rest of your session.
Subsequent traces are started directly from Tealium and the QR code automatically refreshes each time a new trace starts. Scan the QR code with your device's camera, and click the link to launch your app and automatically begin tracing. Any Tealium events generated by your app after joining the trace are recorded in your trace session.
### Leave trace
If you leave a trace session without ending it, you are able to rejoin the same trace from a different device without losing the history of that trace session.
To leave a trace:
1. Select the **Leave Trace** checkbox in the trace UI.
1. Scan the QR code again with your device's camera.
1. Click the link for your device to no longer participate in the trace session.
### End of Visit (AudienceStream)
Testing "End of Visit" actions in Tealium AudienceStream requires a signal to immediately end the visitor's session, otherwise it is necessary to wait for the session to expire normally.
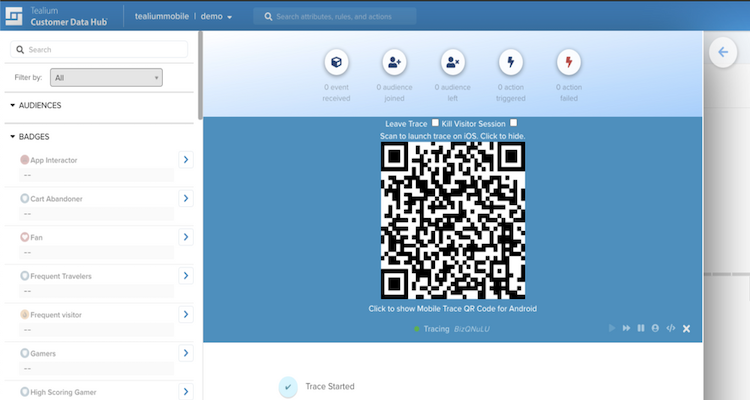
In the Mobile Trace Tool, end the session immediately by selecting the **End Visitor Session** checkbox, which adds a parameter to the QR code that makes the SDK send a `kill_visitor_session` event.
## Charles Proxy
Use the Charles Web Debugging Proxy to start a trace from an application using the Mobile SDK and the Tealium Collect tag.
### Requirements
* [Charles Proxy](https://www.charlesproxy.com)
* [Tealium server-side account](https://docs.tealium.com/introduction-to-customer-data-hub/)
### Setup
To set up your mobile device to proxy traffic through Charles on your computer, follow the instructions for [Android](https://docs.tealium.com/platforms/android-kotlin/charles-proxy-android) or [iOS](https://docs.tealium.com/platforms/ios-swift/charles-proxy-iosdevice) device.
### Using a rewrite
Run your application using Charles as the proxy and filter the network traffic for `teal`. Right-click the request and select **Copy URL**.
From the Charles menu, select **Tools > Rewrite** to open the **Rewrite Settings** dialog.
To add a location:
1. Select the **Enable Rewrite** checkbox and click **Add** below the **Location** list.
1. Enter `Add Trace ID` in the **Name** field and click **Add** to add a location.
1. Enter the necessary information in the location fields and enter the Collect tag URL in **Host**.
If you click outside of the **Edit Location** dialog box, Charles automatically determines the additional URL components.
1. Leave the **Query** field empty and click **OK**.
To add an action:
1. Click **Add** below the **Action** list and set **Type** to `Body` from the list.
1. In the **Where** section, select the **Request** checkbox.
1. In the **Match** section, set **Value** to `"data":{` and select the **Match whole value** checkbox.
1. In the **Replace** section, set **Value** to `"data":{"cp.trace_id":"TRACE_ID",` and select the **Replace first** checkbox.
1. Click **OK** and **Apply** changes.
After completing the steps, browse your application and view the requests in the AudienceStream or EventStream trace session. To run another trace, launch Charles and edit the existing rewrite rule to change the `TRACE_ID` placeholder to your new trace ID value.
## Manual
If you are in development mode using an emulator, or do not want to use Charles, you can add and leave a trace manually with native code.
### Start a trace (Manual)
To start and run a trace manually, add the trace ID to the volatile data within your native code.
```kotlin
instance.getDataSources().getVolatileDataSources().put("tealium_trace_id", "TRACE_ID");
```
**Swift**
```swift
tealium?.volatileData()?.add(data: ["tealium_trace_id": "TRACE_ID"])
```
**Objective-C**
```obj-c
NSDictionary *tealiumTrace = @{@"tealium_trace_id":@"TRACE_ID"};
[[Tealium instanceForKey:TEALIUM_INSTANCE_ID] addVolatileDataSources: tealiumTrace];
```
### End a trace (Manual)
To end a trace manually and simulate any "End of Visit" enrichments, add the following track to the optional data anywhere within the app:
```java
Map data = new HashMap<>(1);
data.put("event", "kill_visitor_session");
data.put("cp.trace_id", "TRACE_ID");
```
```swift
tealium?.trackViewWithTitle("SCREEN_NAME", dataSources: ["event":"kill_visitor_session", "cp.trace_id":"XXXXX"])
```