---
title: Install
description: This article explains how to install and configure the Tealium for Salesforce using Apex classes and triggers to track Lead and Contact updates with Tealium Collect.
url: https://docs.tealium.com/platforms/salesforce/install/
---
## Requirements
* Salesforce administrator access
* Tealium account enabled for AudienceStream or EventStream
## Install the solution
The Tealium for Salesforce solution is installed as a number of Apex classes: one for the Tealium Collect service and one or more to trigger on object updates. It also requires updates to Salesforce configuration to support linking records from Customer Data Hub and to allow the sending of HTTP requests from Salesforce to Tealium.
### Link records from Customer Data Hub to Salesforce
The Tealium for Salesforce solution can link records from the Customer Data Hub into Salesforce by specifying a shared identifier attribute. In Customer Data Hub this attribute can be any Visitor ID attribute that uniquely identifies records coming from an ingestion sync. In Salesforce you must create a custom field in the Object named **Tealium ID** to capture that Customer Data Hub attribute.
For more information, see the [Salesforce Connector Setup Guide for AudienceStream](https://docs.tealium.com/salesforce-connector/).
To add this custom field to the Lead object:
1. From **Setup**, go to **Lead > Fields**.
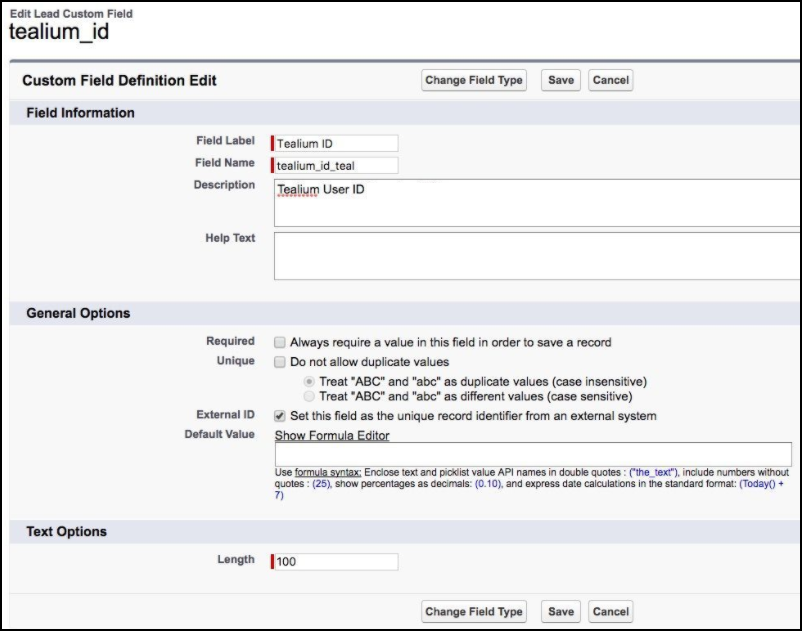
1. Add a new custom field of type Text with the following settings:
* **Field Label**: Tealium ID.
* **Length**: 100.
* **Field Name**: `tealium_id_teal`.
The `_teal` suffix indicates that these variables are specific to Tealium.
1. Click **Save**.
### Create the `TealiumCollect` Apex class
This `TealiumCollect` Apex class generates the HTTP request to the Tealium Collect service. It takes the Tealium configuration and data layer values and formats them into the required URL format.
For more information, see [Apex Developer Guide: Introducing Apex](https://developer.salesforce.com/docs/atlas.en-us.apexcode.meta/apexcode/apex_intro.htm).
To add the `TealiumCollect` Apex class:
1. From the **Developer Console** create a **Class** named `TealiumCollect`.
1. Copy and paste the following code, making sure to specify your account, profile, and data source key:
```java
public class TealiumCollect {
private static Boolean debug = true;
/* TEALIUM CONFIGURATION */
private static String tealiumAccount = "YOUR_ACCOUNT";
private static String tealiumProfile = "YOUR_PROFILE";
private static String tealiumDataSourceKey = "YOUR_DATASOURCE_KEY";
private static String tealiumEventType = "derived";
private static String tealiumEndpoint = "https://collect.tealiumiq.com/event";
@future(callout=true)
public static void track(Map tealiumData){
List tealiumParams = New List();
tealiumParams.add("tealium_account" + "=" + tealiumAccount);
tealiumParams.add("tealium_profile" + "=" + tealiumProfile);
tealiumParams.add("tealium_datasource" + "=" + tealiumDataSourceKey);
tealiumParams.add("tealium_event_type" + "=" + tealiumEventType);
tealiumParams.add("tealium_event" + "=" +
EncodingUtil.urlEncode(tealiumData.get("tealium_event"), "UTF-8"));
String tealiumVid = tealiumData.get("tealium_visitor_id");
if(tealiumVid == null || tealiumVid == ""){
tealiumData.remove("tealium_visitor_id");
}
for(String key : tealiumData.keySet()){
try{
String value = tealiumData.get(key);
Boolean valueTest = (value != null);
tealiumParams.add(key + "=" + (valueTest ? EncodingUtil.urlEncode(value, "UTF-8") : ""));
}catch(Exception e){}
}
HttpRequest req = new HttpRequest();
String tealCollect = tealiumEndpoint + "?" + String.join(tealiumParams, "&");
req.setEndpoint(tealCollect);
if(debug){
System.debug(tealCollect);
}
req.setMethod("GET");
Http http = new Http();
HTTPResponse res = http.send(req);
}
}
```
### Create the Apex trigger for lead or contact updates
This trigger activates based on an update to a Salesforce object. Triggers can be changed to activate on many other object stages and can be customized and filtered to specific scenarios.
For more information, see [Apex Developer Guide: Triggers](https://developer.salesforce.com/docs/atlas.en-us.apexcode.meta/apexcode/apex_triggers.htm).
Use the following steps to create the Tealium trigger:
1. Within the **Developer Console**, create a **Trigger** named `TealiumLeadUpdate` (or `TealiumContactUpdate` based on the object).
1. Copy and paste the Contact object trigger or Lead object trigger code below.
1. Modify the code to match the object you are tracking (`Contact` or `Lead`).
#### Contact object trigger
```java
trigger tealiumContactUpdate on Contact (after insert, after update) {
String tealiumEvent = "crm_contact_update";
/* POPULATE TEALIUM DATA LAYER */
Map tealiumData = new Map();
for (Contact sfdcObj : Trigger.new ){
/* REQUIRED TEALIUM DATA */
tealiumData.put("tealium_event", tealiumEvent);
tealiumData.put("tealium_visitor_id", sfdcObj.tealium_id_teal__c);
/* SFDC DATA */
tealiumData.put("customer_email", sfdcObj.Email);
tealiumData.put("crm_lead_source", sfdcObj.LeadSource);
tealiumData.put("has_opted_out_email", String.valueOf(sfdcObj.HasOptedOutOfEmail));
tealiumData.put("has_opted_out_phone", String.valueOf(sfdcObj.DoNotCall));
tealiumData.put("mobile_phone_number", String.valueOf(sfdcObj.MobilePhone));
tealiumData.put("home_phone_number", String.valueOf(sfdcObj.Phone));
tealiumData.put("customer_first_name", sfdcObj.FirstName);
tealiumData.put("customer_last_name", sfdcObj.LastName);
tealiumData.put("customer_title", sfdcObj.Title);
tealiumData.put("crm_account", String.valueOf(sfdcObj.Account));
/* Addition Custom Fields */
/* tealiumData.put("custom_field", sfdcObj.customField); */
TealiumCollect.track(tealiumData);
}
}
```
#### Lead object trigger
```java
trigger tealiumLeadUpdate on Lead (after insert, after update) {
String tealiumEvent = "crm_lead_update";
/* POPULATE TEALIUM DATA LAYER */
Map tealiumData = new Map();
for (Lead sfdcObj : Trigger.new ){
/* REQUIRED TEALIUM DATA */
tealiumData.put("tealium_event", tealiumEvent);
tealiumData.put("tealium_visitor_id", sfdcObj.tealium_id_teal__c);
/* SFDC DATA */
tealiumData.put("customer_email", sfdcObj.Email);
tealiumData.put("crm_lead_status", sfdcObj.Status);
tealiumData.put("crm_lead_source", sfdcObj.LeadSource);
tealiumData.put("crm_lead_rating", sfdcObj.Rating);
tealiumData.put("crm_lead_industry", sfdcObj.Industry);
tealiumData.put("crm_lead_company", sfdcObj.Company);
tealiumData.put("has_opted_out_email", String.valueOf(sfdcObj.HasOptedOutOfEmail));
tealiumData.put("has_opted_out_phone", String.valueOf(sfdcObj.DoNotCall));
tealiumData.put("mobile_phone_number", String.valueOf(sfdcObj.MobilePhone));
tealiumData.put("home_phone_number", String.valueOf(sfdcObj.Phone));
tealiumData.put("customer_first_name", sfdcObj.FirstName);
tealiumData.put("customer_last_name", sfdcObj.LastName);
/* Addition Custom Fields */
/* tealiumData.put("custom_field", sfdcObj.customField); */
TealiumCollect.track(tealiumData);
}
}
```
### Lead conversion mapping
To preserve the custom field **Tealium ID** during a Lead conversion to a Contact you must map **Lead.Tealium ID** to **Contact.Tealium ID**.
For more information, see [Salesforce Sales Cloud Basics: Map Custom Lead Fields for Lead Conversion](https://help.salesforce.com/s/articleView?id=sales.customize_mapleads.htm&type=5).
Use the following steps to create a custom field mapping:
1. Go to **Lead > Fields**.
1. Click **Map Fields**.
1. Click **Contact**.
1. Map `tealium_id` in the Lead column to **Tealium ID**"in the Contact column.
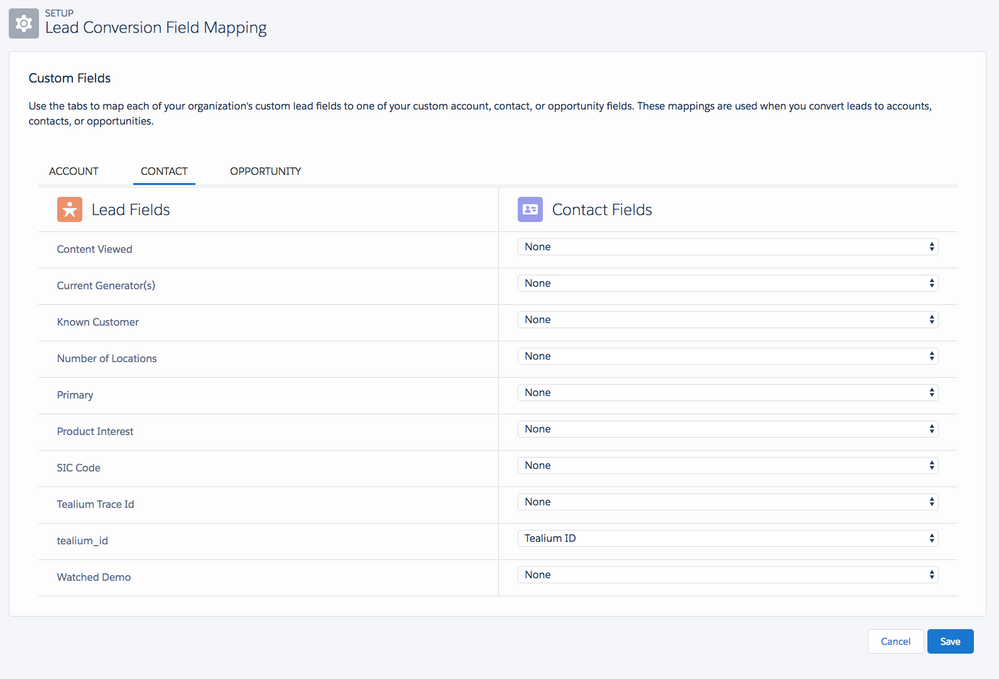
1. Click **Save**.
### Enable remote site settings
The Tealium Collect endpoint must be registered in the remote site settings of Salesforce to send HTTP requests.
For more information, see [Apex Developer Guide: Adding Remote Site Settings](https://developer.salesforce.com/docs/atlas.en-us.apexcode.meta/apexcode/apex_callouts_remote_site_settings.htm).
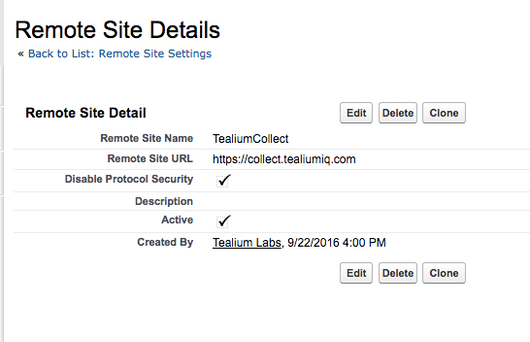
Create the remote site with the following settings:
* **Remote Site Name**: TealiumCollect
* **Remote Site URL**: `https://collect.tealiumiq.com`
* **Disable Protocol Security**: Enable
#### Remote site example
### Add Salesforce event attributes
The Salesforce variables used in the Apex trigger code must be defined in Tealium as event attributes. To see what data is coming from Salesforce, inspect the trigger code or use [Live Events](https://docs.tealium.com/about-live-events/) to see the data in real-time.
Use the following steps to add event attributes:
1. Go to **Enrich > Attributes**.
1. Click **+ Add Attribute**.
1. Select the scope: **Event**.
1. Select the type: **Universal Data Object**.
1. Select the data type: **String**.
1. Set the **Name** to the same variable name used in the trigger code, such as `crm_lead_status`.
1. Save and Publish.