---
title: Badge Attribute
description: A badge is a special visitor attribute for capturing the interesting behavior of a customer.
url: https://docs.tealium.com/server-side/attributes/data-types/badge/
---
## How it works
Badges are the building blocks for [discovering audiences](). Behavior is defined using attributes and rules that describe its conditions.
For example, you might be interested in the behavior of visitors who frequently browse your site but do not make a purchase. In this case, the following behaviors might characterize this type of visitor:
* **Visited**: Has visited the site three times in the last seven days.
* **Showed Interest**: Has viewed a product details page or read an article.
* **Did Not Convert**: Has not purchased or signed up for a service.
This pattern of behavior could be configured as a badge attribute named "Window Shopper" to identify the visitors who match its behavior.
The badge attribute is available in the following scopes: Visitor.
### Badge associations
Badge associations allow you to quickly assign multiple badges based on other badges the visitor has earned. Typically, you would trigger a badge assignment based on a certain browsing behavior or criteria, but with badge associations you can trigger more than one badge assignment after the visitor has successfully earned the qualifying badge or badges.
Learn more about [setting up badge associations](#manage-badge-associations).
## Enrichments
Badges are assigned to and removed from visitors based on the logic of their rules. Each new visitor is assigned a default badge named **Unbadged**. This badge is automatically removed after the visitor earns a custom badge. Badges are assigned (and removed) using the following enrichments.
### Assign badge
Assigns the badge to a visitor when a set of conditions are met. All visitors are initially without a badge. For example, to assign the **Window Shopper** badge, it must be determined if the visitor navigated away from the site without purchasing.
**Attribute Name**: "Window Shopper"
* **Starting Value**: `"Unbadged"`
* **Resulting Value**: `"Window Shopper"`
### Remove badge
Removes an assigned badge when the visitor no longer satisfies the conditions. For example, a **Window Shopper** badge is removed after the visitor makes a purchase.
**Attribute Name**: "Window Shopper"
* **Starting Value**: `"Window Shopper"`
* **Resulting Value**: `"Unbadged"`
### Assign badge from another badge
Assigns a badge based on another badge. For example, a **Window Shopper** badge is replaced with a **Cart Abandoner** badge after the visitor abandons a cart. Of course, a visitor can have more than one badge, so a visitor can be a **Window Shopper** and a **Cart Abandoner**.
**Attribute Name**: "Cart Abandoner"
* **Starting Value**: `"Window Shopper"`
* **Resulting Value**: `"Cart Abandoner"`
## Popular badges
The following table lists several popular badges. For a complete list of popular badges, see [Popular Badges]().
|Badge name| Description|
|---| ---|
|Known Visitor| - Assigned when we capture an important identifier of the visitor
- For example: Customer ID (client's ID), Customer Email, Facebook ID
- Possible Action to take: none, but used in an Audience to ensure the visitor is targetable with a selected vendor API
- These visitors are more commonly targeted through Email or Social Media.
|
|Unknown Visitor| - Assigned when the visitor has yet to authenticate on the website
- Authentication does not necessarily mean they have logged in, if a visitor comes to the site from an email and the email is in the URL then we've determined who the visitor is and they've "authenticated"
- Possible Action to take: display a modal to the visitor encouraging them to identify themselves
- These visitors are more commonly targeted through Display Ad.
|
|Window Shopper| - A visitor who visits the site often but does not purchase
- For example, a visitor who has been to the site three times in the last seven days, has viewed a product details page or read an article, and has not purchased or signed up for a service
- Possible Action to take: determine their affinity to a category and change the landing page of the next session to personalize the experience
|
|Purchaser| - A visitor who has converted
- For example: purchased a product or signed up for a service
- Possible Action to take: email in 2 weeks with an offer enticing to make another purchase or an email showing related items for purchase. For example, if the visitor bought a baseball bat offer a baseball bag and batting gloves
- Possible Action: remove visitor from retargeting campaign so they are not remarketed unnecessarily
|
| Browse Abandoner | - A visitor who has viewed a product and did not add an item to the cart.
- Possible Action to take: if a Known Visitor and Facebook ID is known, send data to Facebook to retarget the brand to the visitor.
|
| Cart Abandoner | - A visitor who has added an item to the cart and did not purchase.
- Possible Action to take: if email address is known, send a personalized email with the abandoned items.
|
| Search Abandoner | - A visitor who has landed on the site from a search engine and has not completed a qualifying action, such as three page views in the visit.
|
## Manage badge associations
### Create the enrichment (for new or existing badges)
1. Go to **Attributes > Visitor / Visit Attributes**.
1. Add a new badge or click the edit icon for the badge to which you want to append another badge or badges.
1. Click **Add Enrichment** and select **Assign badge from another badge**.

1. From the drop-down list, select the badge you want to assign.

1. Repeat steps 2-4 to assign more badges.
1. Click **Finish**.
1. When you are done, save your profile to apply the changes.
### Use the Badge Association Wizard (for existing badges only)
1. In the **Visitor / Visit Attributes** table, click the badge to which you want to assign.
1. Click the Badge Association icon in the top-right corner of the panel.

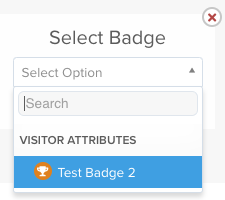
1. Click the `+` icon and select the badge that you want to assign.
### About the badge association wizard
Click an existing badge to display the Badge Association wizard. The currently assigned badge is always in the center column with arrows on each side. The arrows always point in the direction of the recipient badge. You can assign any number of badges to the current and the recipient badge, but you can't reassign a recipient back to its source badge. Take a look at the example below.
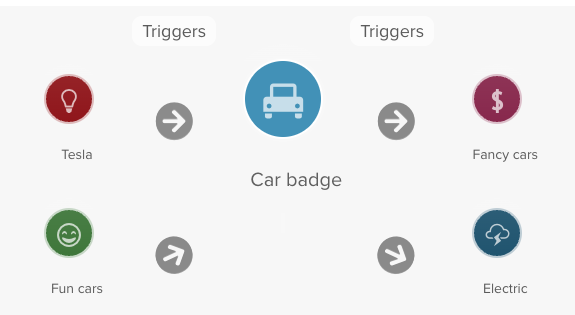
The **Car badge** in the center is currently assigned to qualifying visitors. Here's how the other badge assignments will trigger.
1. Qualifying visitors receive the **Car badge**.
1. **Car badge** visitors are automatically assigned **Fancy cars** and **Electric** badges.
1. **Tesla** badge visitors are automatically assigned **Car badge**, **Fancy cars**, and **Electric cars** badges.
1. **Fun cars** badge visitors are automatically assigned **Car badge**, **Fancy cars** and **Electric** badges.