---
title: Manage audiences
description: This article provides information about creating, editing, and deleting audiences, as well as activating audiences and creating segments.
url: https://docs.tealium.com/server-side/audiences/manage/
---
An audience is a combination of one or more attribute conditions. The more filters you add, the more specific your audience.
## Create an audience
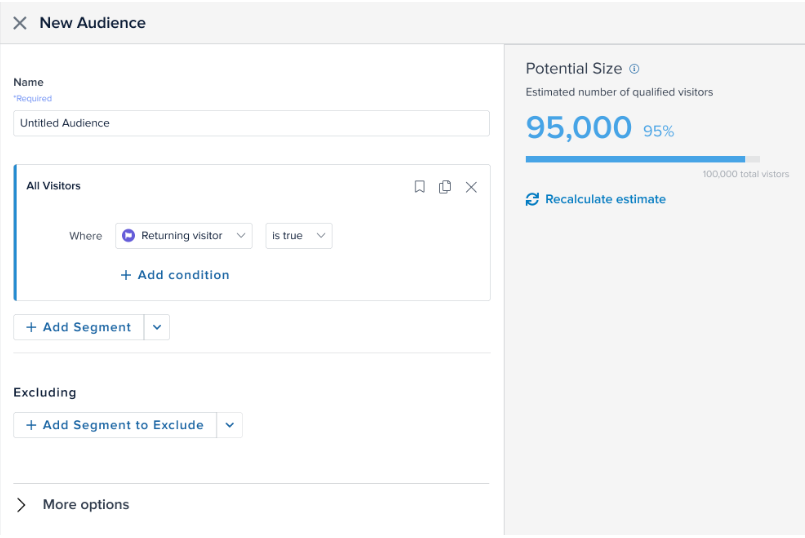
Use the following steps to create an audience:
1. Go to **Activate > Audiences**.
1. Click **+ New Audience**.
1. Enter a **Name** for the audience.
If you use a [DataAccess](https://docs.tealium.com/about-dataaccess/) product (EventStore, AudienceStore, EventDB, or AudienceDB), the audience name must be fewer than 128 characters in length. Otherwise, DataAccess may trim the audience name and errors may occur.
1. To add a condition for the audience, select an attribute, an operator, and a value.
* The estimated potential size for the audience is displayed. For more information, see [potential size](https://docs.tealium.com/about-audiences/#potential-size).
* When you hover over an attribute, the enrichment for the attribute is displayed.
* If you select a badge for the attribute, select **is assigned** or **is not assigned**.
* For operators that specify a time frame, select a value and the time frame.
1. To add another condition, click **+ Add Condition**.
* Click **Calculate** to update the potential size as you add conditions.
1. To save this segment, click the **Save** icon. 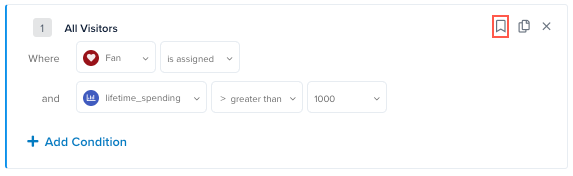
1. Enter a **Name** for the segment, then click **Done**.
If you use a [DataAccess](https://docs.tealium.com/about-dataaccess/) product (EventStore, AudienceStore, EventDB, or AudienceDB), the segment name must be fewer than 128 characters in length. Otherwise, DataAccess may trim the segment name and errors may occur.
1. To add a segment, click **+ Add Segment**, then add conditions for the segment.
1. To add a previously saved segment, click the down-arrow next to **+ Add Segment** and select a segment.
* When you hover over a segment, the conditions for the segment are displayed.
1. To perform a one-time backfill of the audience, select **Fill Audience**. For more information, see [Fill an audience](https://docs.tealium.com/about-audiences/#fill-an-audience).
1. To add a label or notes, click **More Options**.
1. To add a label, click **Add Label** and select a label.
1. Enter notes, if needed. Click **AI Note** to generate notes with AI. For more information, see [AI Note Generation](https://docs.tealium.com/ai-features/#ai-note-generation).
1. To immediately activate the audience, click **Connect & Activate**, then select and configure a connector.
* For more information, refer to the setup guide for the selected connector.
1. To save the audience without activating it, click **Done**.
1. Save and publish.
## Create an audience from an existing audience
You can duplicate an audience from the list of audiences, or from the audience details view, then modify the duplicate to create a new audience.
To duplicate an audience from the list of audiences, follow these steps:
1. Go to **Activate > Audiences**.
1. In the audience menu, select **Duplicate**.
* The copy of the audience is displayed.
1. Click **Edit** to modify the **Name** and conditions as needed for the new audience.
* Click **Calculate** to update the potential size as you edit or add conditions.
1. Click **Done** or **Connect & Activate**.
1. Save and publish.
To duplicate an audience from audience details, follow these steps:
1. Go to **Activate > Audiences**.
1. Click an audience in the list, then click **Duplicate**.
* The copy of the audience is displayed.
1. Click **Edit** to modify the **Name** and conditions as needed for the new audience.
* Click **Calculate** to update the potential size as you edit or add conditions.
1. Click **Done** or **Connect & Activate**.
1. Save and publish.
## Edit an audience
To edit an audience, follow these steps:
1. Go to **Activate > Audiences**.
1. Click an audience in the list, then click **Edit**.
1. Modify the audience as needed.
* Click **Calculate** to update the potential size as you edit or add conditions.
1. To perform a one-time backfill of the audience, select **Fill Audience**. For more information, see [Fill an audience](https://docs.tealium.com/about-audiences/#fill-an-audience).
1. To add an activation or view activations for this audience, click **Activations**.
* For information on adding an activation, see [Activate an audience](#activate-an-audience).
1. To view information about visitors and activity for this audience, click **Insights**.
1. To view the functions triggered by this audience, click **Functions**.
1. When you are finished editing the audience, click **Done** or **Connect & Activate**.
1. Save and publish.
## Activate an audience
To activate an audience, select and configure a connector, as follows:
1. Go to **Activate > Audiences**.
1. Click an audience in the list, then click **Edit**.
1. Click the **Activations** tab, then click **+ Add Activation**.
1. Select and configure a connector.
* For more information, refer to the setup guide for the selected connector.
1. Click **X** to close the audience.
1. Save and publish.
## Deactivate an audience
To deactivate an audience, follow these steps:
1. Go to **Activate > Audiences**.
1. Click an audience in the list, then click **Activations**.
1. Click the connector, then toggle the connector to **Off**.
1. Save and publish.
## Delete an audience
You can delete an audience from the list of audiences or from the audience details view.
To delete an audience from the list of audiences, follow these steps:
1. Go to **Activate > Audiences**.
1. Click the audience menu, and select **Delete**.
1. In the confirmation dialog, click **Delete**.
1. Save and publish.
To delete an audience from audience details, follow these steps:
1. Go to **Activate > Audiences**.
1. In the list of audiences, click the audience.
1. Click **Delete**.
1. In the confirmation dialog, click **Delete**.
1. Save and publish.