---
title: Add a connector
description: This article explains how to add and configure a connector.
url: https://docs.tealium.com/server-side/connectors/add/
---
Adding a connector involves the following steps:
* Add a connector
* Select a source
* Add a connector action
* Map data
## Add a connector
New connectors are deactivated by default. For information about activating a connector, see [Activate or deactivate a connector](https://docs.tealium.com/manage-connectors/#activate-or-deactivate-a-connector).
To add an EventStream or AudienceStream connector, use the following steps:
1. Go to **Connect > Connectors > Marketplace**.
You can also go to **Connect > Connectors > Overview**, and click **+ New Connector**.
The list of connectors is sorted alphabetically by default.
1. Filter the list of connectors as needed in the following ways:
* Click the **Data Type** filter, then select **Event** or **Visitor**.
* Click the **Device Type** filter, then select **Mobile Device**, **Web Browser**, **IoT/Connected Devices**, or **Custom Devices**.
* Click the **Sort By** filter, then select **A-Z** or **Z-A**.
* Enter a partial or full connector name in the **Search** box.
1. Select a connector, then click **New Connector**.
The **Connector Summary**, which includes links to vendor documentation and configuration instructions, is displayed.
1. Click **New Connector**.
1. Enter a **Name** for the connector.
1. If required, select **I Accept** for the EULA Agreement.
1. For **Authentication**, enter your login credentials, token or password, Account ID, and any other information required for establishing a connection with the vendor service.
1. To configure an action for the connector, click **Done & New Action**.
To configure an action later, click **Done**.
## Select a source
The source for a connector is either an event feed or an audience, depending on the type of connector.
### Add an event source
1. For **Data Type**, select **Event Data**.
1. Select a **Data Source**.
1. Select an **Event Feed**.
1. Click **Next**.
### Add a visitor source
1. For **Data Type**, select **Visitor Data**.
1. Select an **Audience**.
1. For **Trigger**, select one of the following:
* **Joined Audience** - Trigger the action if a visitor joined the audience during this visit. For example, when a Cart Abandoner or Frequent Shopper joins an audience.
* **Left Audience** - Trigger the action if a visitor left the audience during this visit. This action does not occur when a visitor is deleted. For more information, see [Deleting a visitor](https://docs.tealium.com/visitor-search/#deleting-a-visitor).
* **In Audience at start of visit** - Trigger the action at the beginning of the visit if the visitor is already in the audience.
* **In Audience at end of visit** - Trigger the action if the visitor is in the audience at the end of the visit.
1. To limit how often this action triggers, toggle **Frequency Cap** to **On**, then select an **Action Priority** and an **Action Cooldown Group**.
For more information, see [Action Frequency Capping and Prioritization]().
1. Click **Next**.
The **New Action** screen is displayed.
### Add a cloud data source
1. Select a **Data Source**.
1. Select a **Segment**.
1. Click **Continue**.
## Add an action
1. In the **New Action** screen, enter the **Action Name**.
1. Select an **Action Type**.
The list of action types varies depending on the connector. Big Data connectors, such as AWS Kinesis or Google Pub/Sub, typically have a **Send Visitor Data** action.
1. Complete any required fields for the action, using pre-populated drop-down lists where available.
If any required fields are missing data, an error message is displayed in red text.
When a value is selected or entered for all required fields, **COMPLETED** is shown.
1. Click **Save**.
The **Action Details** screen is displayed.
New actions are deactivated by default.
If you use a **Send Visitor Data** action with the **Include Current Visit Data** option selected, the `events` array in the visitor data only includes event attributes that are also defined in AudienceStream (as an attribute or an enrichment). It is a best practice to only select the **Include Current Visit Data** option when the connector needs the visit data. For more information, see the [AudienceStore Data Guide]().
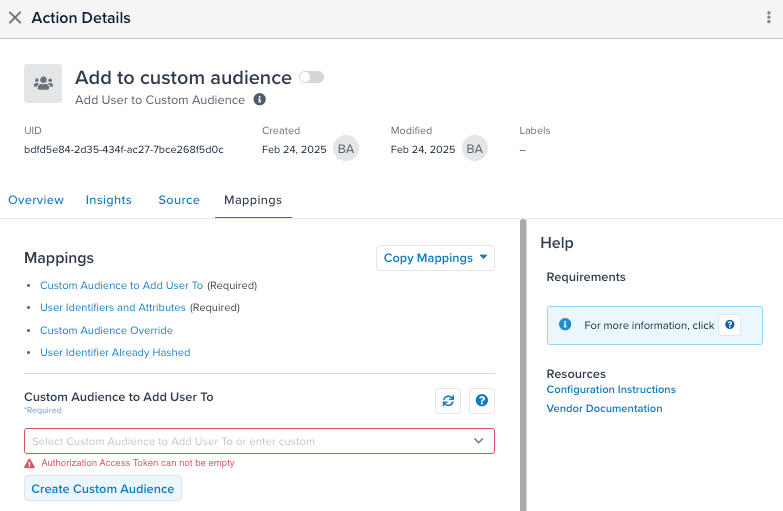
## Mappings
The **Mappings** tab displays the required parameters and the available mapping categories.
Use the following steps to map attributes to vendor parameters:
1. For each required parameter, enter a value or map an attribute to the parameter, as needed.
The list of attributes is populated based on the **Source** you selected. For example, choosing an audience displays all visit and visitor-scoped attributes but does not display event attributes.
1. Expand each category to see the available mappings.
1. Map attributes to vendor parameters as needed.
1. To map additional attributes, click **+ Add Mapping**.
1. Click **Back** to modify, or click **Finish**.
1. Save and Publish.
### Copy mappings
The **Copy Mappings** feature lets you copy data mappings to or from an existing connector action. This screen lets you select the action to copy to or from and select how to handle overwrites.
To copy mappings to or from an existing action, follow these steps:
1. **Select the copy action.**
From the **Mappings** screen, click **Copy Mappings** and select either:
* **Insert Mappings From an Action**: Copies mappings from the selected action to the current action.
* **Copy Mappings to an Action**: Copies mappings from the current action to the selected action.
1. **Choose the overwrite mode.**
Select one of the following options to determine how to copy mappings that already exist in the target action:
* **Keep Original Mappings**: Adds new mappings from the source without modifying existing mappings in the destination.
* **Overwrite All Mappings**: Replaces all existing mappings in the destination with those from the source action.
1. **Select the action.**
Apply filters or search to narrow the list of source actions, then select the radio button next the action.
1. **Click Done**
## Templates
Connector templates let you build custom API requests for connectors. Use them to dynamically populate payloads in the format required by a vendor's endpoint, such as JSON or XML.
For more information, see [about-connector-templates](https://docs.tealium.com/about-connector-templates/).
## Test your connector
After you have added and configured a connector, you need to test it. The easiest way to test your connector is by using the [Trace Tool](), as follows:
1. Start a new trace.
1. Examine the real-time log.
1. Check for the action you want to validate by clicking the **Actions Triggered** entry to expand.
1. Find the action you want to validate and view the log status.
Connectors pass only valid trace IDs. Invalid trace IDs are removed from the payload.