Google コンセントモード
この記事では、Google コンセントモードとコンセントモードマッピングのための翻訳エクステンションの使用について概説します。
Google コンセントモードは、データ収集のためのユーザー同意を管理するための二つのアプローチを提供します:基本コンセントモードと高度コンセントモード。これらのモードを理解することは、データプライバシー規制の遵守とデータ収集戦略の最適化に不可欠です。
-
基本コンセントモード: 伝統的なアプローチで、ユーザーの同意が得られない場合はタグやコネクタアクションがブロックされます。これにより、同意なしに個人を特定できる情報(PII)を含む無許可のデータ収集を防ぎます。
-
高度コンセントモード: このアプローチでは、同意の状態に関係なくGoogleタグをロードし、ユーザーの同意決定をGoogleに通知します。タグは次のいずれかの方法で適応します:
- トラッキングに同意していないユーザーから匿名データを収集するためのクッキーなしエンドポイントを使用する。
- 同意を提供したユーザーに対しては、標準エンドポイントを使用する。
この高度な戦略は、PIIの使用に対するユーザーの同意を尊重しながら、分析と広告のコンバージョンのためのデータ収集を最大化することを目指しています。
法務およびリーダーシップチームと相談し、ポリシーに合致するコンセントモードを決定することが重要です:同意なしにデータ収集をブロックする(基本)か、標準トラッキングに同意していない訪問の匿名データを収集するGoogleの方法を採用する(高度)か。
詳細については、Google Ads Help: About consent modeを参照してください。
仕組み
Google コンセントモードを実装するには、JavaScript Code エクステンションを追加して、同意選択をGoogle コンセントモード構成にマッピングし、デフォルトの同意構成とカテゴリマッピングを持つ Google Consent Mode tag を構成します。訪問が同意選択を行うと、Google コンセントモードタグはこれらの構成をGoogleタグに通知し、適切なデータ収集エンドポイント(デフォルトの収集エンドポイントまたはクッキーなしエンドポイント)を選択してデータをGoogleに送信します。
基本および高度コンセントモードの両方で、Google Consent Mode tagは自身でデータを送信しないため、常に発火させることができます。代わりに、他のタグが反応するためのシグナルを提供します。
同意目的のマッピング
エンドユーザーの同意選択をGoogle コンセントモード構成にマッピングするには、JavaScript Code エクステンションが必要です。このエクステンションを使用して、さまざまな目的またはベンダーに対するエンドユーザーの現在の同意決定をキャプチャし、対応するGoogle コンセントモードの目的または構成に granted または denied(または特定のシナリオで true / false)のステータスを割り当てます。
JavaScript エクステンションテンプレート
JavaScript エクステンションを構成するには、次のテンプレートコードを使用します。これはロードルールの後に実行され、常に実行されるように構成されるべきです:
// After Load Rules - Run Always
b.consent_decision = (tealiumConsentRegister && tealiumConsentRegister.currentDecision) || [];
b.google_ad_storage_consent = <your-logic-here> ? 'granted' : 'denied';
b.google_ad_user_data_consent = <your-logic-here> ? 'granted' : 'denied';
b.google_analytics_storage_consent = <your-logic-here> ? 'granted' : 'denied';
b.google_ad_personalization_consent = <your-logic-here> ? 'granted' : 'denied';
b.google_ads_data_redaction = <your-logic-here> ? 'true' : 'false';
b.google_url_passthrough = <your-logic-here> ? 'true' : 'false';
<your-logic-here> を、ユーザーの同意に基づいて granted または denied、true または false に評価される条件に置き換えてください。
例
あなたの実装は、あなたの同意構成によって異なる場合があります。
Consent Manager の例
Consent Managerを使用している場合、同意ステータスを決定するロジックは次のようになるかもしれません:
// After Load Rules - Run Always
b.consent_decision = (tealiumConsentRegister && tealiumConsentRegister.currentDecision) || [];
b.google_ad_storage_consent = b.consent_decision.indexOf('display_ads') !== -1  ? 'granted' : 'denied';
b.google_ad_user_data_consent = b.consent_decision.indexOf('personalization') !== -1 ? 'granted' : 'denied';
b.google_analytics_storage_consent = b.consent_decision.indexOf('analytics') !== -1 ? 'granted' : 'denied';
b.google_ad_personalization_consent = b.consent_decision.indexOf('personalization') !== -1 && b.consent_decision.indexOf('display_ads') !== -1 ? 'granted' : 'denied';
b.google_ads_data_redaction = b.consent_decision.indexOf('personalization') === -1 || b.consent_decision.indexOf('display_ads') === -1 ? 'true' : 'false';
b.google_url_passthrough = b.consent_decision.indexOf('personalization') !== -1 ? 'true' : 'false';
OneTrustを使用したConsent Integrationsの例
Consent IntegrationsとOneTrustを使用している場合、ロジックは次のようになるかもしれません:
// After Load Rules - Run Always
b.consent_decision = (tealiumConsentRegister && tealiumConsentRegister.currentDecision) || [];
b.google_ad_storage_consent = b.consent_decision.indexOf('C0004') !== -1  ? 'granted' : 'denied';
b.google_ad_user_data_consent = b.consent_decision.indexOf('C0004') !== -1 ? 'granted' : 'denied';
b.google_analytics_storage_consent = b.consent_decision.indexOf('C0001') !== -1 ? 'granted' : 'denied';
b.google_ad_personalization_consent = b.consent_decision.indexOf('C0004') !== -1 && b.consent_decision.indexOf('C0003') !== -1 ? 'granted' : 'denied';
b.google_ads_data_redaction = b.consent_decision.indexOf('C0004') === -1 || b.consent_decision.indexOf('C0003') === -1 ? 'true' : 'false';
b.google_url_passthrough = b.consent_decision.indexOf('C0004') !== -1 ? 'true' : 'false';
これらの正確な変数名を使用する場合、追加のマッピングは必要ありません。Google コンセントモードタグの最新バージョンは、これらの変数をデフォルトで使用します。
エクステンションの同意パラメータを選択する
JavaScript エクステンションで使用する同意パラメータを特定するには、次の手順に従います:
-
ブラウザのクッキーとキャッシュをクリアします。
-
最新のConsent ManagerまたはConsent Integrationsテンプレートがアクティブなウェブサイトまたはステージング環境を訪問します。
-
GDPRスタイルのオプトインモデルを使用している場合、同意ダイアログですべてのトラッキングを受け入れます。
-
ブラウザの開発者ツールを開き、コンソールに移動します。
-
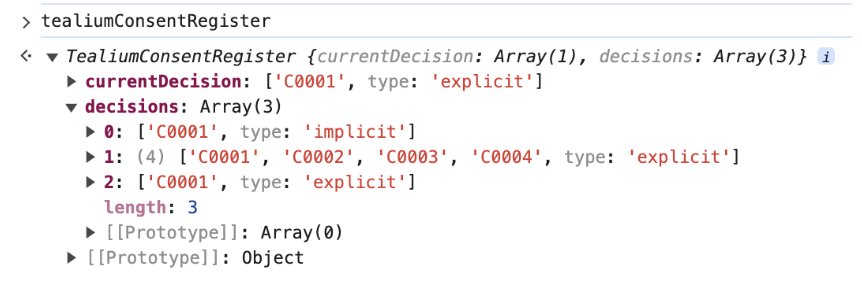
TealiumConsentRegisterオブジェクトを表示するには、tealiumConsentRegisterを入力します。このオブジェクトにはcurrentDecisionとdecisions配列が含まれています。currentDecision配列には、現在許可されている目的が含まれています。
currentDecision オブジェクトは、あなたのロジックで使用できる同意オプションを b.consent_decision.indexOf('<Value to change>') でリストします。
最終更新日 :: 2025年September月4日