Manage CloudStream data sources
This article describes how to manage CloudStream data sources.
Supported vendors
The configuration for cloud data sources is nearly the same for every vendor. For vendor-specific configuration details, see the following:
Create a cloud data source
To create a cloud data source for CloudStream, use the following steps:
- Go to CloudStream > Data Sources.
- Click + Add Data Source.
- Select a vendor.
- In the Name field, enter a unique name for the data source related to your use case.
- Click Continue.
You can connect to up to 10 data sources in a profile.
Establish a connection
Before you configure the data to import, you must establish a connection to your cloud data source. A connection is the reusable configuration of your vendor credentials that connects Tealium to your cloud data source.
On the Connection Configuration screen, confirm the name of the data source, then select an existing connection from the list or create a connection by clicking the + icon.
Click Save to return to the Connection Configuration screen, then click Establish Connection.
After you successfully establish a connection, select a table from the Table Selection list.
Enable processing
Turn on Enable Processing to begin importing data immediately after you save and publish your changes. Or, leave this setting off while you complete the configuration and turn it on later.
We recommend that you test the data source and query before you enable any data sources, segments, or activations.
Frequency
Select how often you want to fetch data:
- Near real-time: The process runs every 2 seconds.
- Hourly: The process runs at the start of each hour.
- Daily: The process runs once a day at the time you select (UTC).
- Weekly: The process runs once a week on a specified day and time (UTC).
Configure query mode and query
In the Query Mode and Configuration screen, select the appropriate query mode and optionally include a SQL WHERE clause to import only those records that match your custom condition.
Select a query mode
The query mode determines how to select new rows, modified rows, or both for import. The timestamp and incrementing columns ensure accurate data processing by allowing the connector to resume from the correct position after any interruptions or errors. This prevents data from being missed or duplicated.
- If you select Timestamp + Incrementing (Recommended), you must select two columns, a timestamp column and a strictly incrementing column.
- If you select Timestamp or Incrementing, you must select a column to use to detect either new and modified rows or new rows only.
- If you select Full Resync, all rows are imported during each import cycle. This option is useful when data changes frequently or when you want to ensure that all records are up-to-date. Full resync query mode requires that you use Hourly or Daily frequency, and you must specify the Timestamp Column, Incrementing Column, or both.
Offset management is not available in full resync mode.
For more information, see Query modes.
Configure the query
To configure the query, use the following steps:
-
In the Query > Select Columns section, select the columns to import. To change the table or view, click Previous and select a different table.
-
(Optional) To add a custom condition, include a SQL
WHEREclause.The
WHEREclause does not support subqueries from multiple tables. To import data from multiple tables, create a view and select the view in the data source configuration. -
For full resync query mode, enter the Limit for the maximum number of records to import. Daily queries can import up to 1,000,000 records, and hourly queries can import up to 50,000 records.
-
Click Test Query to validate your SQL query and preview the results.
Map columns
On the column mapping page, you’ll see the columns you selected in the previous step. Each column is automatically assigned a data type and a suggested cloud attribute name, which you can change as needed.
Columns not mapped to a cloud attribute are ignored.
Cloud attributes cannot be marked as restricted data.
Summary
In this final step, view the summary, make any needed corrections, and then save and publish your profile. To edit your configuration, click Previous to return to the step where you want to make changes.
- Confirm the cloud attribute mappings.
- Click Finish to create the data source and exit the configuration screen. The new data source is listed in the Data Sources dashboard.
- Click Save/Publish to save and publish your changes.
Test configuration
We recommend that you test the data source and query before enabling data sources, segments, or activations. However, running a test may activate segments, trigger enabled actions, or affect downstream systems. To prevent unintended results, disable connectors and functions, limit test records, and coordinate with recipients.
To test your data source configuration, use the following steps:
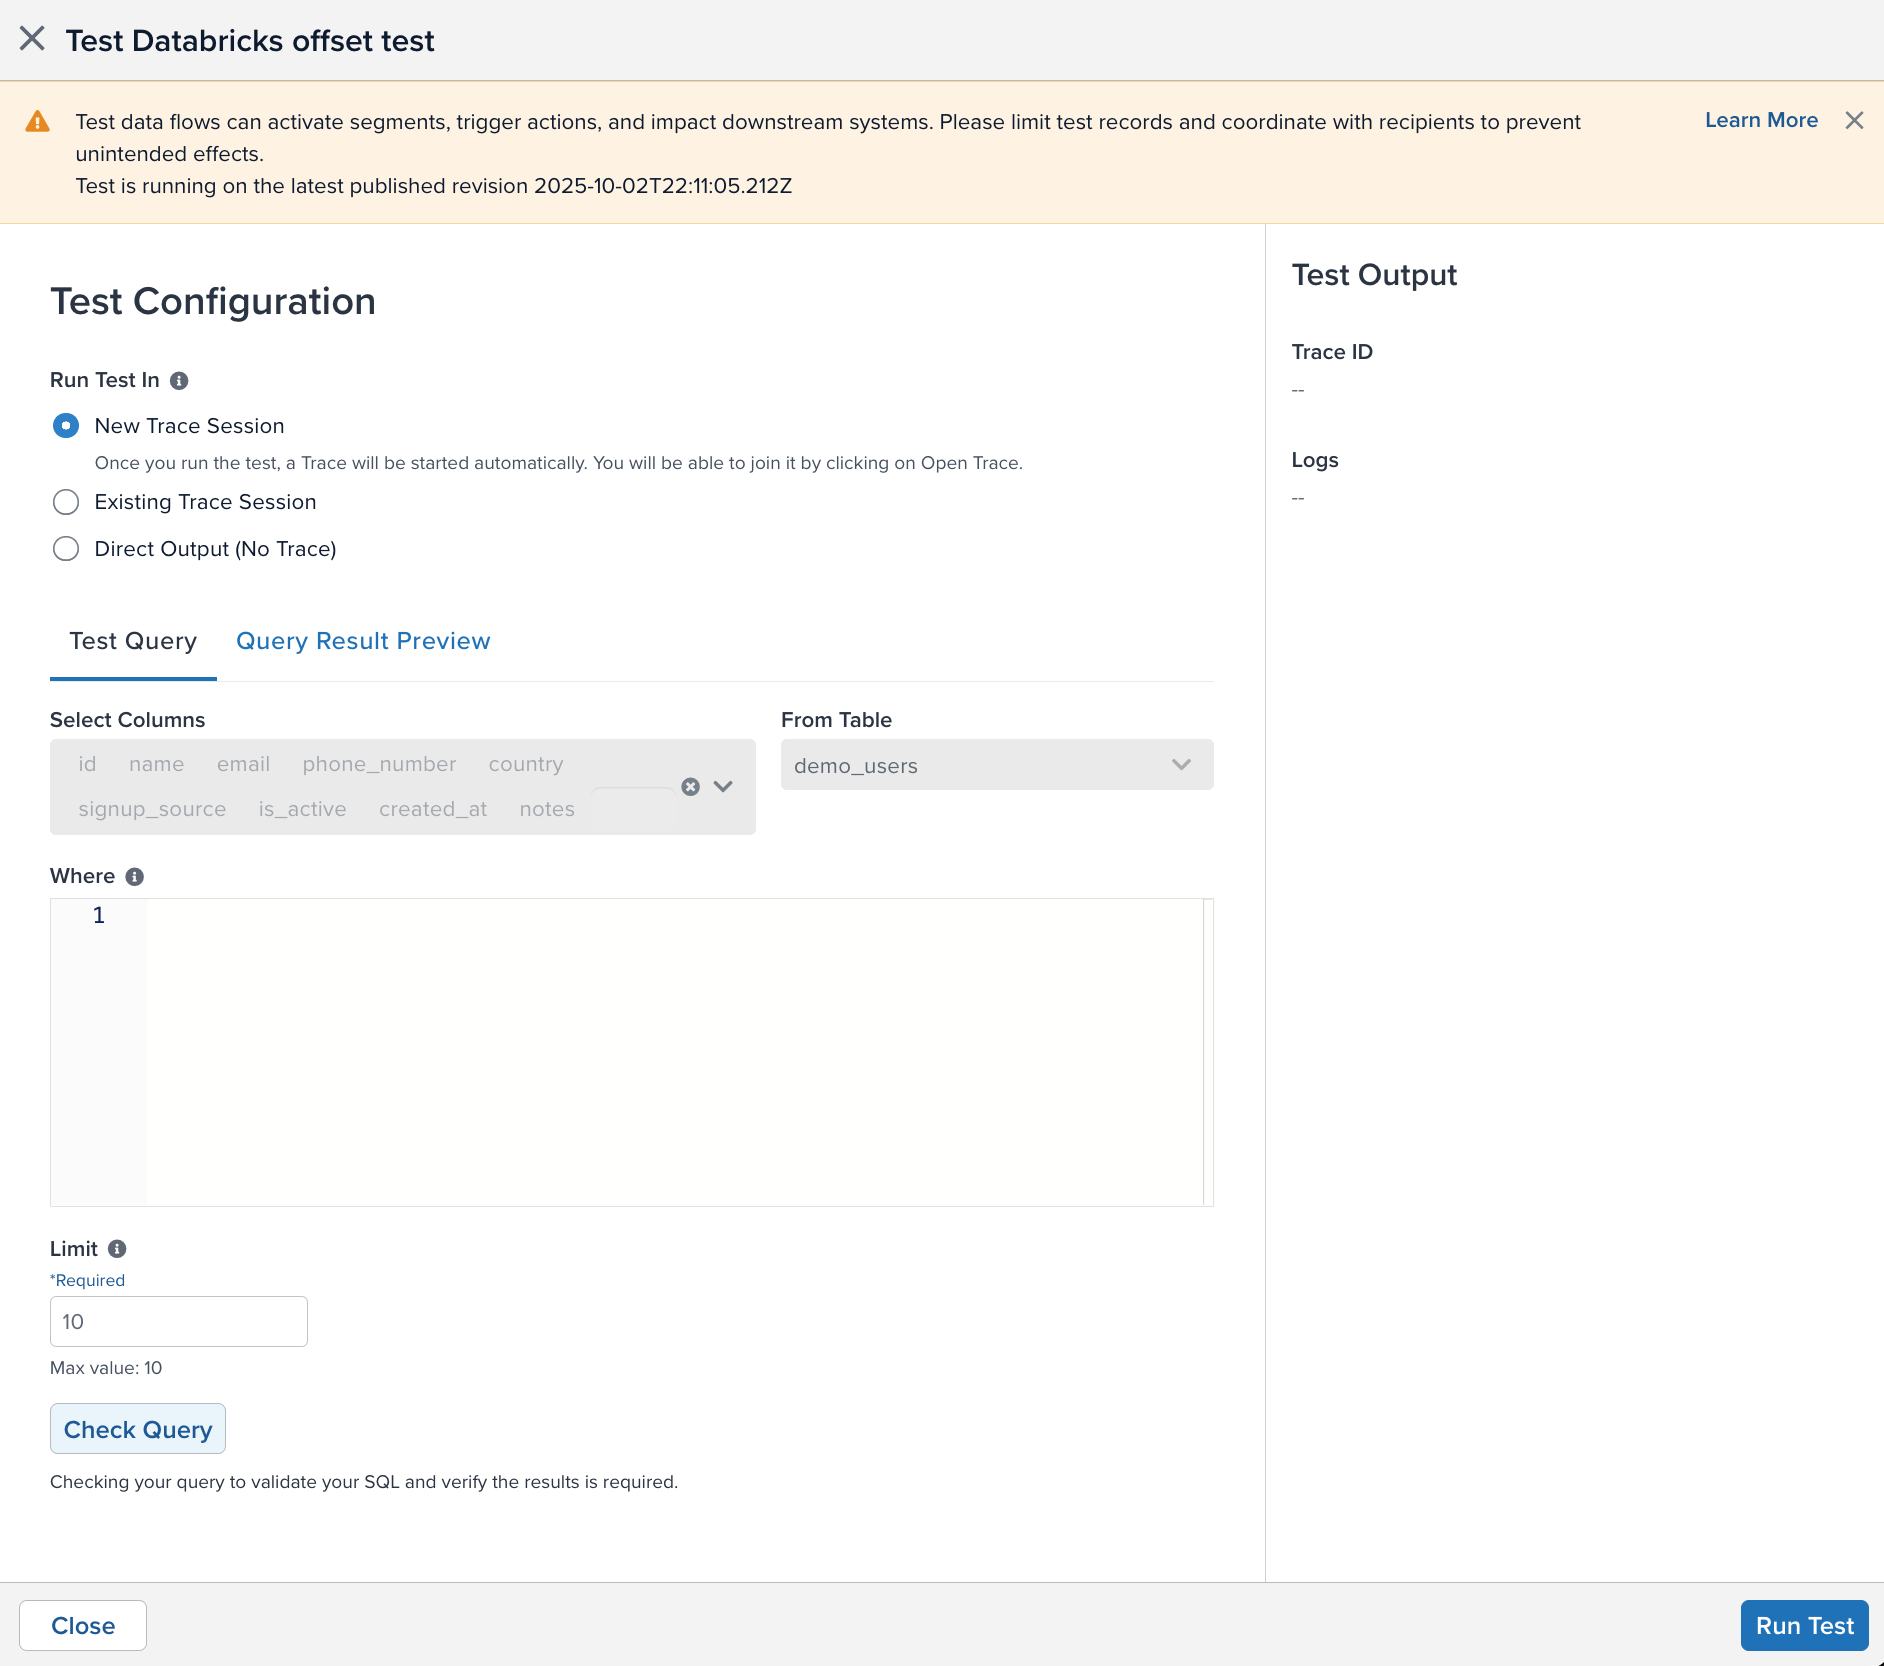
- Click the action button in the upper-right corner of a data source window, and then click End-to-end Testing.
- Select how you want to receive the output
- New Trace Session: The output will be displayed in a new trace session with up to 10 records. This option is best for confirming end-to-end verification and log details.
- Existing Trace Session: The output will be displayed in a trace session you have already started. Enter the Trace ID and click Join Trace.
- Direct Output: The raw results from the output will be displayed on the screen. No trace ID will be added to the data records and trace will not be available. This option is best for quickly confirming the query and attribute mapping.
- Select the number of rows to process for the test. The maximum number of rows is 10.
- Under Test Query, select the columns from the table to include in the test. Click the X in a column to remove it from the list. You must select at least one column.
- Under From Table, select the table you want to query. The Select Columns box will update with the table’s columns.
- Under Where, enter the SQL query to perform on the table.
- Click Check Query to validate the SQL and verify that required fields are set.
- The results will appear in a table under the Query Result Preview tab:
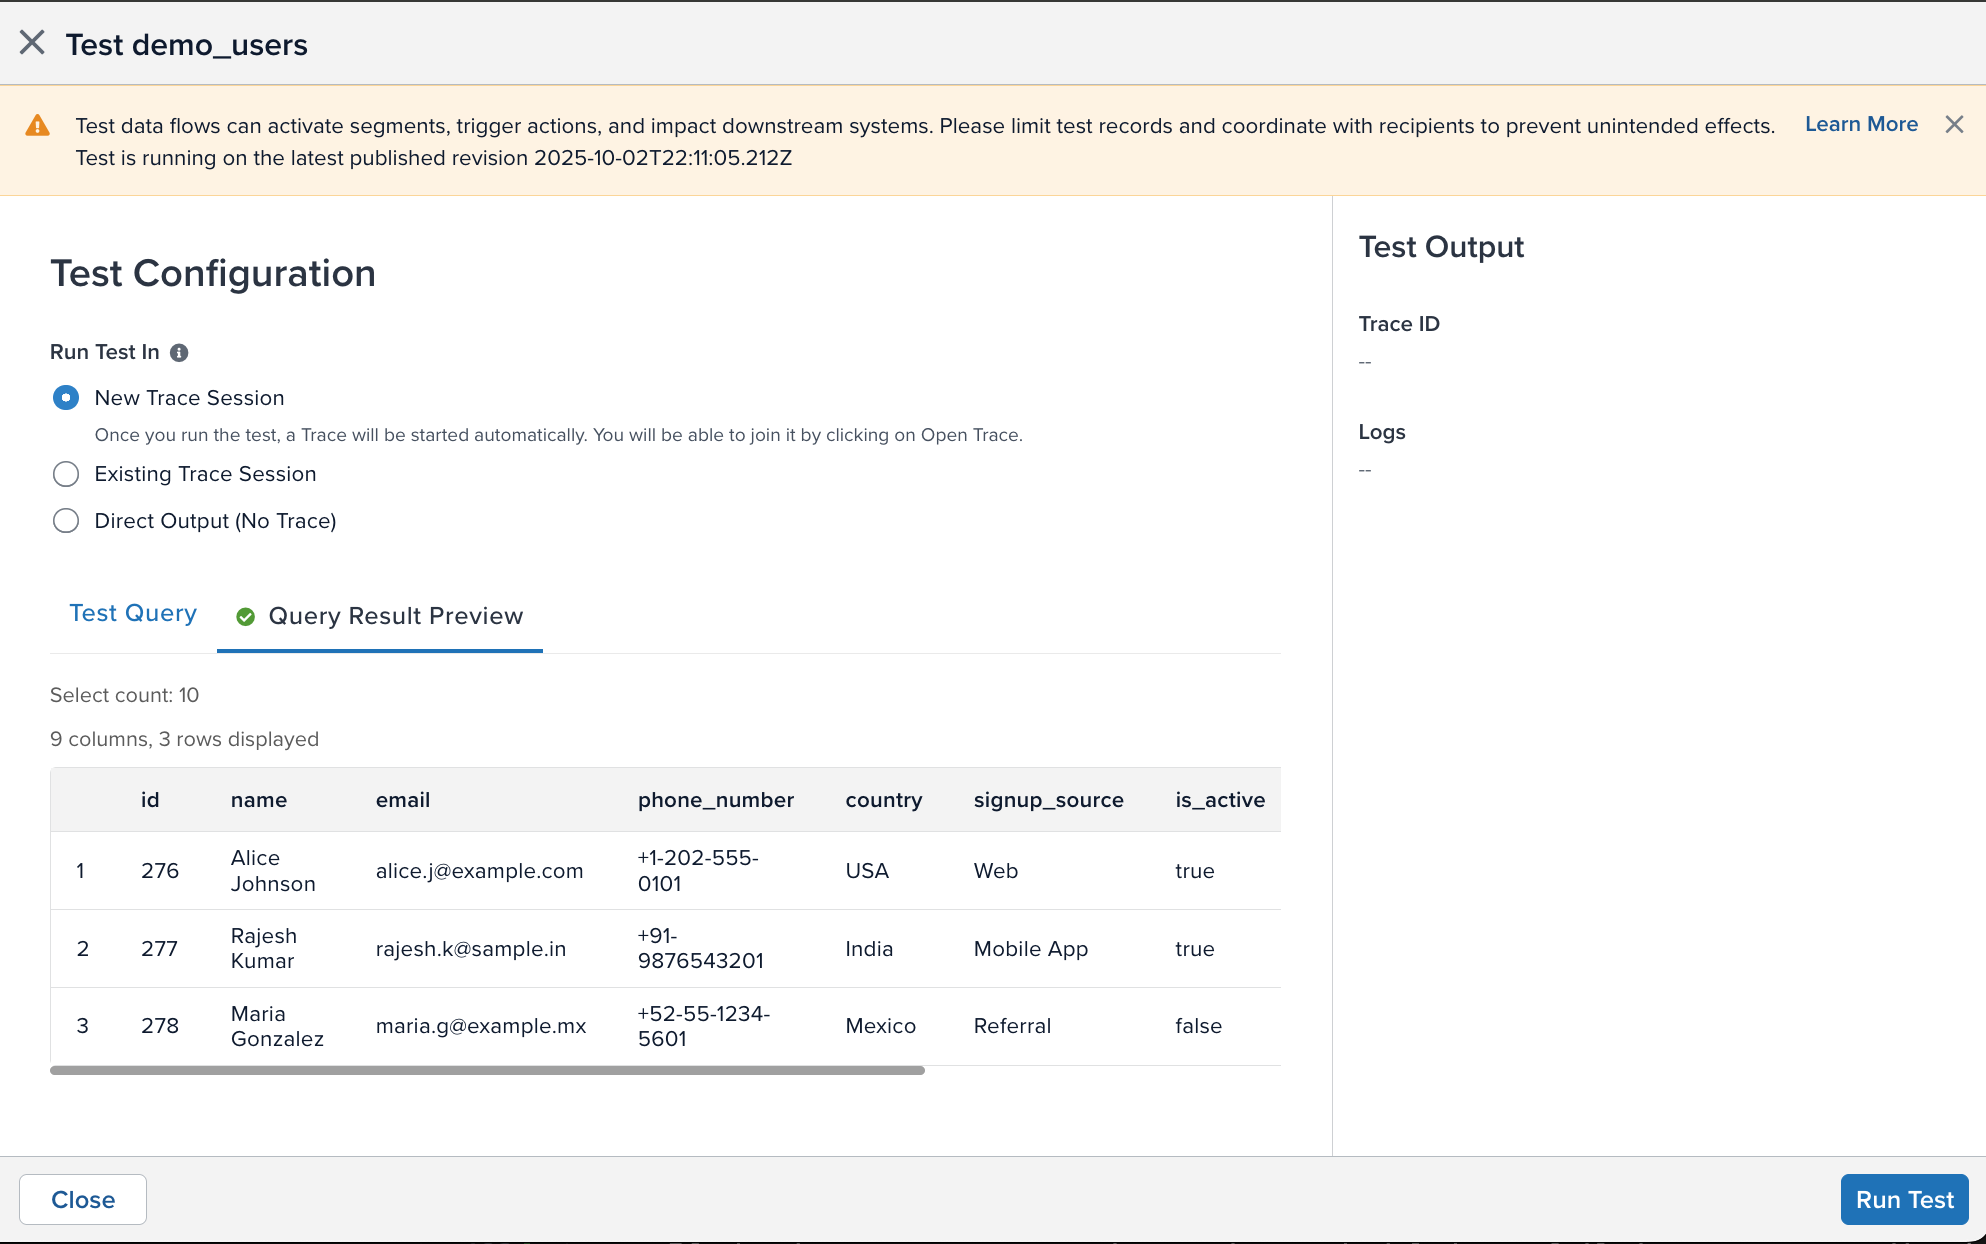
- Click Start Test to start the configuration test.
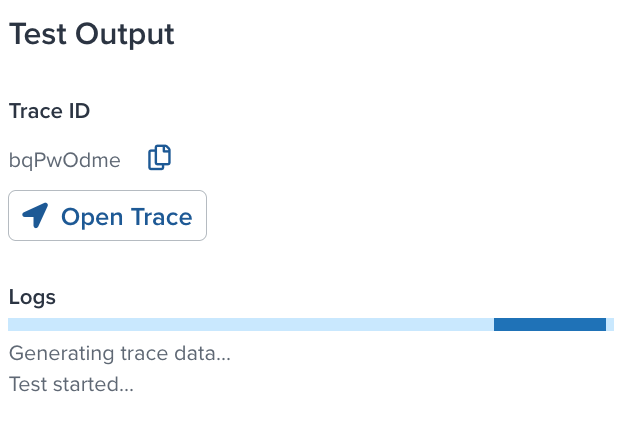
The right sidebar will display a progress bar that estimates the amount of time to finish the test and status messages to let you know if the test has encountered any errors.
When the test is complete, the results are displayed:
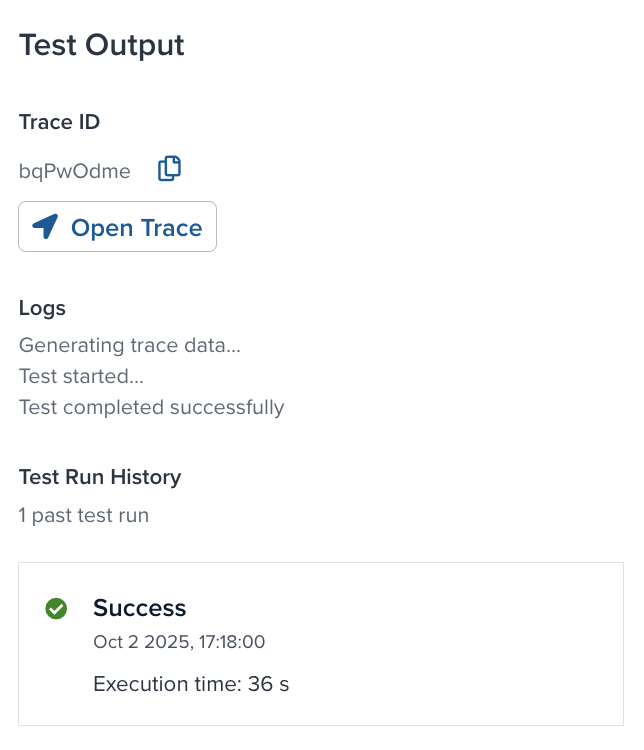
- If you want to watch the test run in a trace, click Join Trace.
- If the test fails, you can do the following:
- Click Edit Test Configuration to change the configuration settings.
- Click Retry Test to run the current configuration again.
Duplicate a data source
To duplicate a data source:
- Click the data source.
- Click the Duplicate button.
- Enter a name for the duplicated data source.
Edit a data source
To edit a data source, use the following steps:
- Click the data source.
- Click the edit button.
- Update the configuration as needed.
- Click Done.
Manage offset
Data sources track the date or incrementing value position where querying begins in your cloud data view or table. An offset lets you reset or manually set that position to control where in the view or table to start querying.
For example, suppose a recent mailing list activation contained an error and processed 100 records, and now the current incrementing offset is 342. To reprocess those records after correcting the email activation, set the offset to 242. When you restart the data source, it queries records starting from that position and sends the corrected email.
You can only manage the offset if the following conditions are true:
- The current profile is published.
- The query mode is Timestamp + Incrementing (Recommended), Timestamp, or Incrementing. You cannot manage the offset for Full Resync query mode.
- The data source is stopped.
- If the data source status is running, scheduled, or failed, you cannot edit the offset. Only information about the current offset is available.
- If the status is initializing, inactive, or there is a connection error, the offset is not available.
To manage the offset for the data source, use the following steps:
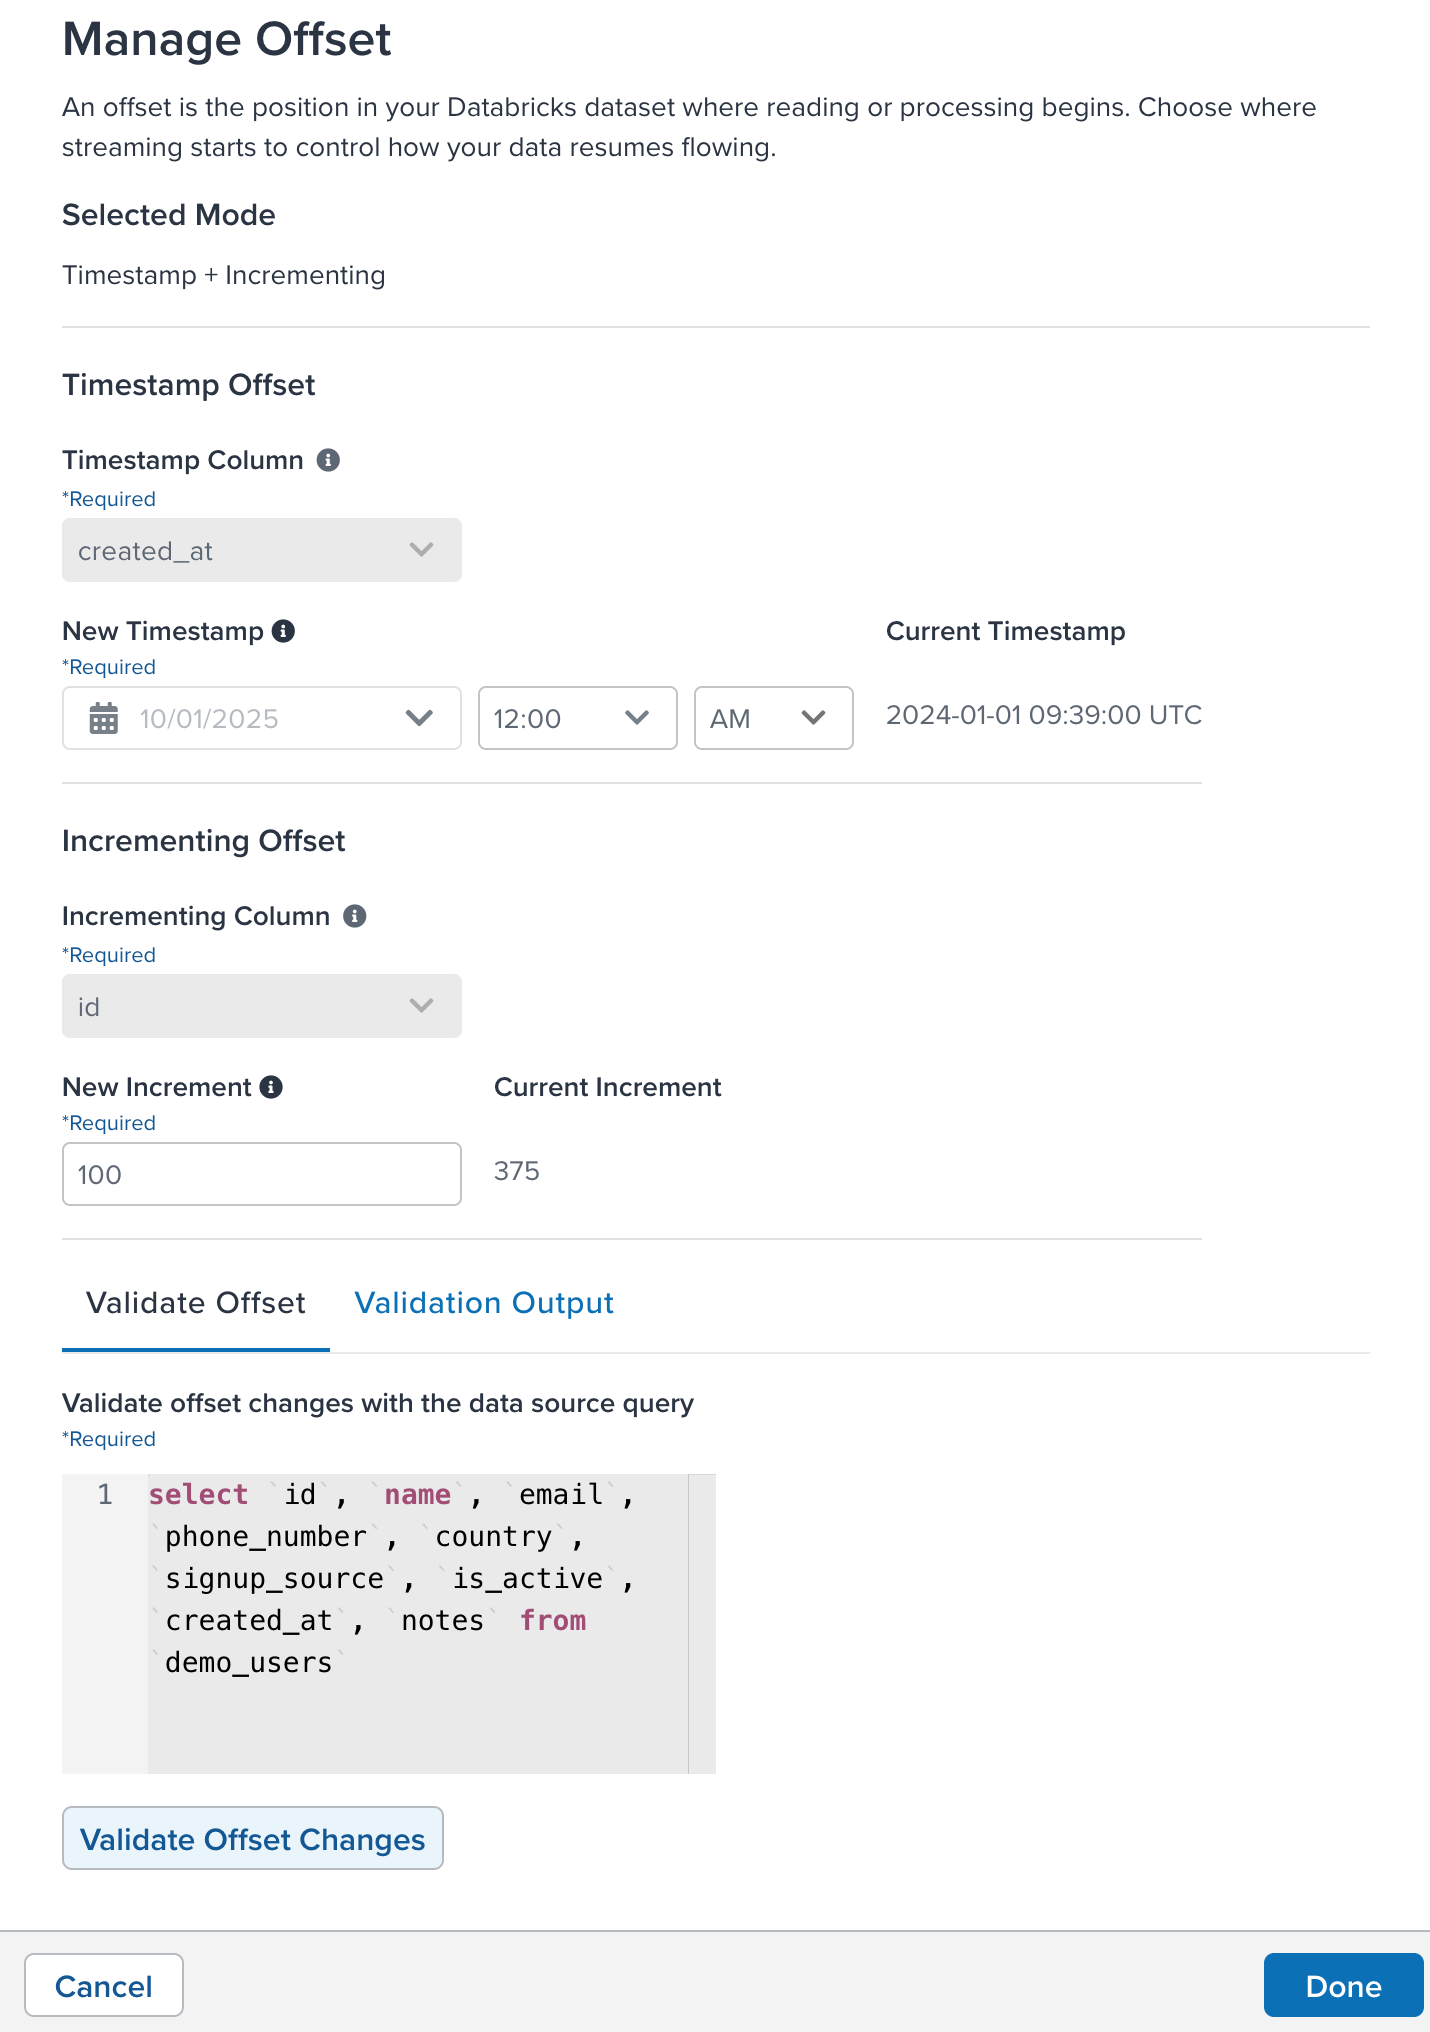
- Click the action button in the upper-right corner of the data source details window and then click Manage Offset.
- The offset methods available are Timestamp and Incrementing Column. Your query mode determines which offsets are available.
- Under Timestamp Column, select the column in the table that represents the timestamp.
- Under New Timestamp, select a date and time to offset the timestamp from when importing the data.
- The new timestamp must be a past time and date. It cannot be a future date and time.
- The current timestamp field displays the currently used offset.
- Under Incrementing column, select the column that represents the incrementing value for each row added to the table.
- Under New Increment, enter a number to use to offset the ID from when importing the data.
- The new offset ID must be a positive integer.
- The current offset ID field displays the currently used number to use as an offset.
Click Validate Offset Changes to preview the data that will be imported from the new offset position. The table shows sample rows. It also provides an estimate of how many rows will be processed after you adjust the offset.
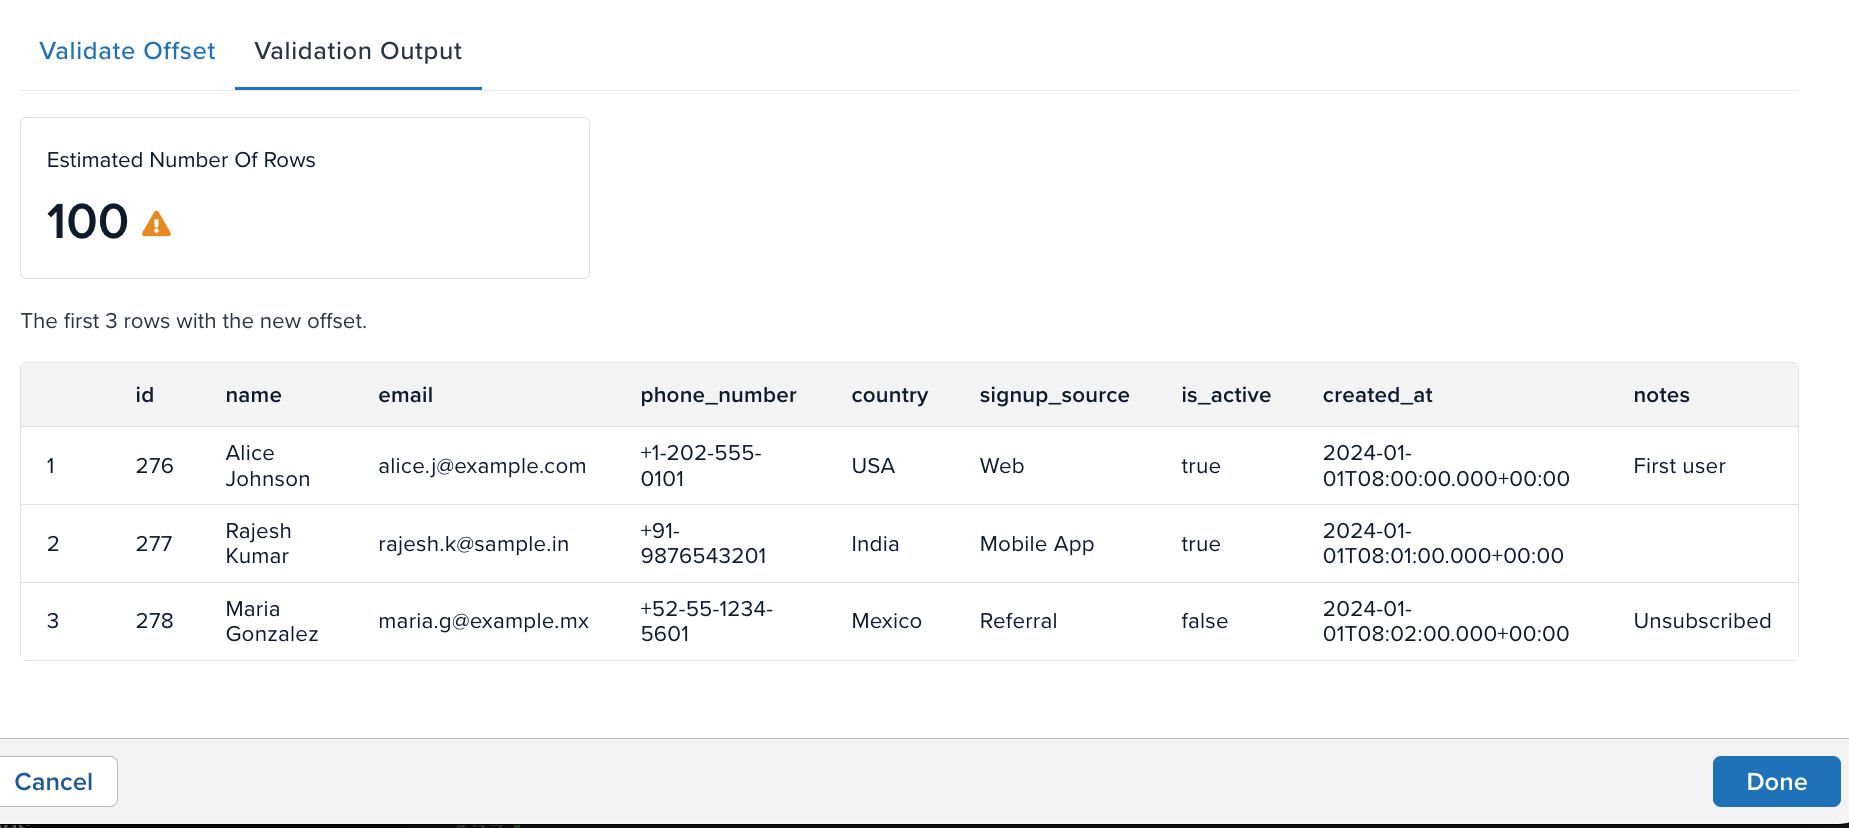
Click Done to confirm the new offset settings. Click Cancel to discard your changes.
Restart the data source after changing the offset.
Processed rows and errors
To see import activity, navigate to Data Sources and expand the data source.

CloudStream can import up to 500 data records per second.
Statuses
After configuring a cloud data source, it may display one of the following statuses:
| Status | Description |
|---|---|
| Failed | A connection error has occurred, such as an authentication failure, and imports are halted until the error is resolved. Row-level errors during an import do not trigger this status and are logged while the data source remains in Running. |
| Inactive | The data source was created but was never turned on or transitioned to any other status. |
| Initializing | The connector is starting for the first time or resuming from a Stopped state. This is a temporary state before transitioning to Running or Scheduled. |
| Running | The connector is actively querying and importing data. |
| Scheduled | The next import is scheduled to run. This state can follow Initializing or Running. |
| Stopped | The data source was previously enabled but is now turned off. No data imports occur until it is enabled. |
| Unassigned | The task is awaiting allocation to a cloud worker. |
This page was last updated: October 31, 2025