Platform Permissions (Early Access)
This article provides information on the new platform permissions as well as instructions on managing permissions.
The Platform Permissions feature provides centralized management of permissions across Tealium products and services. You can control access to Tealium and Tealium features, and personal identifiable information (PII) data.
Platform Permissions is in GA for new customers and in EEA (Expanded Early Access) for select customers. If you are interested in trying this feature or need to migrate from EA to EEA, contact your customer success manager.
For more information about the Expanded Early Access improvements, which have feature parity with the GA version, see Platform Permissions.
How it works
The Platform Permissions feature provides two categories of permissions: account role permissions and group permissions. Account role permissions are assigned to users to allow them to manage groups, users, privacy, and product configuration. The group permissions control which users can access PII data, the areas and features of Tealium that users can access, and the profiles users can access. Users are assigned to one or more groups, and have the permissions and access associated with the groups.
After you have created the necessary groups and assigned account role permissions to users, turn on Permissions Enforcement to enforce the permission settings for the account.
Before turning on Permissions Enforcement, make sure that users have been added to groups and admin role permissions have been assigned to users that manage users, groups, and PII permissions. If you turn on permissions enforcement before you assign users to groups or admin roles to users, you may lose access to your account.
Account role permissions
Account role permissions are for users that perform administrative tasks (configuration, adding new users, and so on) and allow these users to manage Platform Permissions. You can assign multiple account role permissions to a user.
There are three levels of account role permissions that specify the administrative tasks a user can perform:
-
User Admin: The user has access to the following features:
- Manage Permissions: Can add, edit, and remove groups and user permissions.
- Password Policy: Can update the password policy.
- API Key Authorization: Can grant users the ability to generate an authorization key.
- Reset MFA: Can reset multi-factor authentication for users.
-
Privacy Admin: Requires User Admin permission.The user has access to the following features:
- PII View & Manage: Can set PII permissions for groups and setup and manage data sources, connectors, attributes, enrichments, and rules.
- Tag Marketplace policy: Can update the Tag Marketplace Policy.
- Consent Management: Can manage global consent parameters and languages, which apply to all profiles that use consent management.
-
Technical Admin: The user can access account configuration features, such as First-Party Domains.
To allow administrative users to manage groups and permissions, account role permissions must be assigned to users before Permissions Enforcement is turned on.
The Account Admin has all of the permissions for the User Admin, Privacy Admin, and Technical Admin.
Group permissions
Permissions and profiles are assigned to groups. Users are assigned to one or more groups, and have the permissions for those groups and can access the profiles for those groups. User must be assigned to at least one group to be able to access Tealium.
If a user is in multiple groups with different permissions, the highest permissions apply. For example, if a user is in group A, which has No PII permission, and is in group B, which has View PII permission, the user has View PII permission.
There are three categories of group permissions: Server-Side Publish, PII permissions that specify the level of access to users have to PII data, and product permissions that specify the products and product features that users can access.
Server-Side publish permission
When Server-Side Publish Enabled is selected for a group, users in that group can publish server-side changes. This permission is not specific to products or product features.
PII permissions
PII Permissions control who can see PII data and who can edit the Restricted Data property that identifies PII data. Only one level of PII permissions can be assigned to a group. The three levels of PII permissions are as follows:
- No PII: Users can view PII attributes, but cannot see the values of these attributes. PII is obscured wherever it is shown, including Trace and Live Events.
- View: Users can view the values of PII attributes, data but cannot edit or manage PII data.
- Manage & View: Users can view, edit, and manage PII data.
To edit the Restricted Data property for an attribute, users must have the Manage & View PII permission and View, Edit & Delete permission for that feature.
For more information on the Restricted Data property, see About Restricted Data.
Product and feature permissions
Product access permissions specify the Tealium products and features that users can access.
To access Tealium, users must be assigned to one or more groups that provide the necessary product and feature permissions. Before turning on Permissions Enforcement, make sure that users have been added to groups and admin role permissions have been assigned to users that manage users, groups, and PII permissions. If you turn on permissions enforcement before you assign users to groups or admin roles to users, you may lose access to your account.
Currently, the following product permissions can be assigned to a group:
- AudienceStream
- EventStream
- Data Access
- Data Connect
- Predict
- Functions
- Server-Side Tools
- Server-Side (Others)
Feature permissions that can be assigned to a group vary depending on the product permissions assigned to the group, as shown in the following table.
Users that have View & Edit or View, Edit & Delete permission also have Save permission.
| Product | Features | Available Permissions |
|---|---|---|
| AudienceStream |
|
|
| AudienceStream |
|
|
| EventStream |
|
|
| DataAccess |
|
|
| DataAccess |
|
|
| DataConnect |
|
|
| DataConnect |
|
|
| Predict |
|
|
| Functions |
|
|
| Server-Side Tools |
|
|
| Server-Side Tools |
|
|
| Server-Side (Others) |
|
|
Eventstream and AudienceStream share some elements, such as rules and labels. If a user has Publish permission and only has access to EventStream, publishing changes also affects AudienceStream if changes were made to shared elements. Similarly, if a user has Publish permission and only has access to AudienceStream, publishing changes also affects EventStream if changes were made to shared elements.
How lack of permission changes the user interface
When a user does not have permission for a product or feature, the user interface changes as follows:
- When a user does not have access to a product, that product is not shown in the navigation.
- When a user has access to some features, but not others, they only see the features they can access in the navigation.
- When a user does not have Edit permission for a feature, the Edit button is not displayed on pages for that feature.
Managing permissions enforcement and PII permissions
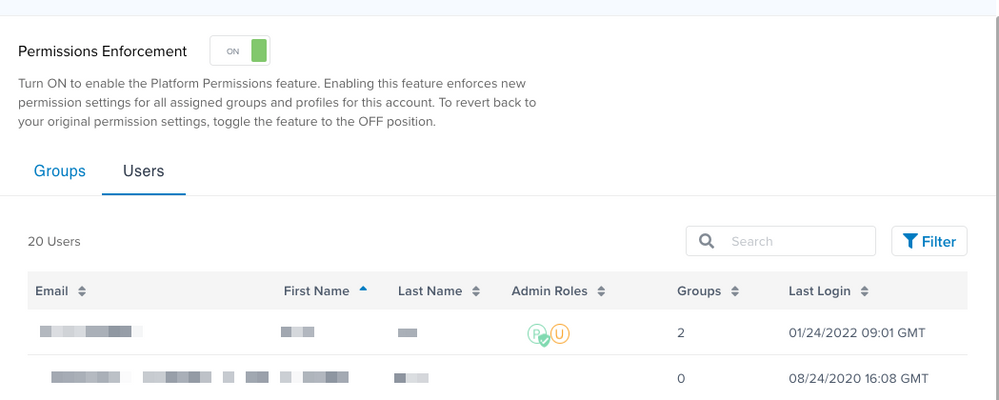
After you have created the necessary groups, assigned users and profiles to groups, and assigned account role permissions to users, turn on Permissions Enforcement to enforce the permission settings for all assigned groups and profiles for the account. To revert back to your original permission settings, toggle the feature to the OFF position.
Before turning on Permissions Enforcement, make sure that users have been added to groups and account role permissions have been assigned to users that manage users, groups, and PII permissions.
If Permissions Enforcement is turned on before users have been added to groups, users will not have access to Tealium. If Permissions Enforcement is turned on before account role permissions are assigned, users will not be able to manage groups, users, and permissions.
Turn ON platform permissions
- In the admin menu, click Manage Permissions.
- Toggle Permissions Enforcement to ON.
Turn OFF platform permissions
- In the admin menu, click Manage Permissions.
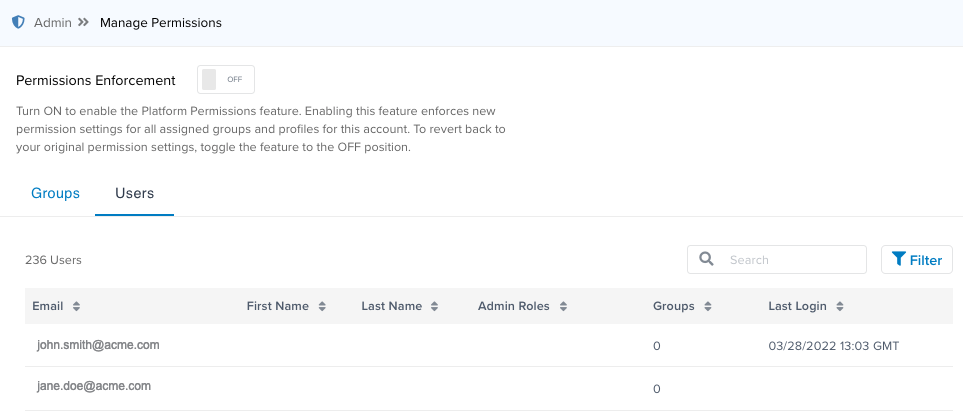
- Toggle Permissions Enforcement to OFF.
Turn ON PII permissions
Platform Permissions must be turned off before you turn on PII Permissions. See Turn OFF Platform Permissions.
- In the admin menu, click Manage Users.
- Toggle PII Permission Enforcement to ON.
To re-enable Platform Permissions, see Turn On Platform Permissions.
Turn OFF PII permissions
Platform Permissions must be turned off before you turn off PII Permissions. See Turn OFF Platform Permissions.
- In the admin menu, click Manage Users.
- Toggle PII Permission Enforcement to OFF.
To re-enable Platform Permissions, see Turn On Platform Permissions.
Managing groups
To manage groups, users must have server-side User Admin permission or client-side Manage Account permission..
Create a new group
Use the following steps to create a group:
- In the admin menu, click Manage Permissions.
- Click + Create New Group.
- For Group Type, select New Group, then click Next.
- Enter a unique Group Name.
- Select the PII Permissions for this group.
- Select Product Access:
- AudienceStream
- EventStream
- Data Access
- Data Connect
- Predict
- Functions
- Server-Side Tools
- Server-Side (Others)
- Click Next.
- If this group needs to be able to publish server-side changes, select Publish Enabled.
- Select Feature Permissions for the selected products, then click Next.
- Select the account profiles that will have access to this group, then click Next.
- Enter, or copy and paste, an email address for each user to be added to this group, then click Save.
Duplicate an existing group
You can create a new group by duplicating an existing group and modifying the permissions and access for the new group. Use the following steps to duplicate a group:
- In the admin menu, click Manage Permissions.
- Click + Create New Group.
- For Group Type, select Duplicate Group from Existing.
- Select the group to duplicate.
- Enter a name for the duplicate group, then click Next.
- Enter, or copy and paste, an email address for each user to be added to the group, then click Save.
Add users to a group
You can add existing users to groups. For information on adding new users, see Managing Server-Side User Permissions. You can also add a user to a group from the list of users. See Add or Remove Groups for a User.
Use the following steps to add an existing user to a group.
- In the admin menu, click Manage Permissions.
- Click on the group you want to edit.
- Click + Add Users.
- Enter, or copy and paste, an email address for each user you want to add, then click Save.
To add a user to multiple groups, repeat these steps for each group.
Change feature permissions for a group
To change the feature permissions for a group, edit the group as follows:
- In the admin menu, click Manage Permissions.
- Click on the group you want to edit.
- Click the Features tab.
- Select or deselect PII Permissions.
- Change product access and feature access as needed.
- Click Save.
Add or remove profiles for a group
To add or remove profiles for a group, use the following steps:
- In the admin menu, click Manage Permissions.
- Click on the group you want to edit.
- Click the Profiles tab.
- To remove a profile, follow these steps:
- Click the profile menu and select Remove.
- Click Remove in the confirmation dialog, then click Save.
- To add a profile, follow these steps:
- Click + Add Profile.
- Select profiles, then click Save.
View groups
To view the groups for an account, use the following steps:
- In the admin menu, click Manage Permissions.
A list of the existing groups is displayed. By default, the list is sorted by Group name in ascending alphabetical order. - To sort the list by Group name (alphabetic, ascending or descending), click the Group column heading.
- To sort the list by number of profiles (ascending or descending), click the Number of Profiles column heading.
- To sort the list by the number of members in the group (ascending or descending), click the Number of Members column heading,
- To sort the list by creation date (ascending or descending), click the Creation Date column heading.
Remove a group
When a group is removed, user in the group no longer have the permissions associated with that group. To remove a group, use the following steps:
- In the admin menu, click Manage Permissions.
- In the group menu, select Remove.
- In the confirmation dialog, click Remove.
View user information
To view the current list of users, use these steps:
- In the admin menu, click Manage Permissions.
- Click the Users tab.
The list of users shows the email address and first and last name, as well as the account roles, the number of groups for the user, and the last login time.

- To sort the list of users, click any column heading.
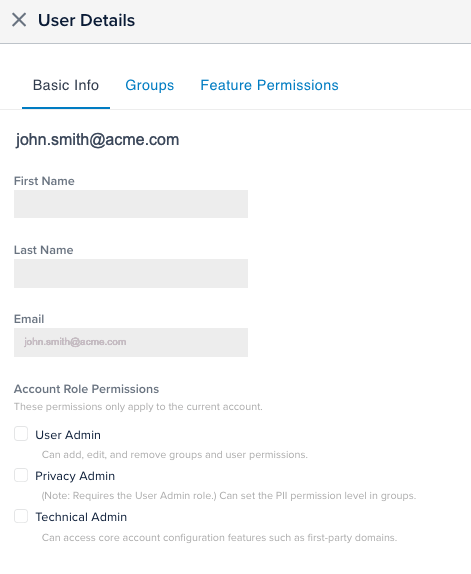
- To view details for a user, click a user in the list.
The Basic Info tab is displayed by default and shows first name, last name, email address, and Account Role Permissions for this user. - Select or deselect account role permissions.
- Click the Groups tab to view more details about the groups this user is in.
- Click the Feature Permissions tab to view the products and features this user can access.
Feature permissions are shown by profile. To select a different profile, click the currently displayed profile name.
Add or remove groups for a user
To add or remove groups for a user, you must have User Admin permission. User these steps to add or remove groups:
- In the admin menu, click Manage Permissions.
- Click the Users tab.
- Click the Groups tab.
- To add a group, do the following:
- Click + Add Group.
- In the Add Groups screen, select one or more groups, then click Save.
- To remove a group, do the following:
- Click the group menu and click Remove.
- Click Remove in the confirmation dialog, then click Save.
- In the Group Details screen, click Save to save your changes to groups.
Assign account role permissions to a user
Account role permissions can be added for existing users. For information on adding new users, see Managing Server-Side User Permissions.
To assign account role permissions to a user, use the following steps:
This page was last updated: March 14, 2024

