Customer spending levels guide
This guide describes how to target visitors in real time based on the amount that they have spent within a specified time frame.
Benefits
Building strategies based around customer spending levels is useful for the following reasons:
- Personalized Customer Engagement:
- Encourage low spenders to make additional purchases through introductory offers, discounts, or product recommendations that align with their spending behavior.
- Target medium spenders with cross-sell or upsell opportunities, nudging them toward higher spending categories.
- Reward high spenders with exclusive perks or loyalty incentives to strengthen retention and increase lifetime value.
- Optimized Budget Allocation: Segmenting campaigns by spending levels ensures your marketing budget is distributed effectively, focusing resources on the most promising customer segments for growth or retention.
- Enhanced Customer Insights: Tracking customer spending patterns helps identify trends, such as seasonal behaviors or product preferences, enabling you to adjust strategies and inventory planning.
- Improved ROI on Campaigns: Tailor messaging and offers based on spending levels increases the likelihood of conversions, ensuring a higher return on your marketing investment.
What to measure
Customer spending levels can be tracked in several different ways:
- Tracking the total amount a customer spends over a given period of time.
- Tracking the average amount a customer spends with each purchase.
- Tracking spending trends over time, and whether they increase or decrease.
This guide demonstrates how to create a basic tracking configuration. It includes tracking total lifetime spending, 30-day spending, and 60-day spending windows. It then segments customers into low and high spending groups for each time frame.
After the visitors have been identified, you can take action on them through a server-side connector to your email marketing service.
Requirements
This use case requires the following:
- Tracked events: Retail
- Tealium AudienceStream
In general, the following event attributes will be helpful in tracking purchase activity to assess customer spending levels. Your actual attribute names might differ.
| Attribute Name | Example value |
|---|---|
customer_city |
San Diego |
customer_country |
United States |
customer_email |
john.smith@example.com |
customer_first_name |
John |
customer_id |
8237572 |
customer_last_name |
Smith |
customer_postal_code |
92101 |
customer_state |
CA |
order_currency_code |
USD |
order_total |
2549.00 |
tealium_event |
purchase |
For more information about the data layer definition for retail, see Retail.
Required AudienceStream Attributes
| Attribute Name | Type | Scope | Description |
|---|---|---|---|
| Purchased | Boolean | Visit | Indicates that a Purchase event has occurred. |
| Email Address | String | Visitor | Captures the email address of the visitor. |
| Lifetime Purchase Total | Number | Visitor | Collects the total of purchases during the visitor’s lifetime. |
| 30 Day Purchases | Timeline | Visitor | Collects the purchases by the visitor in the past 30 days. |
| 60 Day Purchases | Timeline | Visitor | Collects the purchases by the visitor in the past 30 days. |
| 30 Day Purchases Running Total | Number | Visitor | Counts the total of purchases by the visitor in the past 30 days. |
| 60 Day Purchases Running Total | Number | Visitor | Counts the total of purchases by the visitor in the past 30 days. |
Step 1: Create attributes
Create the following attributes:
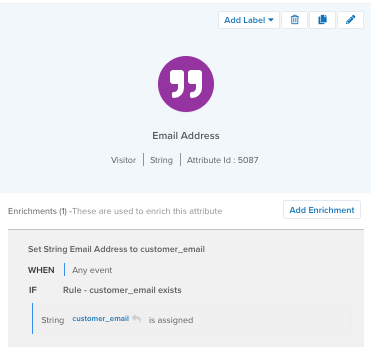
Create Email Address attribute
Create a string visitor attribute named Email Address with the following enrichment:
- Set to
customer_emailon ANY EVENT ifcustomer_emailis assigned.
Create Purchased attribute
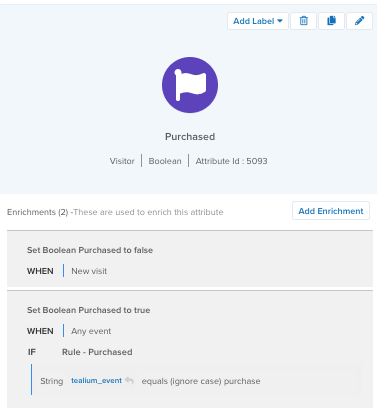
Create a boolean visit attribute named Purchased with the following enrichments:
- Set to
falseon NEW VISIT. - Set to
trueon ANY EVENT wheretealium_eventis equal (ignore case) topurchase.
Create Lifetime Purchase Total attribute
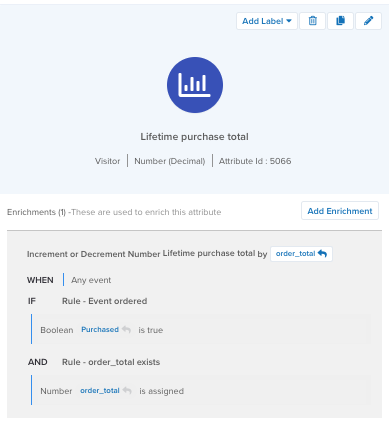
Create a number visitor attribute named Lifetime Purchase Total with the following enrichment:
- Increment Number by
order_totalon ANY EVENT wherePurchasedis true andorder_totalis assigned.
Create 30 Day Purchases timeline attribute
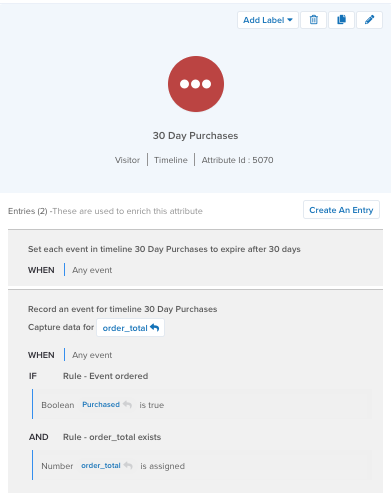
Create a timeline visitor attribute named 30 Day Purchases timeline with the following enrichments:
- Set Expiration For Timeline Events to
30 days. - Update Timeline at the Time of event received and capture the attribute data for
order_totalwherePurchasedis true andorder_totalis assigned.
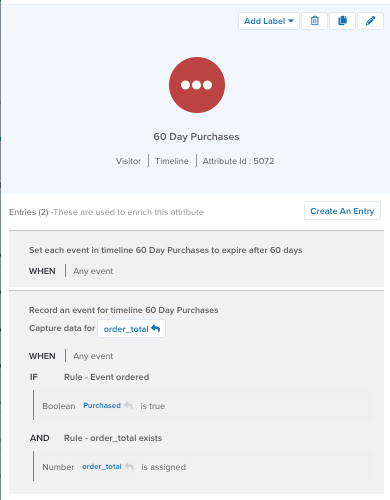
Create 60 Day Purchases timeline attribute
Create a timeline visitor attribute named 60 Day Purchases timeline with the following enrichments:
- Set Expiration For Timeline Events to
60 days. - Update Timeline at the Time of event received on ANY EVENT and capture the attribute data for
order_totalwherePurchasedis true andorder_totalis assigned
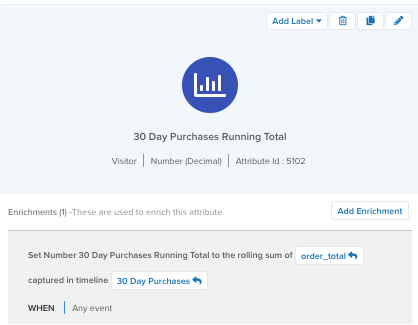
Create 30 Day Purchases Running Total attribute
Create a number visitor attribute named 30 Day Purchases Running Total with the following enrichments:
- Set Number 30 Day Purchases Running Total to the rolling sum of
order_totalcaptured in timeline30 Day Purchaseson ANY EVENT.
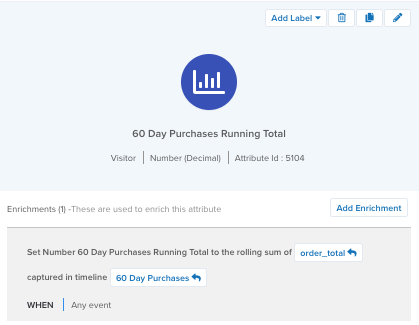
Create 60 Day Purchases Running Total attribute
Create a number visitor attribute named 60 Day Purchases Running Total with the following enrichments:
- Set Number 60 Day Purchases Running Total to the rolling sum of
order_totalcaptured in timeline60 Day Purchaseson ANY EVENT.
Step 2: Create audiences
Now you can easily create audiences using the badges you’ve just created.
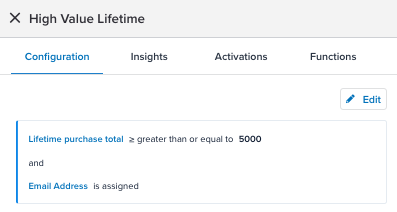
Create High Value Lifetime audience
Create a High Value Lifetime audience with the following conditions:
- Lifetime purchase total is greater than or equal to
5000 - Email Address is assigned
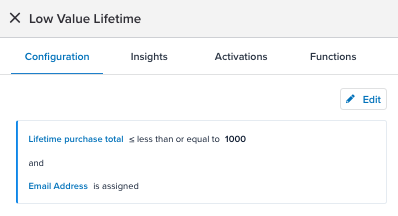
Create Low Value Lifetime audience
Create a Low Value Lifetime audience with the following conditions:
- Lifetime purchase total is less than or equal to
1000 - Email Address is assigned
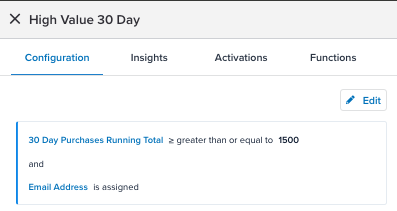
Create High Value 30 Day audience
Create a High Value Lifetime audience with the following conditions:
- 30 Day Purchases Running Total is less than or equal to
1500 - Email Address is assigned
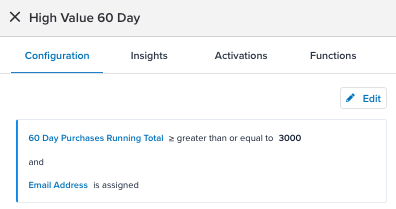
Create High Value 60 Day audience
Create a High Value Lifetime audience with the following conditions:
- 60 Day Purchases Running Total is less than or equal to
3000 - Email Address is assigned
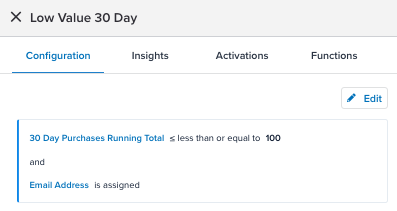
Create Low Value 30 Day audience
Create a Low Value Lifetime audience with the following conditions:
- 30 Day Purchases Running Total is less than or equal to
100 - Email Address is assigned
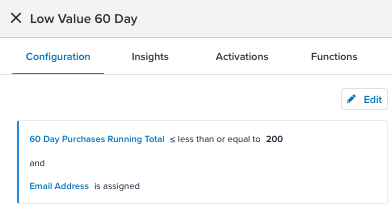
Create Low Value 60 Day audience
Create a Low Value Lifetime audience with the following conditions:
- 60 Day Purchases Running Total is less than or equal to
200 - Email Address is assigned
Step 3: Configure a connector
With your attributes, badges, and audiences set up, you’re ready to connect this new audience to your email marketing tools to re-engage and convert these audiences.
Some common connectors and actions for customer spending level campaigns include:
- Adobe Campaign Classic
- Iterable: Subscribe User to a List, Upsert User action
- Marketo: Add Lead to List action
- SendGrid: Upsert Contact action
For example, you could set up the Marketo connector to add a visitor’s email address to a high-value customer spending list. Customize your connector actions to trigger only for when a visitor joins the High Value 60 Day audience or is in that audience at the end of the visit.
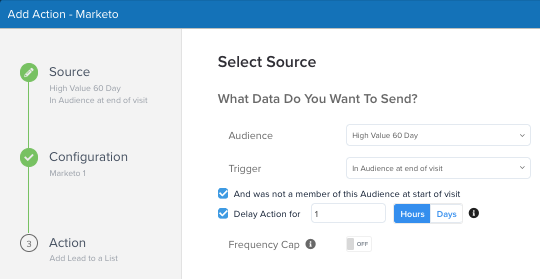

For more information, see Add a connector.
Delayed actions
While you can often send out an email to a user right after they achieve a particular spending level to acknowledge their achievement and encourage them to spend more, you may have a higher chance of conversion by delaying the email for your target audience. Use delayed actions to set connector action delays in Tealium and then trigger your email workflows in your vendor of choice.
We recommend that you set a delay for an hour to remarket visitors that have an interest in buying more. Also, most email marketing tools offer a feature that monitors the number of emails a customer has received so as not to overwhelm them with messages.
For detailed information about how to use delayed actions in Tealium, Delayed actions.
Next steps
This guide illustrates how to build a basic spending level-based campaign. You can increase your understanding of customer behavior by using additional attributes in your campaigns. The following table shows just some of the possible options for customer spending-related attributes:
| Attribute Name | Attribute Type | Scope | Category | Notes |
|---|---|---|---|---|
| Average item price | Number | Visitor | Lifetime Behavior | General behavioral understanding and future use case expansions. |
| Favorite categories | Tally | Visitor | Lifetime Behavior | General behavioral understanding and future use case expansions. |
After creating attributes and audiences, you can further enhance campaigns by integrating additional customer behavior attributes or utilizing advanced personalization features like the Tealium Moments API. For more information, see About Moments API.
This page was last updated: December 19, 2024