Discount shopper guide
This guide describes how to target visitors who browse discounted products.
Benefits
Discount shopper remarketing strategies are effective for the following reasons:
- Recover Lost Sales: Many shoppers abandon their carts due to pricing concerns. A well-timed discount or promotion can entice them to return and complete their purchase.
- Maximize Conversion Opportunities: Discount shoppers are more likely to respond to targeted promotions, leading to higher conversion rates from those who previously browsed but didn’t buy.
- Encourage Repeat Purchases: Offering discounts to existing customers can foster loyalty, encouraging them to return and shop again.
- Move Excess Inventory: Discounts are a great way to clear out overstocked or seasonal items, making room for new products.
- Build Long-Term Relationships: Regularly engaging discount-oriented shoppers shows you understand their preferences, helping to build trust and repeat engagement.
- Increase Average Order Value: Strategic promotions like “Buy More, Save More” can encourage customers to spend more per visit while still feeling they’re getting a great deal.
- Stay Competitive: Many customers compare prices across sites before purchasing. With remarketing discounts, you can win back shoppers who might otherwise choose a competitor.
What to measure
Discount shoppers can be tracked in several different ways:
- Counting the number of discounted product pages viewed.
- Counting products browsed within the discount category to demonstrate category affinity.
- Measuring the length of time spent on discount product pages.
This guide shows you how to create a basic discount shopper configuration that identifies visitors who browse ten or more discounted products on a site. You can adjust the threshold to fit your audience.
After the visitors have been identified, you can take action on them through a server-side connector to your email marketing service. Discount shoppers can be retargeted with offers that meet their interests and needs, such as free shipping or other discounts.
Requirements
This use case requires the following:
- Tracked events:
- Tealium AudienceStream and EventStream
In general, the following event attributes will be helpful in tracking discount shopping activity. Your actual attribute names might differ.
| Attribute Name | Example value |
|---|---|
brand_name |
Ralph Lauren |
browse_refine_type |
["Size", "Color"] |
browse_refine_value |
["XL", "Red"] |
cart_total_items |
4 |
cart_total_value |
77.96 |
category_id |
243 |
category_name |
Shoes: Boots |
page_name |
Homepage |
page_type |
category |
product_on_page |
["PROD123", "PROD456"], |
site_section |
Clothing |
tealium_event |
product_view or category_view |
customer_email |
user@example.com |
This example shows how to track visitors who visit the discount product category or discounted products ten or more times. Change this threshold based on the average number of discounted pages each visitor views.
Before you configure anything in Tealium, you need to compile a list of all product categories on your site that contain discounted products. For example, Sale, Top Deals, and Clearance. The following example uses the product category of Discount.
Required EventStream Attributes
| Data Objective | Example |
|---|---|
| Product(s) Identifier | product_category |
| Page Identifier | page_type |
For more information about the data layer definition for retail, see Retail.
Required AudienceStream attributes
| Attribute Name | Type | Scope | Description |
|---|---|---|---|
| Number of Discount Product Category Pages Browsed | Number | Visitor | Counts the number of discount category or product pages a visitor has viewed across visits. |
| Discount Shopper | Badge | Visitor | Indicates that the visitor has an affinity for discounted products or categories. |
Step 1: Create visitor attributes
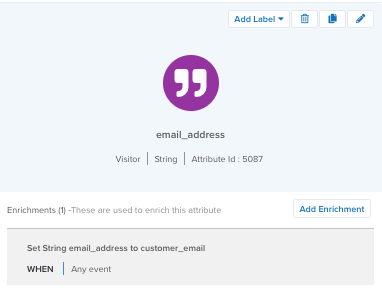
Create email_address attribute
Create a string visitor attribute named email_address with the following enrichment:
- Set to
customer_emailon ANY EVENT.

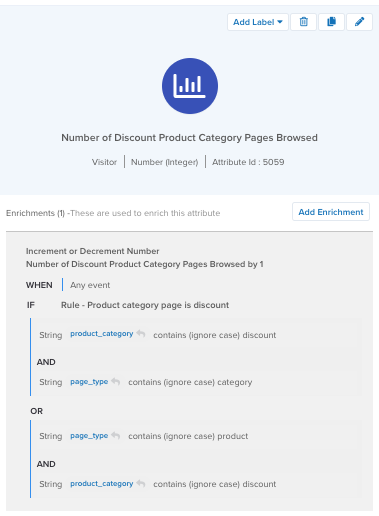
Create Discount Product Category Page Browsed attribute
Create a number visit attribute named Number of Discount Product Category Pages Browsed with the following enrichment:
- Set to Increment or Decrement Number by
1ANY EVENT when:product_categorycontains (ignore case)discountpage_typecontains (ignore case)categoryorproduct.

Create a Discount Shopper badge and rule
Before you create your audience, you’ll need to create a badge to assign to visitors if they’ve browsed ten or more discount pages:
Create a badge visitor attribute named Discount Shopper with the following enrichments:
- Assign this badge to visitor on VISIT ENDED where Number of Discount Product Category Pages Browsed number is greater than or equal to
10.

Step 2: Create an audience
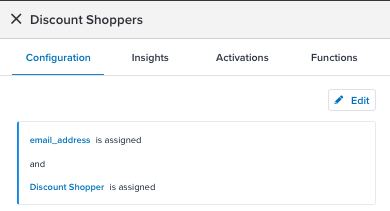
Now you can create a Discount Shoppers audience with the following conditions:
- Browse Abandoner badge is assigned.
email_addressstring is assigned.

Step 3: Configure a connector
With your attributes, badges, and audiences set up, you’re ready to connect this new audience to your email marketing tools to re-engage and convert these audiences.
Some common connectors and actions for targeting discount shoppers include:
- Adobe Campaign Classic
- Iterable: Subscribe User to a List, Upsert User action
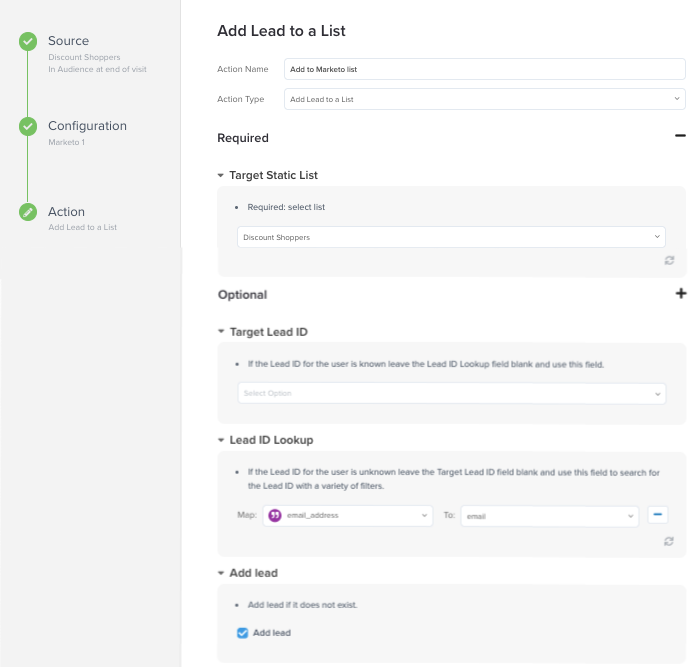
- Marketo: Add Lead to List action
- SendGrid: Upsert Contact action
For example, you could set up the Marketo connector to add a visitor’s email address to a discount shopper marketing list. Customize your connector actions to trigger only for when a visitor joins the Discount Shoppers audience.


For more information, see Add a connector.
Delayed actions
While you can often send out an email to a user right after they browse discounted items, you may have a higher chance of conversion by delaying the email for your target audience. Use delayed actions to set connector action delays in Tealium and then trigger your email workflows in your vendor of choice.
We recommend that you set a delay for an hour or so to remarket visitors that have an interest in buying, but not lose the visitor to a competitive site.
For detailed information about how to use delayed actions in Tealium, Delayed actions.
Next steps
This guide illustrates how to build a basic discount shopper email retargeting campaign. You can increase your understanding of customer behavior by using additional attributes in your campaigns. The following table shows some possible options for discount shopper-related attributes:
| Attribute Name | Attribute Type | Scope | Category | Notes |
|---|---|---|---|---|
| Total cart amount | Number | Visit | Purchase Behavior | A rolling sum of all purchases made by the visitor. |
| Number of coupon codes used | Number | Visitor | Lifetime Behavior | Number that increments +1 for each purchase that uses a coupon code. |
| Number of discount products added to cart | Number | Visitor | Lifetime Behavior | Number that increments +1 for each add to cart event. |
| Number of discount products purchased | Number | Visitor | Lifetime Behavior | Number that increments +1 for each purchase event. |
| Average order amount | Number | Visitor | Lifetime Behavior | Rolling average of all order totals. |
| Average item price | Number | Visitor | Lifetime Behavior | Rolling average of the price of all items purchased. |
The following additional discount shopper behaviors are also useful to track:
- Track visitors who use coupon codes.
- Track visitors who filter product listings by lowest price.
- Track visitors who add discounted products to their cart.
- Track visitors who purchase discounted products.
- Track visitors who add products to a wish list and buy them when they are on sale.
- Track visitors who use a loyalty program to buy discounted products.
Now that you’ve defined attributes for discount shoppers, these attributes can also be used for personalization with Tealium solutions like Moments API. For more information, see About Moments API.
This page was last updated: December 10, 2024