Google Display and Video 360 Connector Setup Guide
This article describes how to set up the Google Display & Video 360 connector in your Customer Data Hub account.
Requirements
To grant Tealium access to create, list, and update Google audiences, link your account to Tealium in the Google DV360 interface (Linked Accounts > Link New Account > External Data Partner > Tealium). For more information, see Google: Sharing audience lists from external data management platforms or customer match uploader partners.
Previously, this connector required that you request for Google to add your account to their allowlist. The latest version of the connector no longer has this requirement.
Connector Actions
| Action Name | AudienceStream | EventStream |
|---|---|---|
| Add Visitor to User-List or Segment | ✓ | ✓ |
| Remove Visitor from User-List or Segment | ✓ | ✓ |
API Information
This connector uses the following vendor APIs:
- User List Operations (creation/listing)
- API Name: Google Audience Partner API
- API Version: v2
- API Endpoint:
https://audiencepartner.googleapis.com - Documentation: Google Ad Manager API
- User List Uploading
- API Name: Google Authorized Buyers
- API Version: v2
- API Endpoint:
https://cm.g.doubleclick.net/upload - Documentation: Google Authorized Buyers API
It may take up to 72 hours from when the connector fires before the visitor becomes available for use.
For more information, see Tips for using third-party audience lists.
Configure Settings
Go to the Connector Marketplace and add a new connector. Read the Connector Overview article for general instructions on how to add a connector.
When you add this connector, you must accept the vendor’s data platform policy that appears.
After adding the connector, configure the following settings:
-
Client Customer ID
- Required
- Your customer identifier in the selected product
-
Select the Target Product
- Required
- The account that establishes a connection here should have access to the target product selected.
-
Google Network ID
- Optional
- If you use the Google-hosted version of the Google Cookie Matching tag, enter your Google Network ID.
- If you use the Tealium-hosted version of the Google Cookie Matching tag, leave this blank.
Create a New Segment
Use the following steps to create a new segment in AudienceStream:
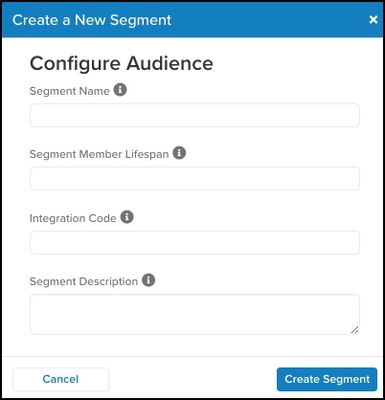
- Click Create a New Segment from the top of the Actions selection drop-down list.
- Enter the Segment Name, Segment Member Lifespan, Integration Code, and Segment Description.

If you use a DataAccess product (EventStore, AudienceStore, EventDB, or AudienceDB), the segment name must be fewer than 128 characters in length. Otherwise, DataAccess may trim the segment name and errors may occur.
- Click Create Segment.
The Integration Code is an ID used by user list sellers to correlate IDs on their systems. If no ID is available, you can manually enter a random number between1and1000. Confirmation will appear in the form of a check mark next to the Create Segment button to verify that the segment has been created.
Allow 3 to 4 hours before using new audiences within an action when you create a new Google Display & Video 360 audience. When your audience list is visible inside Google Display & Video 360, you can then use your audience without error. For more information, see Google Display & Video Help: Audience list targeting.
Action Settings - Parameters and Options
Click Next or go to the Actions tab. This is where you configure connector actions.
This section describes how to set up parameters and options for each action.
Action - Add Visitor to User-List or Segment
Parameters
You must use one of the following ID parameters: Partner Provided ID (already MD5 hashed), Partner Provided ID (apply MD5 hash), Google User ID, iOS Advertising ID, Android Advertising ID, RIDA, AFAI, or MSAI.
| Parameter | * Description |
|---|---|
| Select the Target User-list/Segment |
|
| Partner Provided ID (already MD5 hashed) |
|
| Partner Provided ID (apply MD5 hash) |
|
| Google User ID |
|
| iOS Advertising ID |
|
| Android Advertising ID |
|
| RIDA |
|
| AFAI |
|
| MSAI |
|
| Data Source ID |
|
Consent
When using the Add Visitor to User List action, the connector will send consent as true. Use audience logic to prevent non-consented visitors from being added to lists. Use the Remove Visitor from User List action to remove non-consented visitors from lists.
Action - Remove Visitor from User-List or Segment
Parameters
| Parameter | Description |
|---|---|
| Select the Target User-list/Segment |
|
| Google User ID |
|
| Data Source ID |
|
This page was last updated: June 10, 2025