Update endpoint configurations
This article describes how to update your endpoint configurations after you have configured First-Party Domains.
After you have configured First-Party Domains and validation has been completed, you need to update your endpoint configurations to use First-Party Domains with Tealium iQ Tag Management and Tealium Collect.
The information in this article applies only to C-NAMEs and A-NAMEs that were created using First-Party Domains.
Tag management
To use your first-party domain with Tealium iQ Tag Management you must also make the following changes:
- Update the Universal Tag (
utag.js) code snippet wherever it is installed. - Set the publishing URLs.
The Tealium environment switcher supports First-Party Domains. However, the environment switcher Basic option does not work with First-Party Domains. Use the URL redirect option on the Advanced tab. For more information, see Tealium Tools: Environment Switcher.
Update universal tag loading script
To update the Universal Tag code snippet, follow these steps:
The example code snippet is updated to use your first-party domain.
For the current version of First-Party Domains, the URL for the Universal tag only includes the profile name and environment in the path. The account name and utag portions are omitted.
The URL for the Universal Tag for earlier versions of First-Party Domains, and for most other scenarios, includes the account name and utag portions. For example:
https://tags.tiqcdn.com/utag/example-account/example-profile/prod/utag.js
In the following code snippet example for the current version of First-Party Domains, the code snippet for tags.tealiumecommerce.com/ecomm/prod would be:
<!-- Loading script asynchronously -->
<script type="text/javascript">
    (function(a,b,c,d){
    a='**https://tags.tealiumecommerce.com/ecomm/prod/utag.js**';
    b=document;c='script';d=b.createElement(c);d.src=a;d.type='text/java'+c;d.async=true;
    a=b.getElementsByTagName(c)[0];a.parentNode.insertBefore(d,a);
    })();
</script>
Update publishing URLs
If you have multiple first-party domains configured for a profile, see Update publishing URLs when a profile has multiple first-party domains for information about updating the publishing URLs.
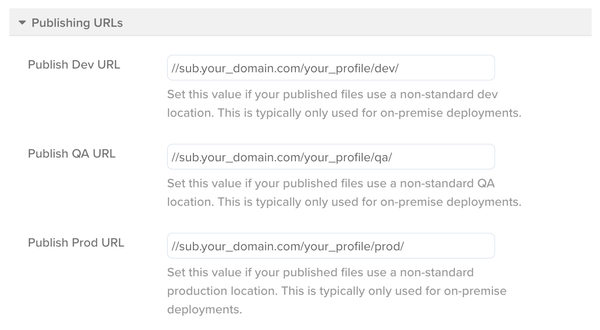
The publishing URLs determine where to load the additional utag.#.js files for each default environment. If the publishing URLs are not updated, then the vendor tag files loaded after utag.js will not originate from your domain.
To set the publishing URLs, use the following steps:
- In the admin menu, click Configure Publish Settings.
- Scroll down to Publishing URLs, then enter a URL for each environment that uses your first-party domain. For example,
tags.example.comandcollect.example.com.
Publish Dev URL://sub.your_domain.com/your_profile/dev/
Publish QA URL://sub.your_domain.com/your_profile/qa/
Publish Prod URL://sub.your_domain.com/your_profile/prod/ - Click Save.
- Save and publish.
Update publishing URLs when a profile has multiple first-party domains
If you have multiple first-party domains configured for a profile, you will not be able to update the publishing URLs from the client-side menu.
You need to add a script similar to the following to update the publishing URLs, replacing the example path with the appropriate path for the page (it will match the utag.js inclusion path, which can be updated at the same time). This script must be added before the script that specifies the URL for utag.js.
<script>
window.utag_cfg_ovrd = window.utag_cfg_ovrd || {}
window.utag_cfg_ovrd.path = '//tags.example.com/main/prod'
</script>
For more information, see Settings.
Update Tealium Collect endpoint
To use your first-party domain with Tealium EventStream API Hub or Tealium AudienceStream CDP, you need to update the data collection URL in your installation of Tealium Collect. For websites, this requires setting the Tealium Collect Endpoint field for the Tealium Collect tag. To use the visitor service, you also need to provide a Visitor Service Override.
To update the Tealium Collect tag, use the following steps:
- Navigate to Tags and expand the Tealium Collect tag.
- In the Tealium Collect Endpoint field, enter your first-party domain endpoint.
For example:sub.your_domain.com/your_account/your_profile/2/i.gif - In the Visitor Service Override field, enter the visitor service URL. Omit the protocol and path. For example:
your-visitor-service.example.com - Click Apply.
A separate Collect tag must be used for each subdomain unless an extension is used to map the values dynamically.
This page was last updated: May 23, 2024
