DealerTrack Data Connect Integration Setup Guide
This article describes how to set up an integration between Tealium Data Connect and DealerTrack.
The DealerTrack integration with Tealium Data Connect lets you import the following data.
- Deal History
- Service Appointments
- Open Repair Orders
- Closed Repair Orders
Requirements
- Tealium EventStream or AudienceStream
- Tealium Data Connect
- Tealium DataAccess (for EventStore or EventDB)
- OpenTrack access
Create a DealerTrack integration
Use the following steps to create a DealerTrack integration with Tealium Data Connect:
- Set up a Tealium Connect data source.
- Establish a connection to the DealerTrack API.
- Create a recipe to send data from DealerTrack to Tealium.
- Send events to Tealium.
- Set up an event feed for data.
- Test with trace and activate the recipe.
Step 1: Set up a Tealium Connect data source
Set up a Tealium Connect data source. For more information, see Set up a Tealium Connect data source.
Step 2: Establish a connection to the DealerTrack API
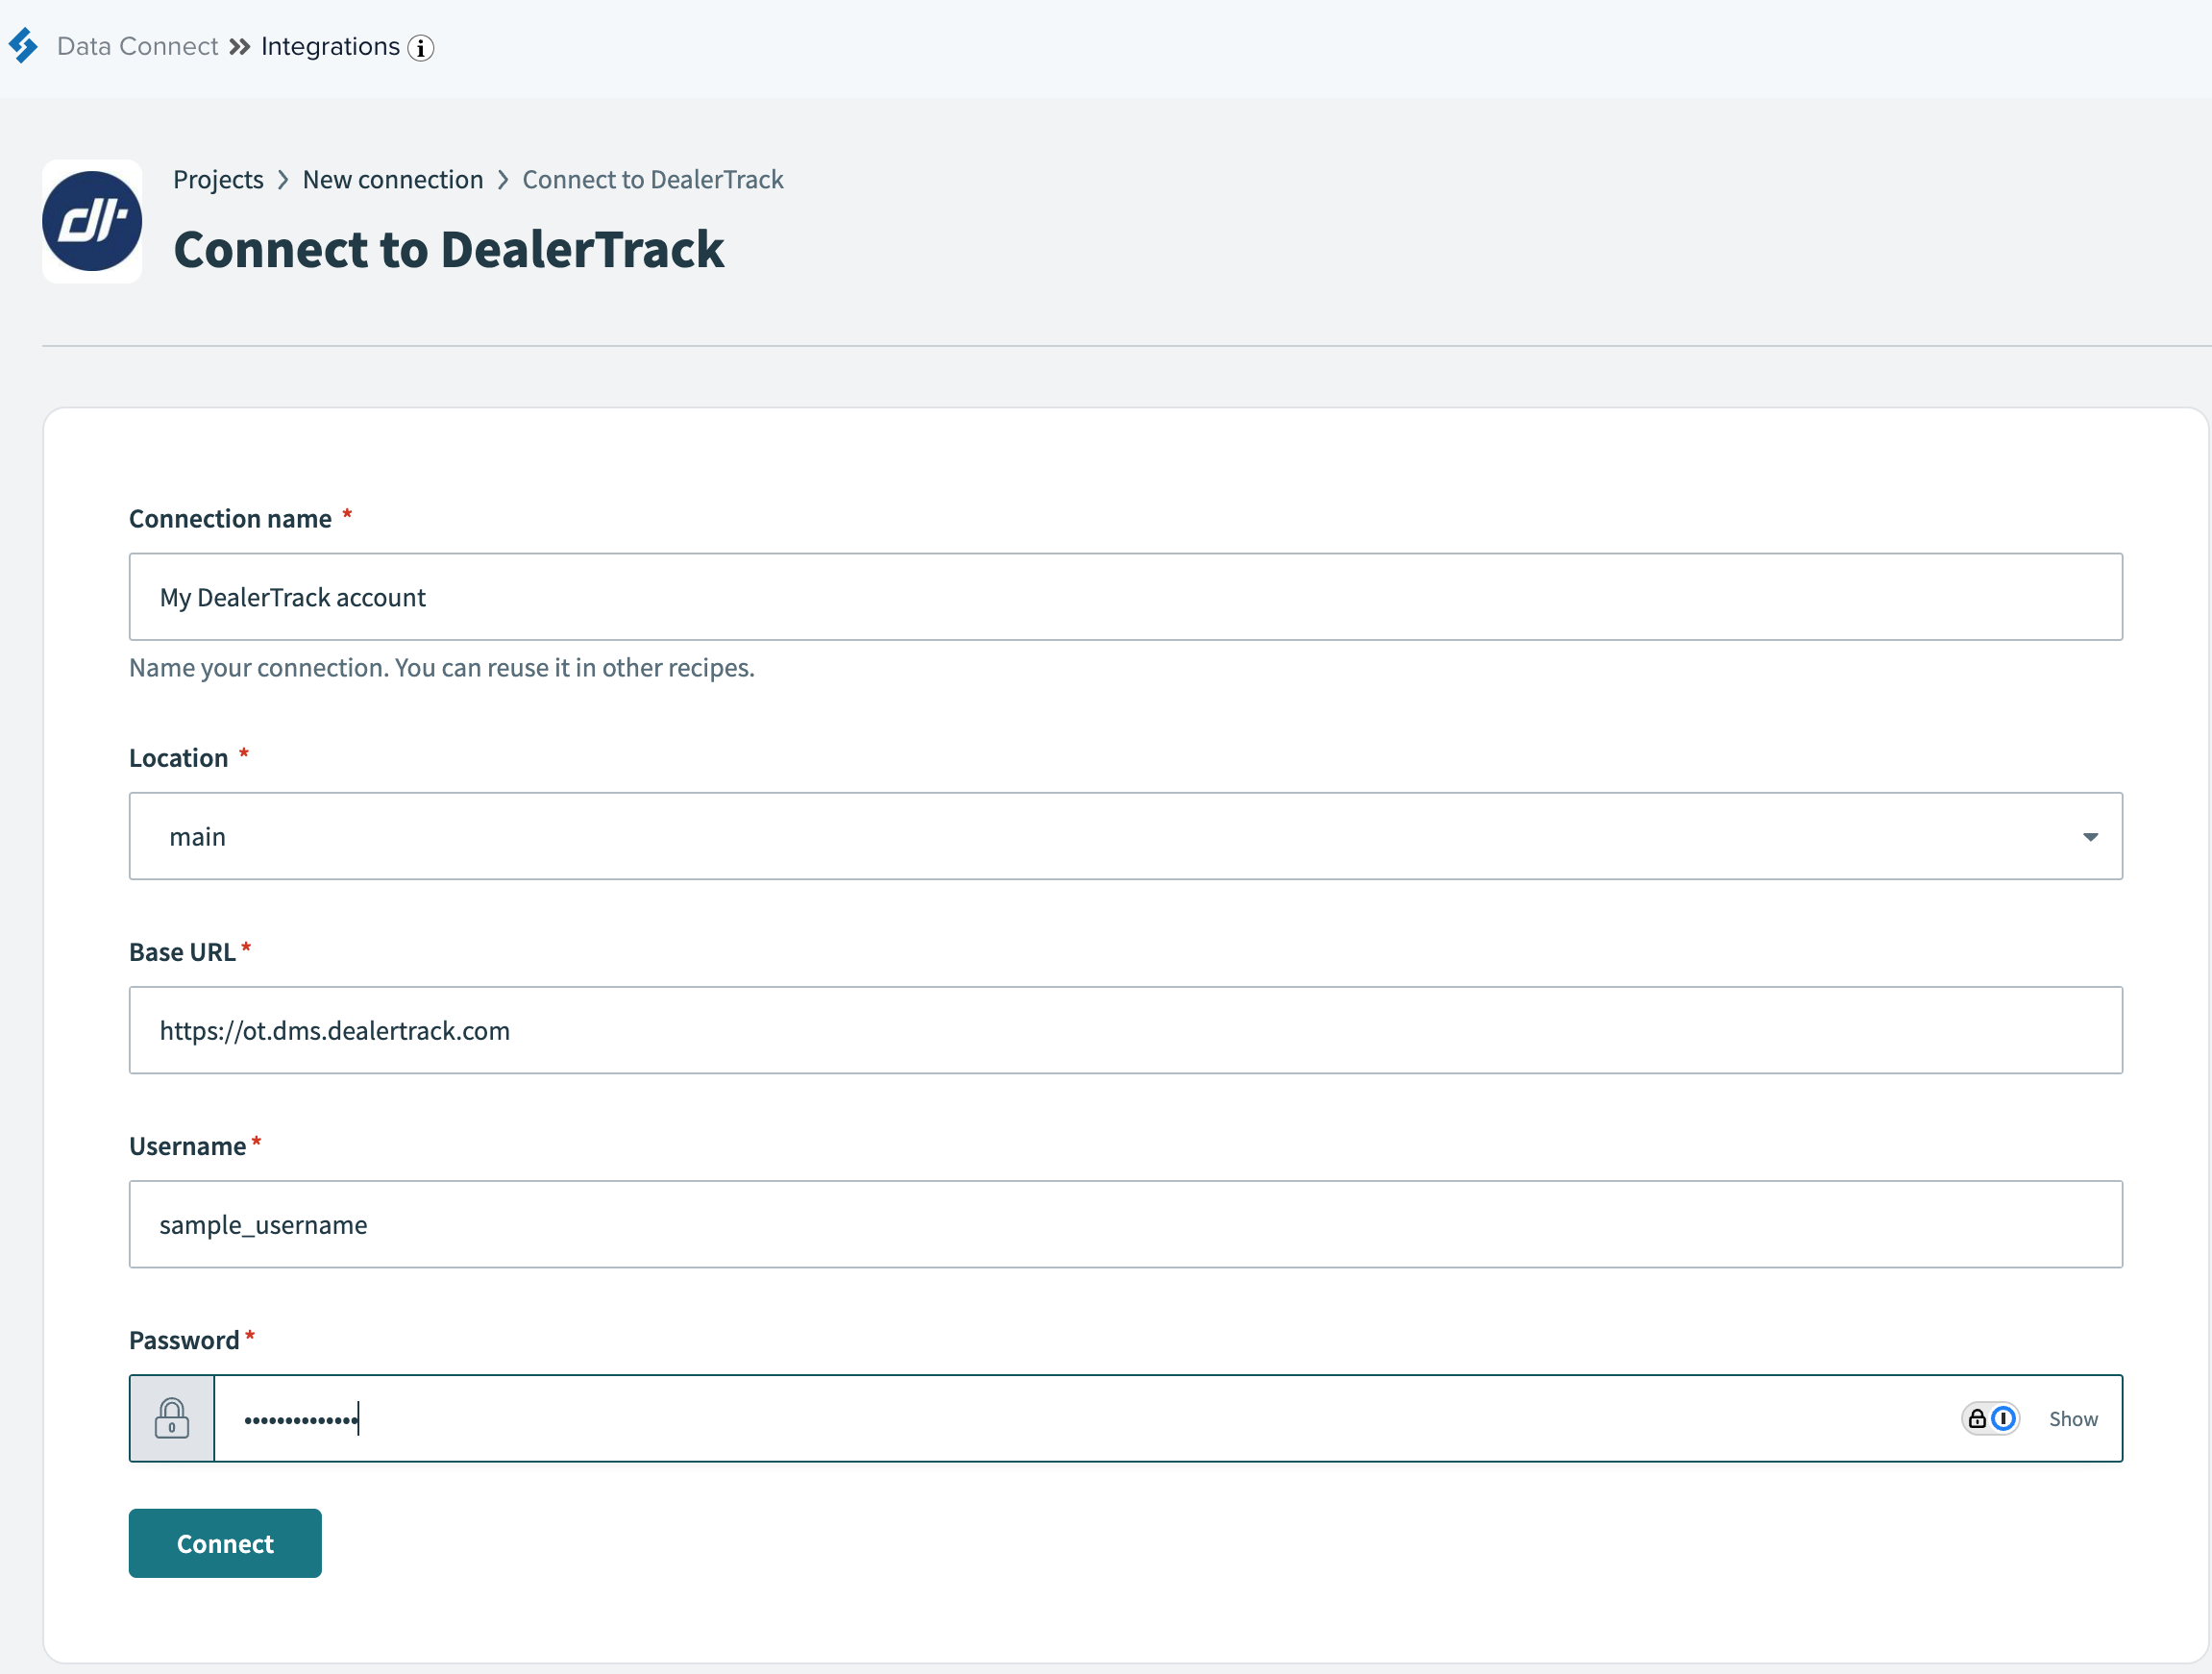
To establish a connection to the DealerTrack API, perform the following steps:
- Go to Data Connect > Integrations.
- Click Connections, and then click Create.
- Select the DealerTrack connection.
- Under Base URL, enter
https://ot.dms.dealertrack.com. - Enter your Username and Password.
- Click Connect.


Step 3: Create a recipe to send data from DealerTrack to Tealium
To create a recipe to send data from DealerTrack to Tealium, perform the following steps:
For more information on how to create a new recipe, see Create a recipe in Data Connect.
- Go to DataConnect > Integrations.
- In the Integrations screen, click Create > Recipe.
- Create a new recipe that triggers from the Schedule app. For information on how to create a recipe that triggers from an app, see Create a recipe in Data Connect.
The Actions section below contains details on what data is possible to retrieve from DealerTrack.
Step 4: Send events to Tealium
To send events to Tealium, perform the following steps:
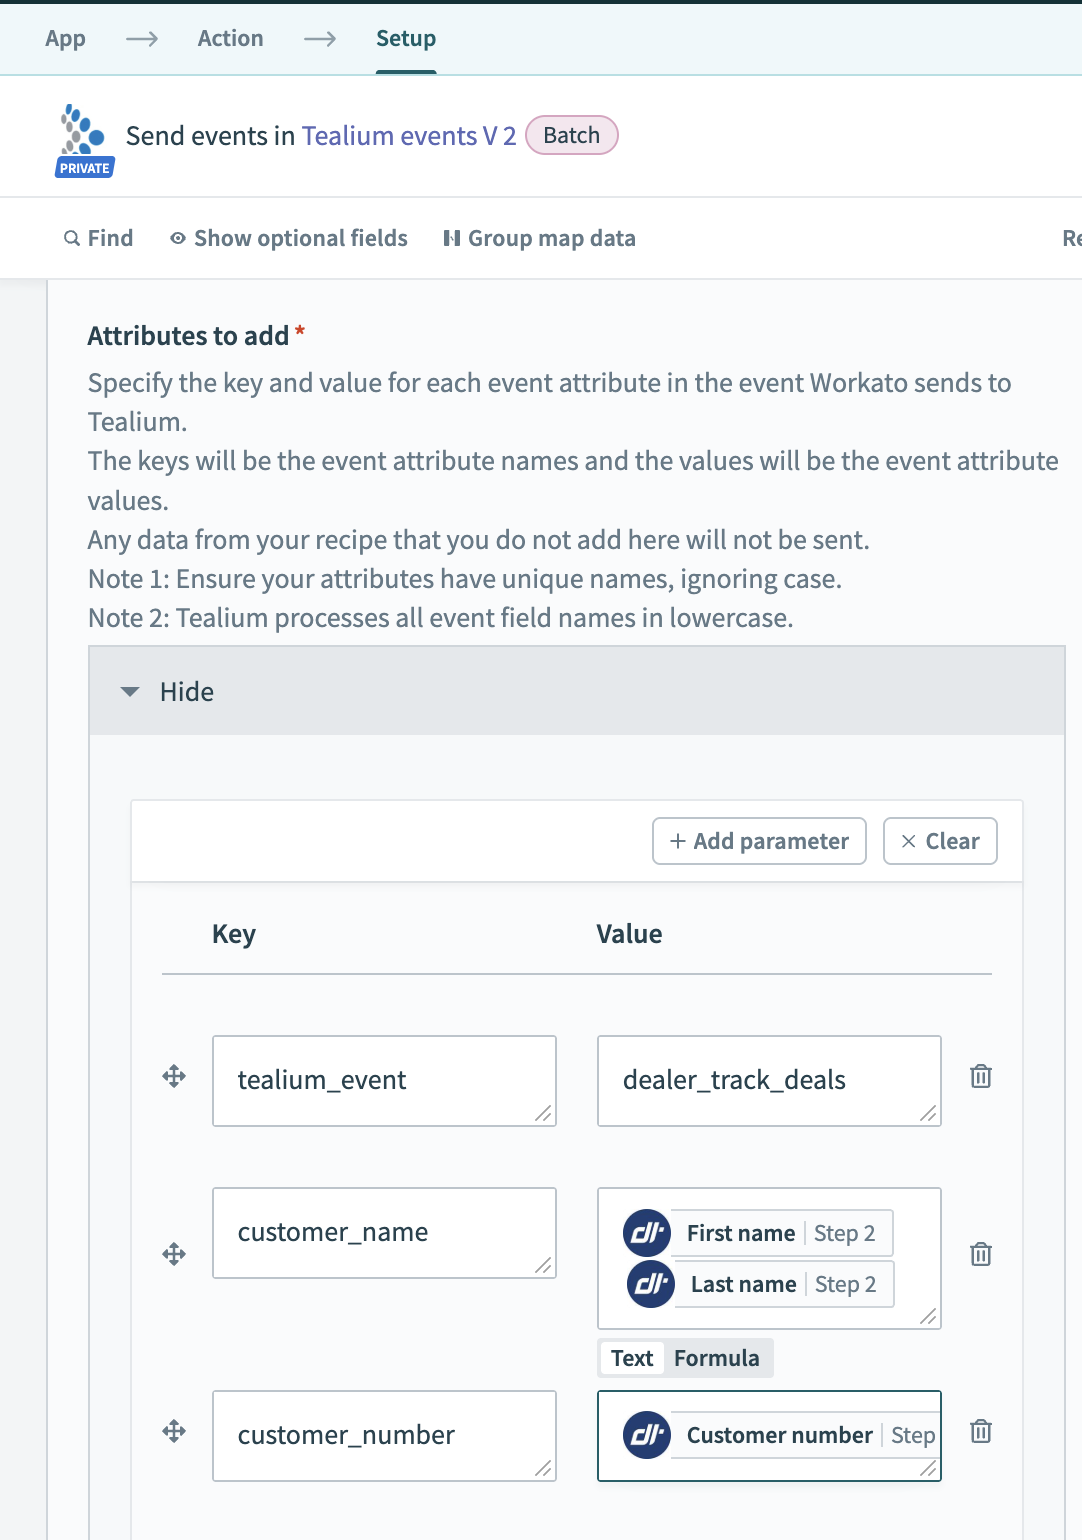
- Go to Send Events in Tealium Events V2.
- Configure the data that you want to send to Tealium.

For additional information, see Create a recipe: Configure an Action.
Step 5: Set up an event feed for leads

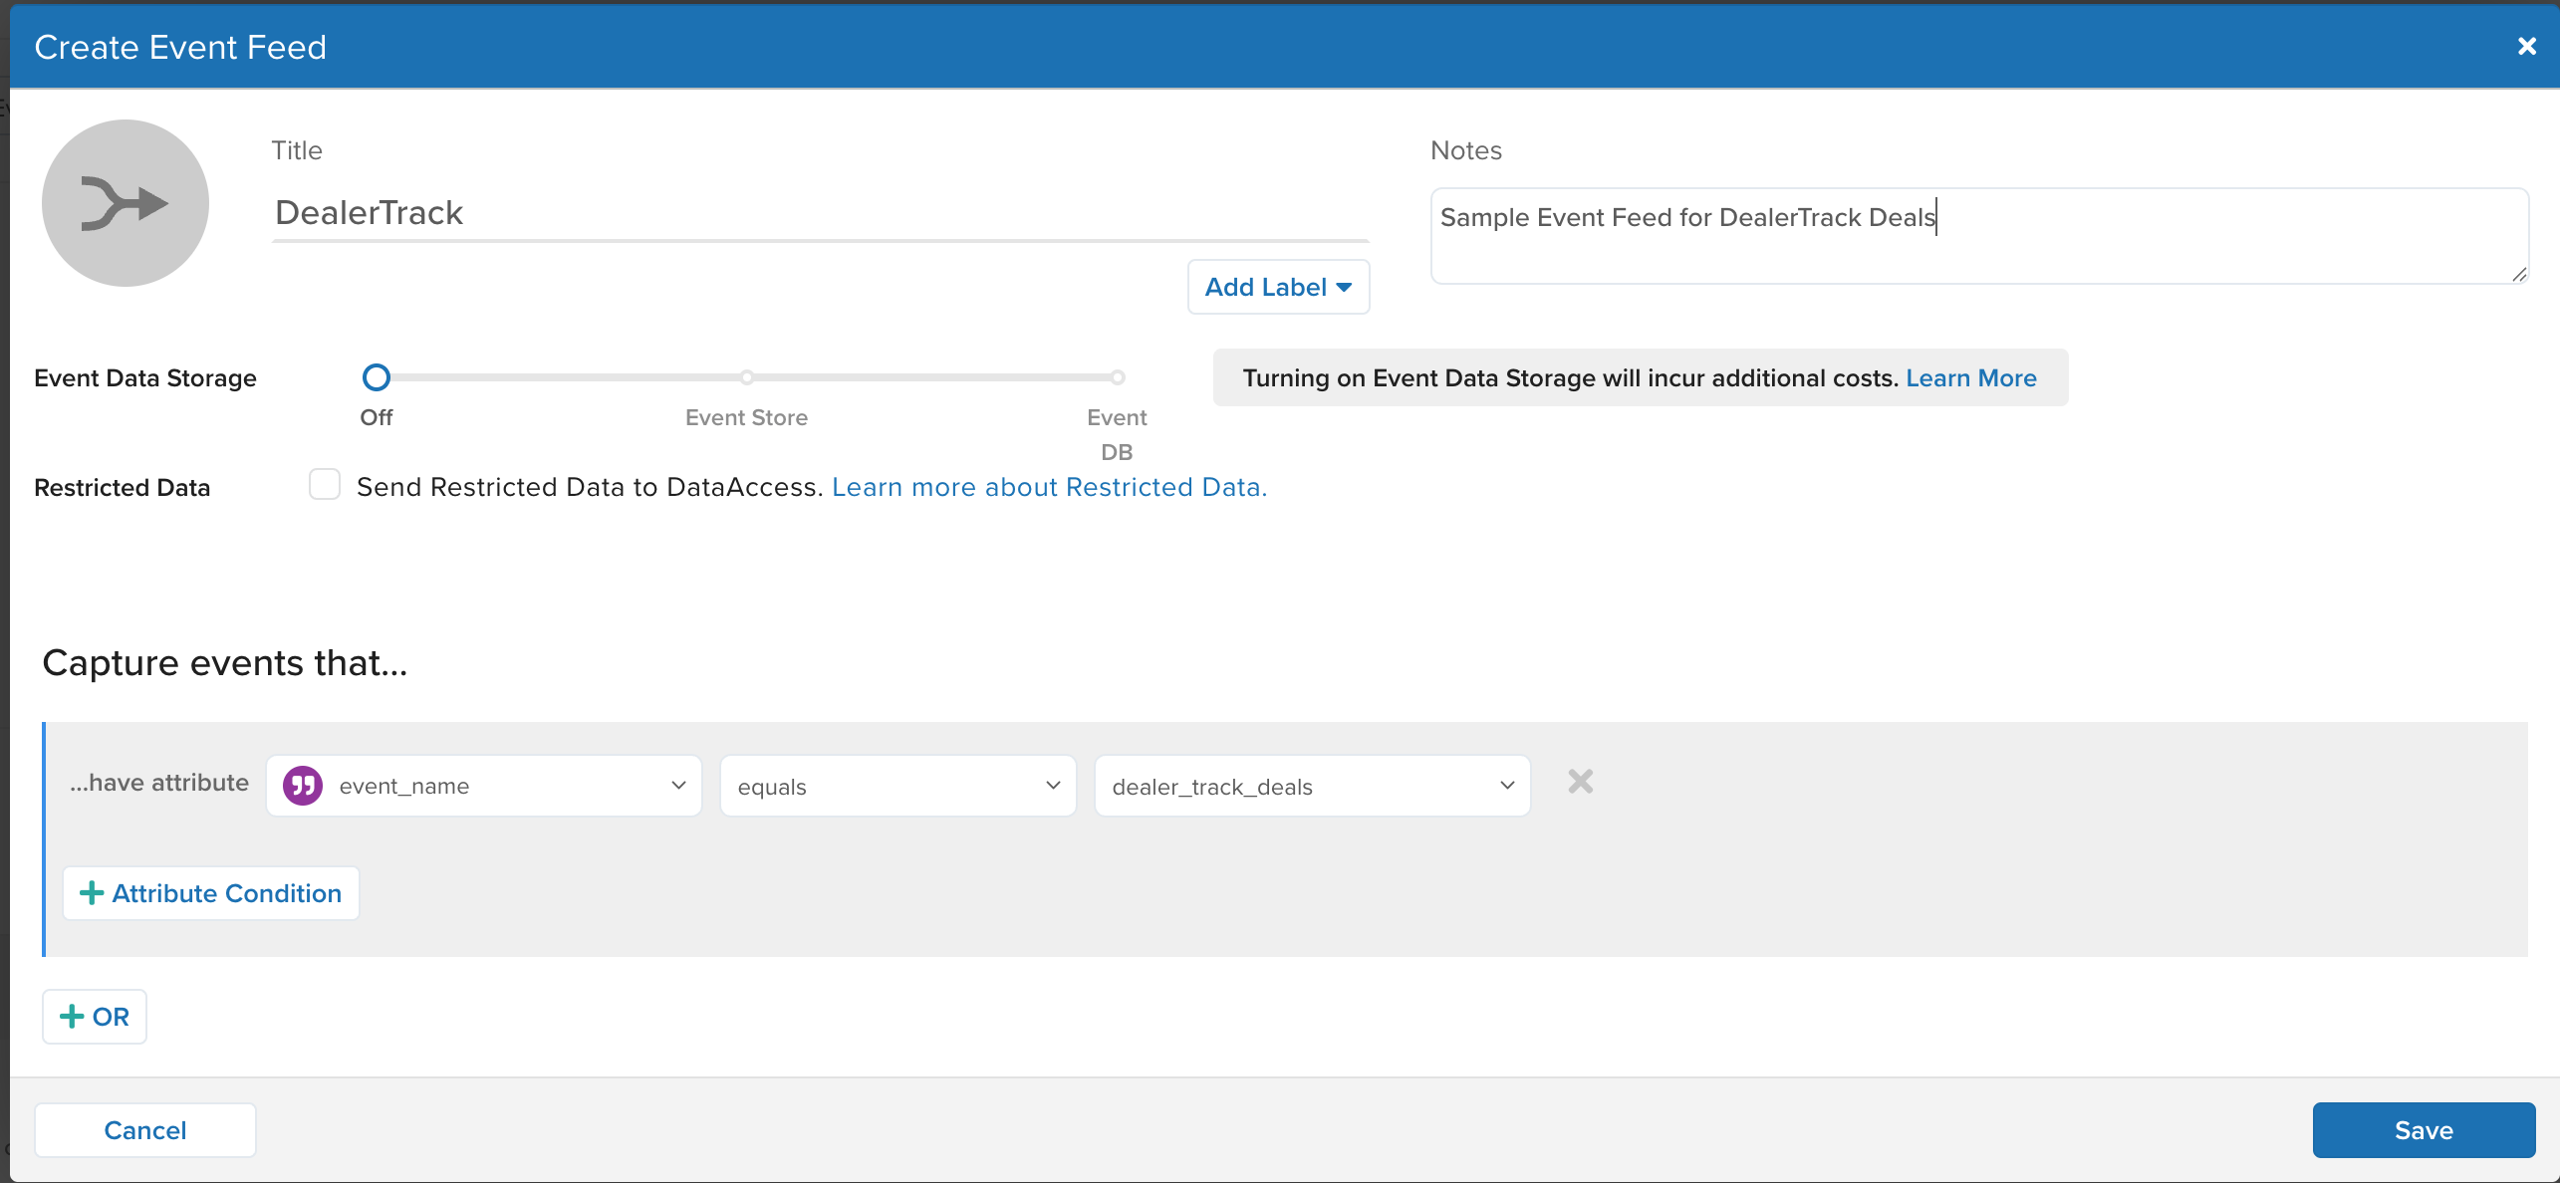
Use the following steps to create an event feed:
- Go to EventStream > Live Events and click + Add Event Feed.
- In the Create Event Feed dialog, enter a Title and any Notes.
- The event feed title is dependent on how lead events come into Data Connect.
- (Optional) Click Add Label to select labels to apply to this event feed.
- Under Event Data Storage, enable the feed for EventStore or EventDB.
- Set an Attribute Condition for the feed to capture events that match new lead events.
- Click Save.
- Save and publish your profile.
Step 6: Test with trace and activate the recipe
Before activating the recipe, perform thorough testing. Once testing is successful, activate the recipe to start the automated data integration process.
Use the following steps to test with trace and activate the recipe:
- Go to Trace.
- Under New Trace, click Start. A dialog with a trace ID appears.
- Copy the trace ID and click Continue.
- Go to Data Connect > Integrations.
- In the Integrations screen, perform the following steps for recipes that send new leads from DealerTrack to Tealium:
- Select your recipe.
- Select the Tealium events V2 action to edit it.
- Under Attributes to add, add a
tealium_trace_idkey and paste the trace ID in the Value. - Click Save.
- From the Start recipe list, click Test recipe.
- Return to the Trace interface to inspect the log details.
- After you are done testing, click Stop test.
- To activate the recipe, click Start recipe.
Actions
The following actions can be tracked through this integration:
Search Deal by Origination Date
| Parameter | Description |
|---|---|
| Company Number | The company number. For example, ZE7. |
| Enterprise Code | The enterprise code. For example, ZE. |
| Server Name | The name of the server. For example, arkonap.arkona.com. |
| Origination Date Start | Date of the car deal, search beginning with this date. The format is YYYY-MM-DD. |
| Origination Date End | Date of the car deal, search ending with this date. The format is YYYY-MM-DD. |
| Deal Status | The status of the deal, if blank or not sent it will pull all deal statuses. Acceptable parameters are Accepted, Capped, Closed, Unaccepted, or blank. |
Appointment Lookup
| Parameter | Description |
|---|---|
| Company Number | The company number. For example, ZE7. |
| Enterprise Code | The enterprise code. For example, ZE. |
| Server Name | The name of the server. For example, arkonap.arkona.com. |
| Date From | Starting Date of Appointment Search, this is the day of the actual appointment, not when it was created. The format is YYYY-MM-DD. |
| Date To | Ending Date of Appointment Search, this is the day of the actual appointment, not when it was created. The format is YYYY-MM-DD. |
| Created Date Time Start | When to start the search of when Appointments were created. The format is yyyy-mm-ddThh:mm:ssZ. |
| Created Date Time End | When to end the search of when Appointments were created. The format is yyyy-mm-ddThh:mm:ssZ. |
Open Repair Order Lookup
| Parameter | Description |
|---|---|
| Company Number | The company number. For example, ZE7. |
| Enterprise Code | The enterprise code. For example, ZE. |
| Server Name | The name of the server. For example, arkonap.arkona.com. |
| Created Date Time Start | When to start the search of when Open Repair Orders were created. The format is yyyy-mm-ddThh:mm:ssZ. |
| Created Date Time End | When to end the search of when Open Repair Orders were created. The format is yyyy-mm-ddThh:mm:ssZ. |
Get Closed Repair Orders
| Parameter | Description |
|---|---|
| Company Number | The company number. For example, ZE7. |
| Enterprise Code | The enterprise code. For example, ZE. |
| Server Name | The name of the server. For example, arkonap.arkona.com. |
| Final Close Date Start | When to start the search for final closed repair orders. The format is yyyy-mm-ddThh:mm:ssZ. |
| Final Close Date End | When to end the search for final closed repair orders. The format is yyyy-mm-ddThh:mm:ssZ. |
This page was last updated: September 24, 2025