Create a function
This article provides instructions for creating data transformation functions and event or visitor functions.
Create a data transformation function
Follow these steps to create a data transformation function:
- Click + Add Function.
- Enter a name for the function.
- For the trigger, select Data Transformation, then click Continue.
- Enter a Trigger Name.
- In Selector, enter a JSONPath expression (see JSONPath). For example,
$.datasourceIdor$.data.udo.tealium_event. The selector is limited to 128 characters. - Select an Operator, and enter a Value.
The Value is limited to 128 characters. - Click + Add Condition to add an additional
ANDcondition.
A block ofANDconditions is limited to 10 conditions. - Click + OR to add a block of
ORconditions.
The number ofORcondition blocks is limited to10. - Click Continue.
Commented example code is displayed. You can modify this code, or replace it with your own function code. - After testing the function, click the Configuration tab, change the Status to ON, and click Done.
For more information on testing functions, see Test Functions. - Save and publish.
The function is not saved and cannot be triggered until you save and publish. If you edit a function later on, make sure you save and publish for the changes to take effect.
When you save and publish after creating a data transformation function, it can take up to 300 seconds for the change to take effect.
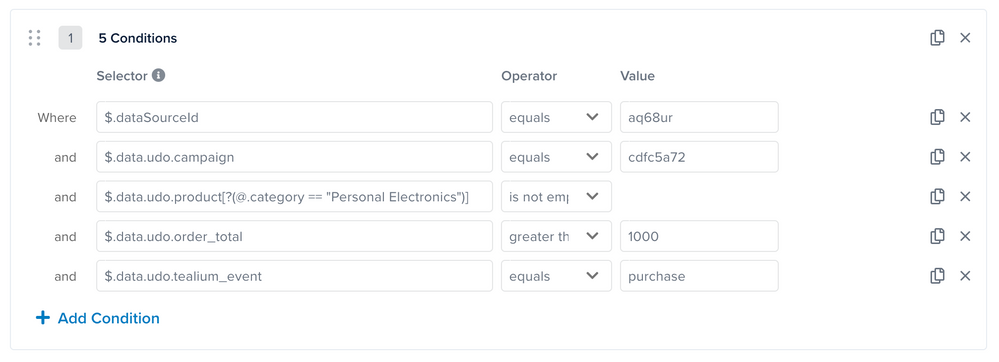
Example of conditions for a data transformation function
To run a campaign for users whose purchase is more than $1000 and whose cart includes personal electronics products, the following conditions could be used:

trigger-conditions-create-edit.png
Create an event, visitor, or data record function
- Click + Add Function.
- Enter a name for the function.
- Select a trigger: Processed Event, Processed Visitor, or Processed Data Record, then click Continue.
- Configure the function, as follows:
- If you select the Processed Event trigger, select an Event Feed.
- If you select the Processed Visitor trigger, select an Audience.
- If you select the Processed Data Record trigger, select a Segment.
- Click Continue.
- Commented example code is displayed. You can modify this code, or replace it with your own function code.
- After testing the function, click the Configuration tab, change the Status to ON, and click Done.
- For more information on testing functions, see Test Functions.
- Save and publish.
The function is not saved and cannot be triggered until you save and publish. If you edit a function later on, make sure you save and publish for the changes to take effect.
This page was last updated: November 24, 2025