Manage audiences
This article provides information about creating, editing, and deleting audiences, as well as activating audiences and creating segments.
An audience is a combination of one or more attribute conditions. The more filters you add, the more specific your audience.
Create an audience

Use the following steps to create an audience:
-
Go to AudienceStream > Audiences.
-
Click + New Audience.
-
Enter a Name for the audience.
If you use a DataAccess product (EventStore, AudienceStore, EventDB, or AudienceDB), the audience name must be fewer than 128 characters in length. Otherwise, DataAccess may trim the audience name and errors may occur.
-
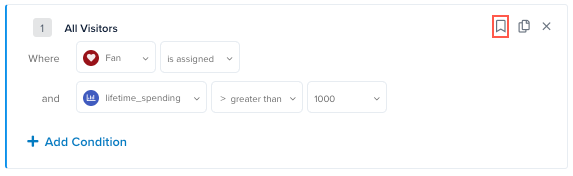
To add a condition for the audience, select an attribute, an operator, and a value.
- The estimated potential size for the audience is displayed. For more information, see potential size.
- When you hover over an attribute, the enrichment for the attribute is displayed.
- If you select a badge for the attribute, select is assigned or is not assigned.
- For operators that specify a time frame, select a value and the time frame.
-
To add another condition, click + Add Condition.
- Click Calculate to update the potential size as you add conditions.
-
To save this segment, click the Save icon.
-
Enter a Name for the segment, then click Done.
If you use a DataAccess product (EventStore, AudienceStore, EventDB, or AudienceDB), the segment name must be fewer than 128 characters in length. Otherwise, DataAccess may trim the segment name and errors may occur.
-
To add a segment, click + Add Segment, then add conditions for the segment.
-
To add a previously saved segment, click the down-arrow next to + Add Segment and select a segment.
When you hover over a segment, the conditions for the segment are displayed. -
To add a label or notes, click More Options.
- To add a label, click Add Label and select a label.
- Enter notes, if needed. Click AI Note to generate notes with AI. For more information, see AI Note Generation.
-
To immediately activate the audience, click Connect & Activate, then select and configure a connector.
- For more information, refer to the setup guide for the selected connector.
-
To save the audience without activating it, click Done.
-
Save and publish.
Potential size
The potential size of the audience is the count of visitor profiles that match the defined audience conditions. The calculation result displays the number of visitors meeting the conditions as both a number and a percentage, alongside the total number of visitors. The total visitors count is the number of visitors in your Tealium profile within your configured retention window, which includes both anonymous and stitched visitors.
Limitations
Potential audience sizing is not available when an audience is built with the following attributes:
- Visit attributes: Visit attributes are transitory and do not persist after the visitor’s session ends.
- Unsaved and unpublished attributes: Attribute values are only created, enriched, and saved to a visitor profile when the attribute configuration is saved and published. Until the save and publish process occurs, no values exist that can be queried to calculate a potential audience size.
Create an audience from an existing audience
You can duplicate an audience from the list of audiences, or from the audience details view, then modify the duplicate to create a new audience.
To duplicate an audience from the list of audiences, follow these steps:
- Go to AudienceStream > Audiences.
- In the audience menu, select Duplicate.
- The copy of the audience is displayed.
- Click Edit to modify the Name and conditions as needed for the new audience.
- Click Calculate to update the potential size as you edit or add conditions.
- Click Done or Connect & Activate.
- Save and publish.
To duplicate an audience from audience details, follow these steps:
- Go to AudienceStream > Audiences.
- Click an audience in the list, then click Duplicate.
- The copy of the audience is displayed.
- Click Edit to modify the Name and conditions as needed for the new audience.
- Click Calculate to update the potential size as you edit or add conditions.
- Click Done or Connect & Activate.
- Save and publish.
Edit an audience
To edit an audience, follow these steps:
- Go to AudienceStream > Audiences.
- Click an audience in the list, then click Edit.
- Modify the audience as needed.
- Click Calculate to update the potential size as you edit or add conditions.
- To add an activation or view activations for this audience, click Activations.
- For information on adding an activation, see Activate an audience.
- To view information about visitors and activity for this audience, click Insights.
- To view the functions triggered by this audience, click Functions.
- When you are finished editing the audience, click Done or Connect & Activate.
- Save and publish.
Activate an audience
To activate an audience, select and configure a connector, as follows:
- Go to AudienceStream > Audiences.
- Click an audience in the list, then click Edit.
- Click the Activations tab, then click + Add Activation.
- Select and configure a connector.
- For more information, refer to the setup guide for the selected connector.
- Click X to close the audience.
- Save and publish.
Deactivate an audience
To deactivate an audience, follow these steps:
- Go to AudienceStream > Audiences.
- Click an audience in the list, then click Activations.
- Click the connector, then toggle the connector to Off.
- Save and publish.
Delete an audience
You can delete an audience from the list of audiences or from the audience details view.
To delete an audience from the list of audiences, follow these steps:
- Go to AudienceStream > Audiences.
- Click the audience menu, and select Delete.
- In the confirmation dialog, click Delete.
- Save and publish.
To delete an audience from audience details, follow these steps:
- Go to AudienceStream > Audiences.
- In the list of audiences, click the audience.
- Click Delete.
- In the confirmation dialog, click Delete.
- Save and publish.
This page was last updated: February 2, 2026